December 17th, 2024

The Bumpy Road to Cascable Studio: App Review Strikes Again

I’ve been shipping apps to the App Store for well over fifteen years now, and although there are App Review horror stories aplenty, I’ve always hoped I’d never be in a position to write one myself. Fifteen years isn’t a bad run, at least.

Another post chock-full of technical snippets and stories from the app’s development over the past year is coming very soon, and will be a lot more positive than this one. I’m really proud of what we shipped, and this App Review experience doesn’t change any of that.

Alright, let’s dive in. They say a picture says a thousand words, so how about a picture of some words. Get those scrollin’ thumbs ready!

What you just scrolled past was the history of my (eventually successful) attempt to get the new Mac version of our app — Cascable Studio — approved for the Mac App Store. The entire process took nearly a month, and we had to push an emergency build through in the middle there with some features stripped out to get something approved for launch.

We’re at version 7.0 now, and the iOS version of this app has been on the App Store since 2015. Indeed, most of the app was fine — this ordeal was all about one particular feature.

A feature that’d already been approved and on the App Store since 2019 in a different app of ours.


Contents


The Troublesome Feature

Our plan was to discontinue an old Mac app of ours called Cascable Transfer and replace it with the Mac version of Cascable Studio. Transfer was a simple but effective app, and Studio supersedes it entirely — it’s far more powerful. Transfer was originally approved for the Mac App Store in 2019.

As part of that work, we brought a Mac-specific feature over to Studio because, frankly, it’s a great feature, and quintessentially Mac: direct integration with other apps. Rather than copy images to a folder with our app then open them in another, why not pass the images directly to other apps?

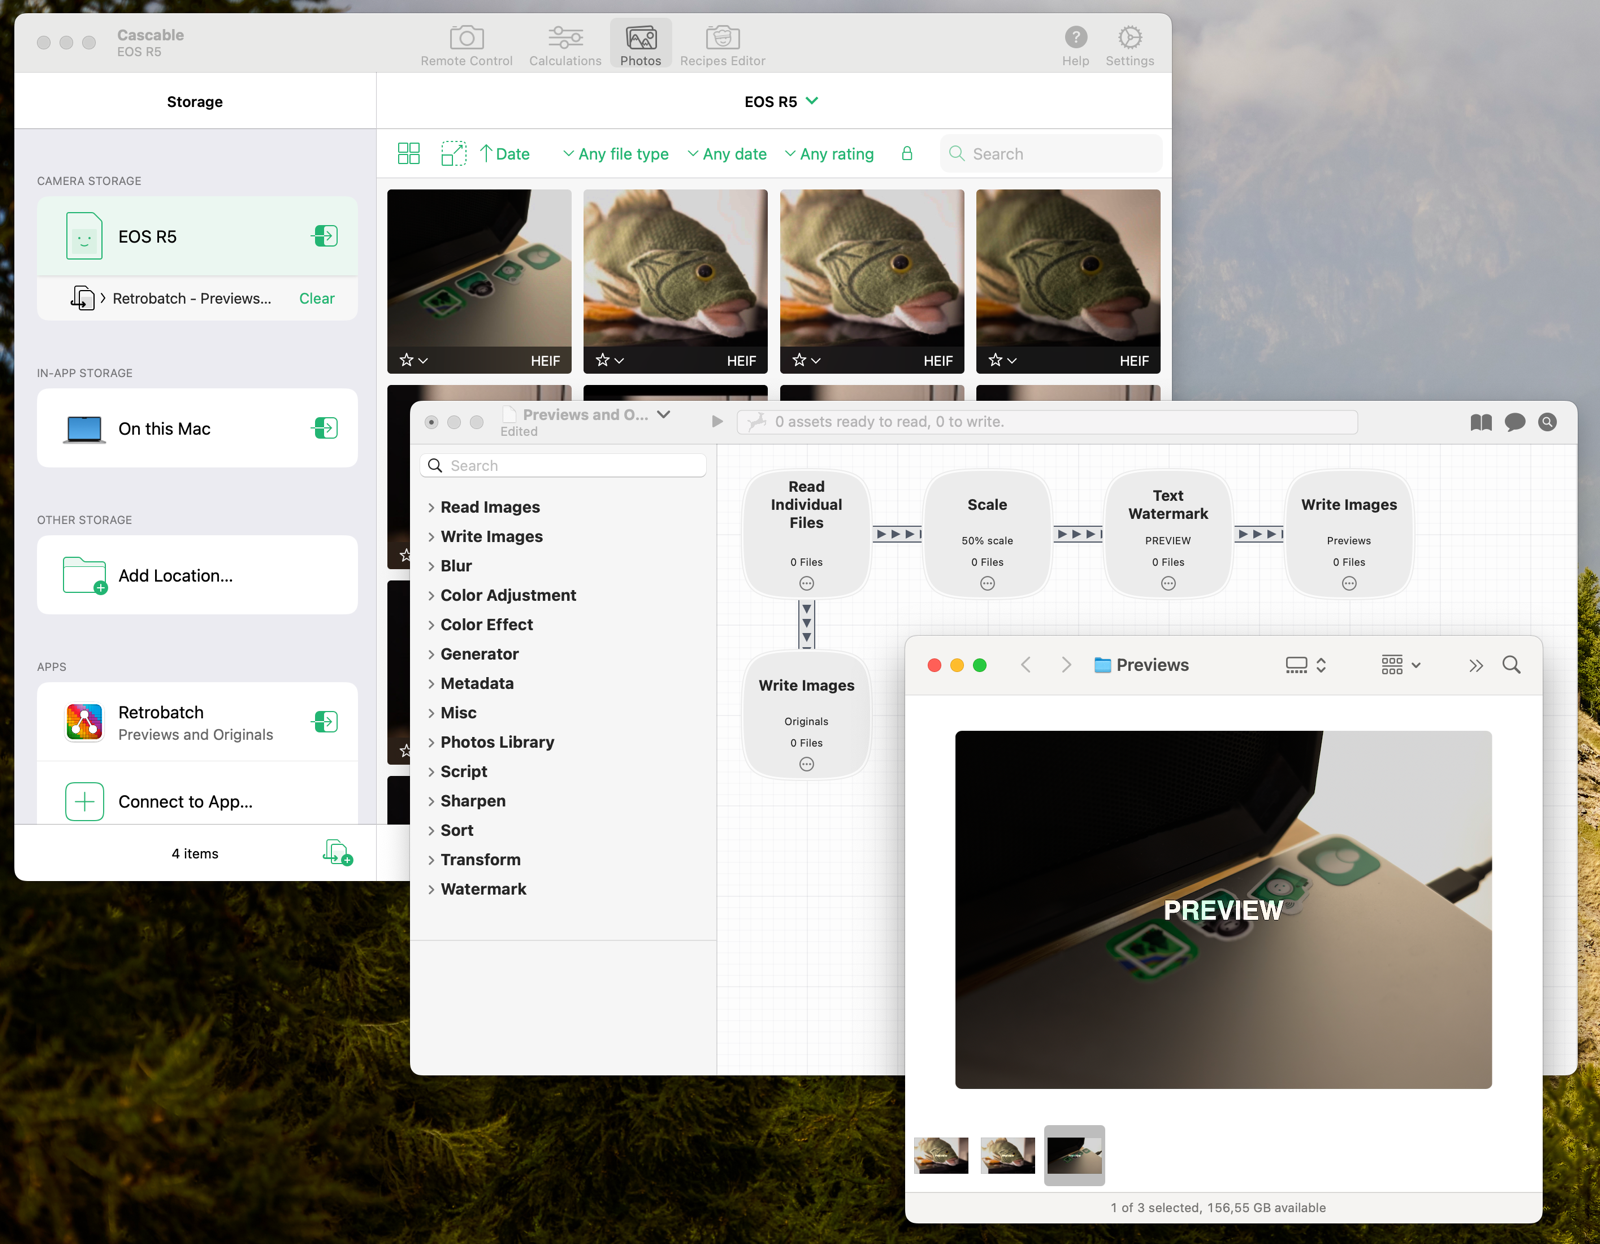
Here’s how it works with the wonderful Retrobatch batch processing tool:

  • Make a workflow in Retrobatch to, for example, make two versions of each image processed — one at 50% scale with a text overlay that goes into a “Previews” folder, and the other is a straight passthrough into an “Originals” folder.

  • In Cascable Studio, connect to Retrobatch and point it at the workflow you just made.

At this point, you can now drag images from your camera to Retrobatch in Cascable Studio, and it’ll copy the images from the camera and pass them straight through to that Retrobatch workflow… and presto! You have a big pile of processed images.

However, where this feature gets really magic — and really into what makes the Mac great — is our app’s ability to build a pipeline for automatic transfers. Link your camera to Retrobatch in our app and suddenly every time you take a picture it’ll be transferred over to Retrobatch and processed. Point your Retrobatch workflow at a cloud-synced folder and bam! Shutter to cloud in, what, five seconds?


Cascable in the background is configured to automatically pass images from the EOS R5 storage location (a camera’s SD card) to the Retrobatch workflow in the middle, which scales them, adds a watermark, and saves them to the folder open in the foreground. The processed images land in the folder 3-4 seconds after the camera’s shutter button is pressed.

Forgive the sales pitch, but I love this feature and it’s why I love the Mac. This interoperability is a core part of the Mac experience and has been since at least the 1990s — well before Mac OS X.

This deep love of this sort of thing is why I fought so hard for this feature.


A Core Part of the Mac Experience Meets the Mac App Store

Alright, so it’s a great feature. Why was App Review so upset?

Part of why this ordeal was, well, an ordeal is that I was never actually explicitly got a straight answer on that. But we’ll get to that.

For an app to be on the iOS or Mac App Store, it has to be sandboxed. In its default configuration, the sandbox completely isolates an app from the outside world and other parts of the system. If you want to communicate outside the sandbox, you need to declare entitlements, which are specific doors in the sandbox that let you communicate with the outside world in that entitlement’s manner.

As some basic examples:

  • To talk to the internet, you need the com.apple.security.network.client entitlement.
  • Bluetooth is com.apple.security.device.bluetooth.
  • Using the device’s camera needs com.apple.security.device.camera.

…and so on.

Some entitlements are so common (like the internet one) that they never really get questioned. Others, App Review will tend to want an explanation and/or demo of their use. This is all fair enough, I guess.

This whole ordeal was over some less common entitlements:

  • To communicate with Retrobatch (and other apps), we use a technology called Apple Events. Apple Events underpin AppleScript as an Apple-provided technology for inter-app communication and scripting — it’s been around almost as long as the Mac has. To use Apple Events from the sandbox, you need to declare the com.apple.security.temporary-exception.apple-events entitlement along with a list of apps you want to communicate with.

  • We also have an integration with an app called Capture One, which as a grossly simplified explanation is “like the Photos app, but for professionals”. With our integration, the user can add photos directly to their Capture One library. For various technical reasons, when attempting to export images to Capture One, the user would see a rather scary dialog about Capture One “accessing data of other applications”. To work around that, we used the com.apple.security.temporary-exception.files.home-relative-path.read-write entitlement to temporarily place exported images outside of our sandbox during the export so the user wouldn’t see that scary dialog.

This is a screenshot of what the relevant entitlements look like in Xcode:


Coming Off The Rails

Now I’m out the other side, I think what happened here were a combination of procedural failures — combined with some unfortunate timing — that coalesced into a nearly month-long review process. Rather than take you through the slog that I did, I’ll instead split out my experience into the explicit ways I think App Review failed here, and ways they should do better in the future.

We usually submit major updates well in advance of the planned launch date, because there’s always stuff to work through with App Review. This time, we submitted a little under three weeks before our target date of December 5th. As a quick timeline, a lot of which isn’t shown in that screenshot above:

November 16th Initial submission.
November 17th Initial rejection, flatly denying the use of all of the "less common" entitlements described above. I ask for a call from App Review.
November 25th I received the call, and was advised to explain the entitlements to App Review but "not to expect any movement for a week due to Thanksgiving". I inferred that the Apple Events entitlements "should be" OK, but it'd need to be escalated.
November 29th Got nervous about the lack of any movement, and pulled the build to resubmit with the feature stripped out.
November 30th Rejected pending information for why we use the Bluetooth, Camera, and Location entitlements.
December 1st Resubmitted.
December 1st Rejected pending information for why we use the Network Server entitlement.
December 1st The build with the feature stripped out was approved.
December 2nd Re-submitted with the feature reinstated.
December 3rd [Luck +10] I attended an App Review lab, and connected with a very nice App Review staff member that was able to look into what was going on for me. Said that it was being looked at in more detail.
December 4th Rejected with an identical rejection to the one on November 17th and a weird additional rejection about our paywall. That same paywall was approved three days prior on both Mac and iOS.
December 4th [Luck +10] Ripcord pulled: I managed to find a relevant person with decent seniority in the right department. I emailed that person and got a "We'll look into it" reply fairly quickly.
December 4th I receive a notice that this is now being looked at by the appeals board.
December 4th I receive a message from the appeals board asking for information on why we're using the less common entitlements identified above.
December 5th Launch day! I launch with this feature missing from the Mac app.
December 9th I receive a follow-up call from the staff member I met in the lab. We scheduled another call for a few days' time to see how the progress was going with the new submission.
December 10th I receive an almost identical rejection to the ones on November 17th and December 4th, the message for which contradicts itself.
December 10th I reply to the rejection pleading for a straight answer. I get told "We advise submitting a revised binary with your suggested changes for review."
December 10th I resubmit without the com.apple.security.temporary-exception.files.home-relative-path.read-write entitlement.
December 11th Rejected pending information for why we use the Bluetooth entitlement. My reply is… snippy.
December 11th Approved!
December 13th I receive a follow-up call from the staff member I met in the lab. We chatted about the past few weeks and I gave some feedback to hopefully pass along. There's still one outstanding question on whether App Review can see some details in the submission form.
December 16th I receive a follow-up call from the staff member I met in the lab. We chat a bit more about that outstanding question and conclude the "incident ticket", as it were.

Yikes.


Failure #1: Escalation Is Difficult and Slow

When you get rejected by App Review, you’ll get a message about why and the ability to reply in text form. Sometimes, rejections are simply requests for information, but there’s always the ability to reply — even if the rejection wasn’t asking for information, a review can sometimes be turned around without re-submitting if you “Um, actually…” them if they got something wrong.

I have no insider information about how the review process works, just fifteen years of outside observation. From my observations, the reject-reply-action turnaround can be fast if the person reviewing the app has the power to continue the review with everything they then have (although it can still be a dice roll — “Will this be actioned in ten minutes or two days?” is still a thing). In my experience this doesn’t include anything regarding policy - i.e., if someone needs to take context into account to make a decision, you’re out of the “fast” queue.

My experience also supports the fast queue being somewhat international and running 24/7, but once you’re out of that you’re limited to progress being made in California business hours — and timescales start being measured in days and weeks.

In my instance here, I got rejected on November 17th, and I asked for an escalation and a follow-up call the next day. I got a reply a little over a day later confirming that the call would come in “3-5 business days”, and the call arrived on November 25th. The person on that call was basically collecting more information from me so the issue could then be escalated.

Unfortunately, this was Monday on the week of Thanksgiving, and I was told that realistically I wouldn’t be seeing any movement until the following week due to that.

Even ignoring the bad timing of Thanksgiving (and the fact that it seems the entire department shuts down for a whole week?), that’s a week between asking for an escalation and getting it. That’s a long time of nothing.


Failure #2: App Review Appears To Be Missing Critical Information for Mac Submissions

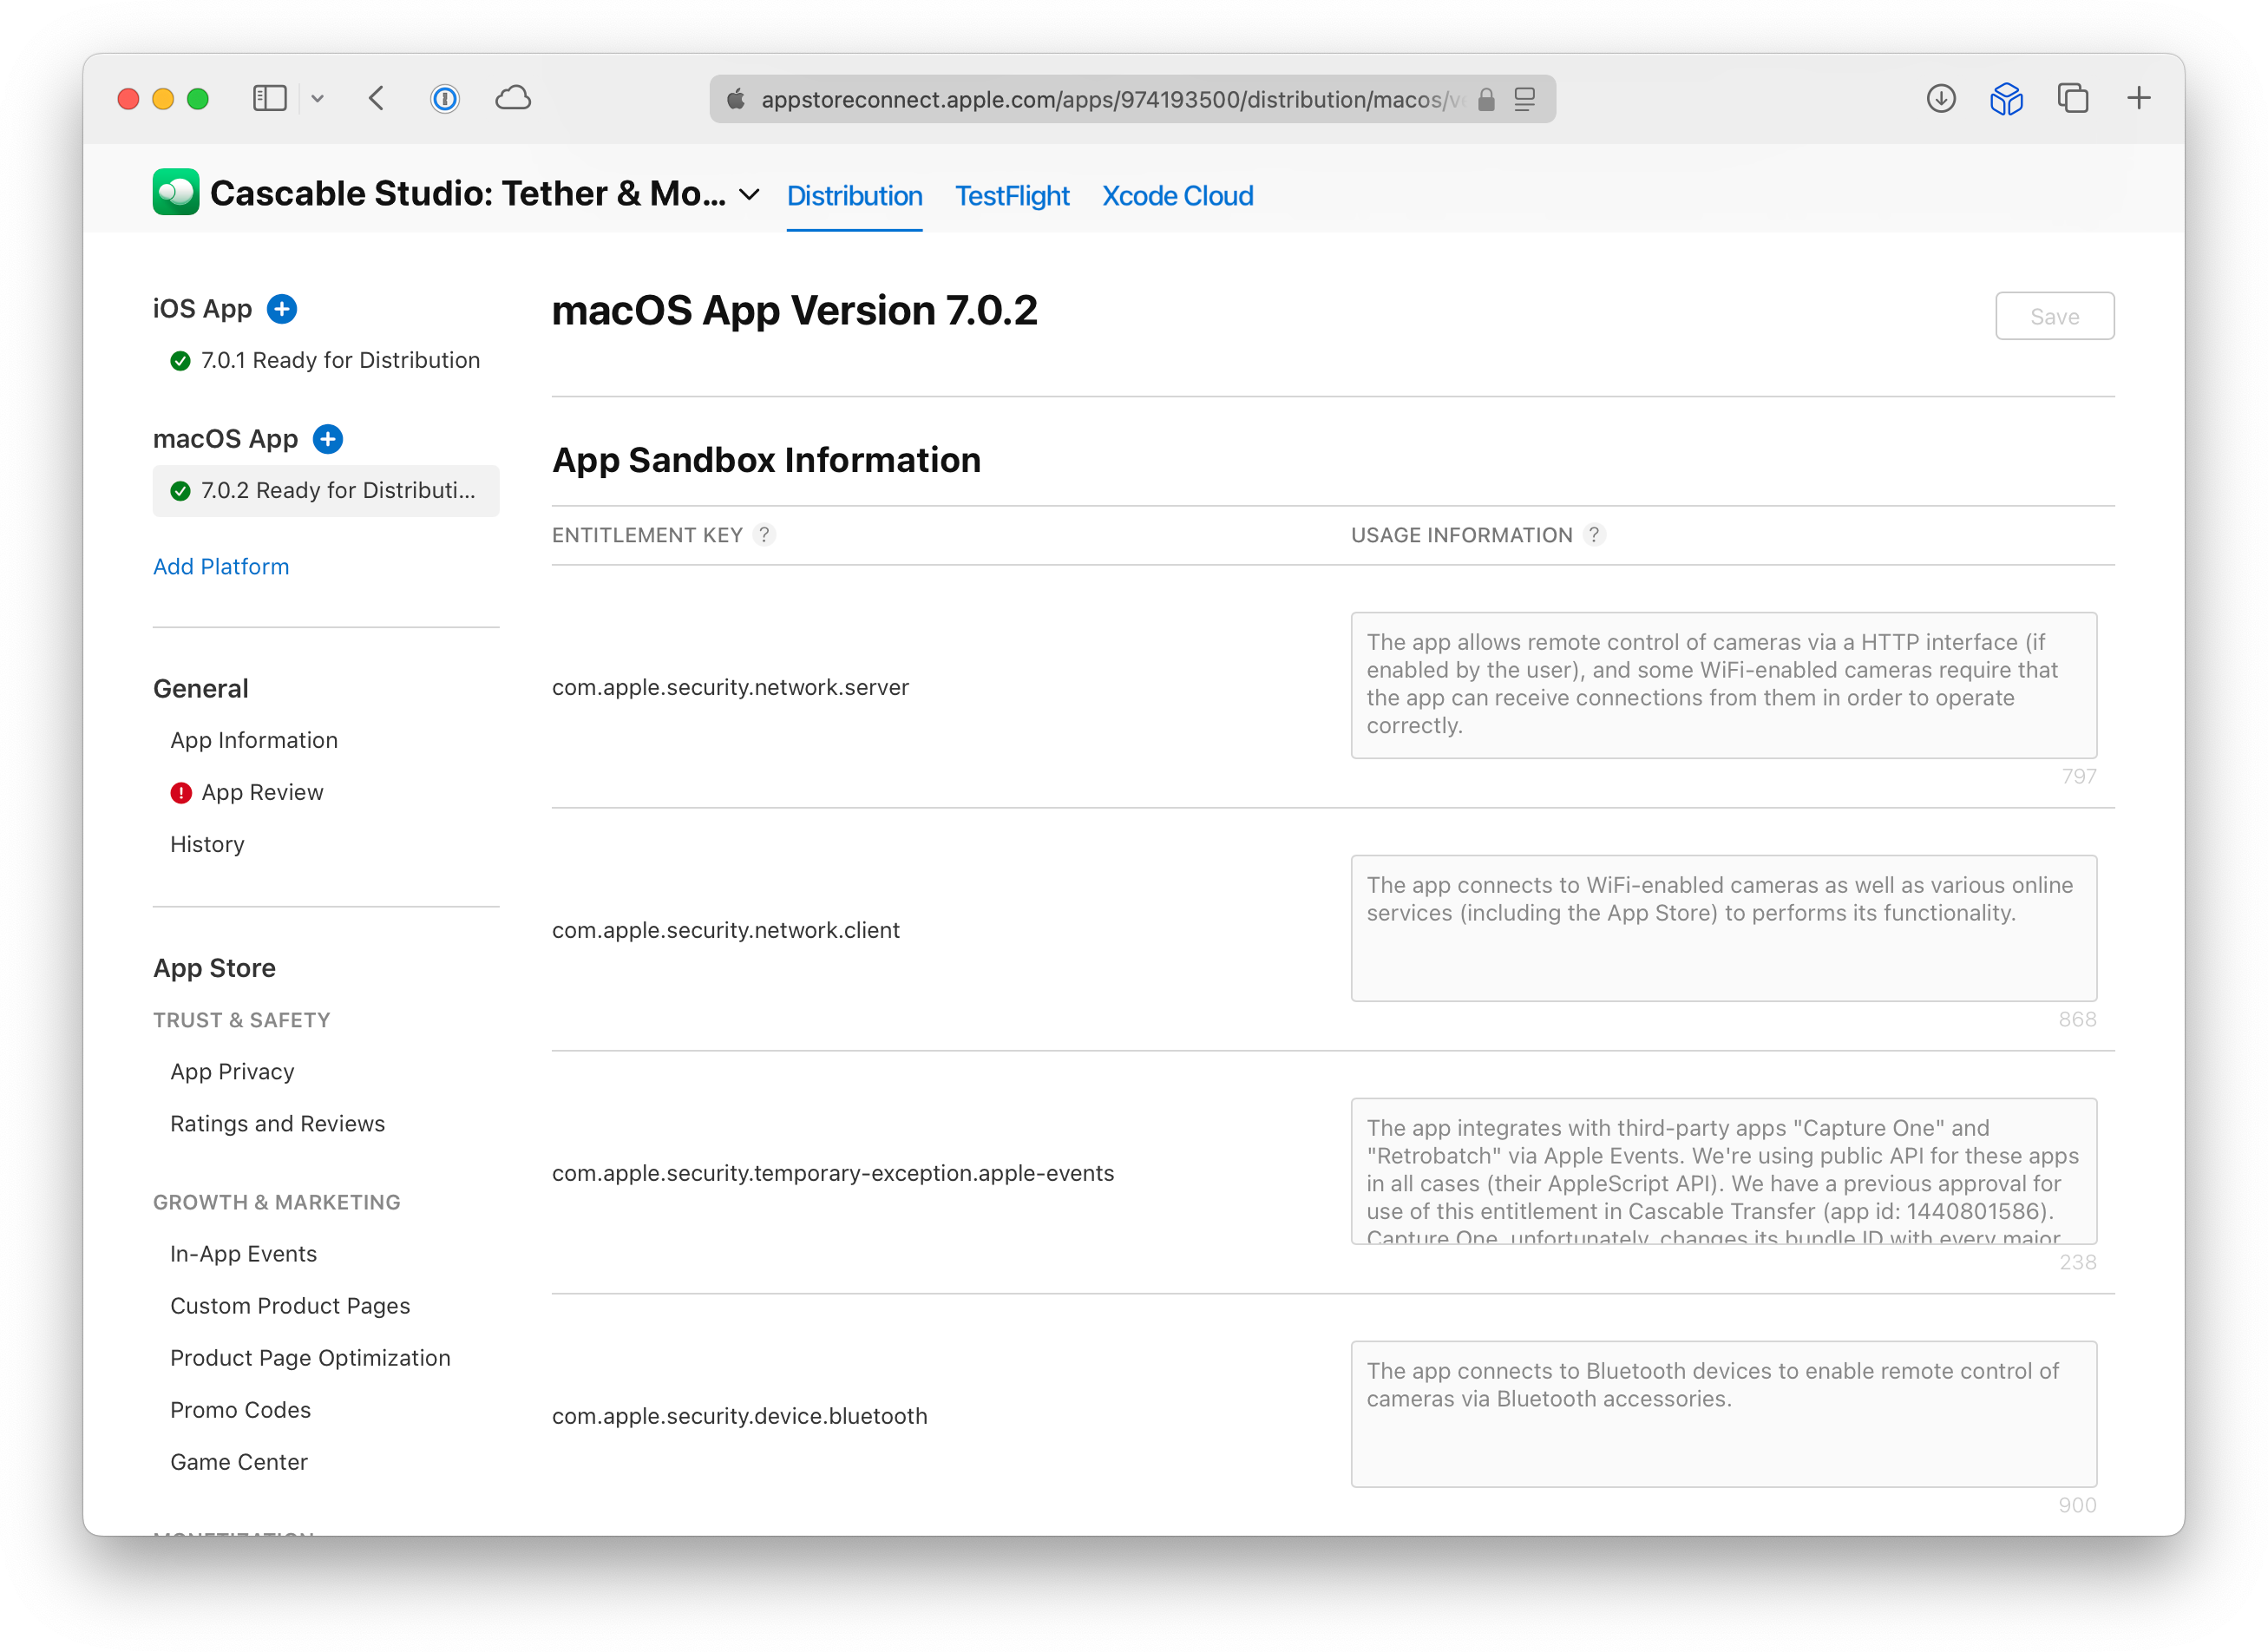
When you submit a Mac app, you get an extra section in the submission form entitled “App Sandbox Information”. In that section, you add all of the entitlements you’re using from a drop-down menu and explain exactly what you’re using each entitlement for. I made sure to fill out that section diligently, and here’s what ours looks like for Cascable Studio:

We got rejected or asked for missing entitlement information multiple times during this process — on November 30th (Bluetooth, Camera, and Location), December 1st (Network Server), December 4th (Apple Events and file access from the appeals board), and December 11th (Bluetooth, again). It wasn’t stated explicitly, but I was told that missing entitlement information was a factor in the initial rejection on November 17th, too.

In all of these cases, we had provided detailed information about why we’re using the entitlements in the mentioned section of the form. In all of these cases (bar one where the entitlement was included in error, and a more detailed explanation for the appeals board), I copy and pasted the information I’d already written from the form we submitted to App Review into the reply to App Review. The reviews then continued.

I must admit, I was particularly snippy about the second Bluetooth one:

We have already explained, in exquisite detail including with a demo video, why we use Bluetooth in this app earlier in this very same submission process. Please review the earlier correspondence for those details. If you are unable to scroll up far enough, I’ll repeat that information here:

You can also see that video here: https://www.youtube.com/watch?v=UVxAIF2eGUs

(Text explanation of what’s happening in the video)

In all of the “live” conversations I’ve had with actual Apple employees (three separate conversations with two separate people), they were not able to see this additional entitlement information. I was told that they don’t necessarily have the same tools the actual reviewers do, so what they see might not match.

This happened often enough that it goes beyond a simple oversight by an individual reviewer. Either they can’t see the provided information, or they’re not aware that it’s there.

Update after I wrote this but before I published it: I received a final follow-up call and I was told that for now, the advice is to duplicate entitlement information into the “Review Notes” field. There seem to be no straight answers to be found anywhere about whether App Review can see these additional fields, even internally.

Entitlement information is critical information to perform a review of an app. If App Review can’t actually see this information in Mac submissions, this is a serious failure of the tooling for this process. If the reviewers can’t see the information, how can they possibly review the app properly?


Failure #3: Rejection Communication is Often Missing Actionable Information

After weeks of back-and-forth and waiting, the final conclusion is that the problem was with the com.apple.security.temporary-exception.files.home-relative-path.read-write entitlement — the Apple Event ones all got approved once that was taken away.

However, that was never explicitly stated in my rejections. Even after going through the appeals board, I got this rejection:

Thank you for your patience.

Regarding 2.4.5, we found that the app may not use the following entitlements:

com.apple.security.temporary-exception.apple-events
(A list of all the Apple Events entitlements)

com.apple.security.temporary-exception.files.home-relative-path.read-write
/Library/Caches/Cascable Capture One Exports/

To resolve this issue, it would be appropriate to adhere to the following provided guidance:

When sending an AppleEvent with the proper types (e.g. typeFileURL), then the receiving application will be granted access to the specified data without having to move/copy the file to a shared location such as the cache.

If you continue to have issues with that mechanism, please submit a Radar against it.

If we boil this down, this message says:

You cannot use Apple Events. You cannot use the shared cache location. When sending an Apple Event with the proper types, you don’t need to use the shared cache location.

…which is a very contradictory trio of sentences. I asked for clarification:

…can you please make a clear judgement regarding Apple Events? Your message contradicts itself.

You wrote:

“We found that the app may not use the following entitlements: (list of Apple Events entitlements)”

Then you wrote:

“When sending an AppleEvent with the proper types…”

So, which is it? Are we not allowed to use the Apple Events entitlements, or is it just the cache directory usage that’s the problem?

I got the reply:

We advise submitting a revised binary with your suggested changes for review.

Would it kill them to give a straight answer? I get that they don’t want to put anything in writing because people like me publish blog posts like this one putting their words out for the entire world to see, but I really can’t possibly see how “If you take away this entitlement, these other ones are OK in your particular use case” is a damaging statement to make.

That information — that the Apple Events entitlement should be OK without the other one — did appear to be present internally almost from the beginning. It was implied on the call I received on November 25th, and if you read between the lines in that rejection above on December 10th it’s kinda-sorta there too.

However, I can’t run a business on inferring from indirect statements and reading between the lines. This process sits between my business and its revenue, and I need to be sure where we stand. I appreciate that they can’t pre-approve an app idea, but when we’re three weeks into a back-and-forth and we’re talking about a very specific feature in a very specific app submission, “we advise submitting a revised binary with your suggested changes for review” is kinda horseshit. So I get to spend engineering hours implementing something to find out if I’m reading between the lines correctly? Yuck.


Failure #4: There Are Frustratingly Few Technical People in App Review

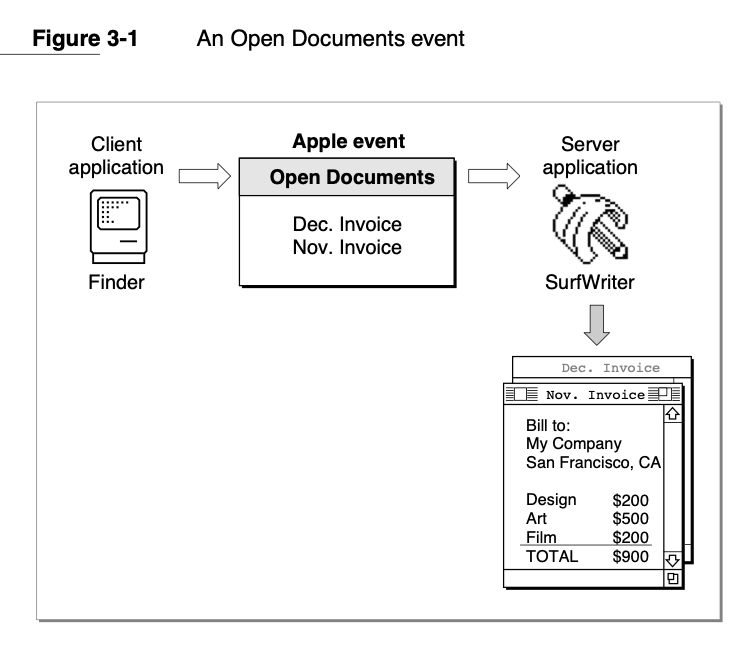
Now. I will grant that Apple Events are a fairly low-level technology. It’s also a very old one — when looking up documentation for Apple Events to give to App Review to show it’s a public Apple technology, I found a document with this diagram in it:

It’s aged delightfully, but I figured showing App Review a diagram from the ’90s was unlikely to help the case that it belongs in the modern App Store.

Anyway, I must’ve explained what Apple Events are to three separate people throughout this process. This did eventually get to someone technical up at the appeals board, but nobody having any idea what an “Apple Event” is really cannot have helped.


It wouldn’t be a blog post without at least one meme.

I do understand that they don’t need to hire programmers to reject apps for bad screenshots or whatever, but if App Review can’t understand the technologies at play when they’re reviewing apps, how can they possibly review the app properly?


One Week Later: My Thoughts

This is now a story I’m writing a blog post about and not one I’m living. It was very stressful to live through — I’m sure I’ve lost some years from my life over all this, and Apple’s larger policy of “no communication until we feel like it” is extremely not helpful. Squeezing in a build with the feature stripped out so we could launch when planned did lessen the load a bit, but it meant that one of the release’s best features was completely absent from the launch’s press material — a huge blow to marketing visibility.

It’s a shame, too — this release was the result of more than a year of work and was the most ambitious launch in the history of the app. It should’ve been a momentous and happy day, but there was a huge cloud put over it because of all this. Alas, three weeks’ lead time on our App Store submission wasn’t enough. I hate to think how long it would’ve been (or if we’d have got an approval at all) if App Review didn’t happen to be hosting labs, and if I didn’t manage to find the contact details of someone to escalate to.

Now, I’m not one of those people that’s morally opposed to app review as a concept (as long as there are alternative distribution options, which is the case on the Mac, at least), but it has to function correctly.

I’m not even that upset about some of the rejections I got during this process. When App Review works well, the back-and-forth is fine. If we ignore the larger chaos here and look just at the rejection on December 11th:

9:23 am Rejected needing information on why we use Bluetooth.
9:56 am We reply with the requested information.
10:05 am In review.
10:08 am Approved.

That sort of back-and-forth with that sort of turnaround time is fine. They’ll sometimes genuinely need information, and taking that and immediately acting upon is a perfectly reasonable process - which also mitigates situations where they’re asking for information they already have.

What isn’t OK is:

  • App Review not being able to see — or not being trained to look for — critical information for the review process.
  • Turnaround times measured in weeks.
  • The entire process shutting down for a whole week due to Thanksgiving.
  • Never being able to get a straight answer, receiving conflicting information in a single message, and having to infer and read between the lines.
  • Me having to schedule my big submissions around times when App Review happens to be hosting labs so I can actually get a human to speak to.
  • Me having to desperately try to find contact details for someone I can escalate things through on any sort of reasonable timescale.

This has to be better. A lot of it points to a department that has to deal with millions of app developers and submissions without the resources to do so well when things fall out of the “optimised path” like this did. Of course, that defence immediately falls apart when you notice that Apple is one of the richest companies on the planet (not that you can throw buckets of money at every problem to make it disappear, but still).


Silver Linings

I do try to make an effort not to complain all the time, so let’s find some positives:

#1: The amount of support I got from the community really helped. Being an indie developer is a uniquely… er, unique? experience — especially on platforms with a monolithic gatekeeper like the App Store — and when things like this happen there’s a little pit of existential dread that forms while you feel like your business hangs on the whims of some people in a meeting room somewhere*. There’s only so much empathy most of my “IRL” friends and family can have for that, and having a big pile of peers cheering me on and otherwise sharing in my experience made things a lot easier to bear.

* Obviously this isn’t a rational reaction to what was happening here — the loss of that feature wouldn’t actually be a death knell for my business. Still, when you build a feature you’re excited about because it’s a great fit for the platform you’ve been using for 30 years, only get a flat Nope. from the gatekeeper without additional context, there’s suddenly a disconnect between what you thought the platform was about and what the gatekeeper thinks the platform is about. That’s not a nice feeling.

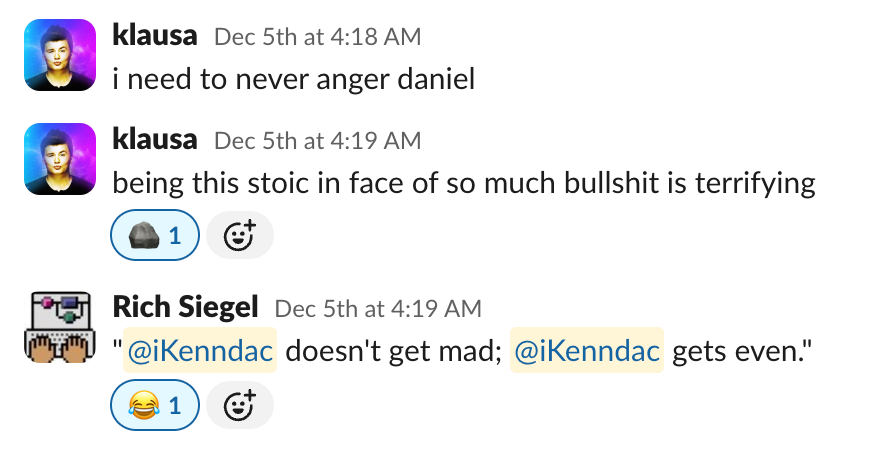
This particular little snippet from a community I’m in made me laugh a lot, so I thought I’d include it here (with permission):

#2: Connecting with an App Review staff member in the App Review labs was a godsend. They didn’t work directly on reviewing apps so it’s not like they could just go in and approve the app, but they were able to see things I couldn’t and ask questions internally that I couldn’t. Getting this additional context — and someone on the inside able to shout for me — at least kept hope alive when my “official” communication from App Review was so devoid of… well, anything. When they didn’t know an answer to a question they promised to find out and follow up with me, and they did so every time. They did an excellent job given the restrictions they had (i.e., not having a giant “Approve” lever they could pull).

Hopefully these App Review labs (which are listed here on the Apple developer site - search for “App Review”) are a continuing and consistent thing, because they offer a much-needed lifeline.


Ramifications for the Future

So, what now? While we do have the feature approved and in the App Store now, this ordeal has affected my outlook for the future quite significantly:

Cascable Studio

It’s likely that, even though the app is approved now, I’ll pull the Apple Event stuff out and into a separate downloadable component that’s outside of App Review’s purview. I’d like to integrate Cascable Studio with more and more apps in the future, and I very much don’t want to go through this argument again any time soon.

This solution is perfectly achievable with sandboxing intact and without any funny business that’d affect App Review, but it is a worse experience for the user and a lot more effort on our part. It sucks for everyone, but it’s better than doing this every time — or even having the shadow of this maybe happening again on every submission.

Our Other Apps

We have another Mac app — Cascable Pro Webcam — that’s currently being sold outside of the App Store. When I first made the app, virtual webcams were flat-out not allowed on the App Store, which to be honest was fair enough — the architecture for virtual webcams at the time was extremely not secure.

However, since then Apple has shipped a new architecture for virtual webcams that Pro Webcam implemented immediately. Now it’s allowed, I was planning on moving Pro Webcam to the App Store with its next major update in the new year — we’re currently using Paddle, and I’m not very happy with them. However, it also uses a “non-standard” entitlement (com.apple.developer.system-extension.install), and after my experience here I’m seriously reconsidering that plan.

Further Into The Future

This ordeal has rekindled my uneasiness of being reliant on a single gatekeeper for my company’s survival. Yes, we can ship on the Mac outside the App Store, but still.

Being multi-platform has been at the back of my mind for a long time, and at the beginning of the year I did a decently-involved investigation into using Swift on Windows. I find my desire to return to that suddenly getting stronger, for some reason.


September 30th, 2024

Handling Responder Chain Actions in SwiftUI (With A 'Lil Help From Objective-C)

Note: If you got here via a web search for handling UIKit menus or responder chain actions in SwiftUI and don’t need/care about the context here, you can jump straight to my GitHub repo containing the sample project, which has a much more succinct readme.

We’re currently in the process of bringing my indie company’s main app, Cascable, to the Mac using the Mac Catalyst technology.


An early build of Cascable for Mac, an iOS app ported to the Mac with Catalyst.

Cascable isn’t a particularly huge app in terms of lines of code (around 90,000 lines of Swift and 57,000 lines of Objective-C), but it is getting pretty large in terms of time. Cascable 1.0 shipped in 2015 and has evolved from there, travelling through various iOS UI trends — starting in the era of Storyboards and visual editing, through autolayout’s visual format language, the expanded auto layout APIs for expressing constraints in code, and finally into SwiftUI.

We’re not in any particular hurry to throw away and rebuild our perfectly working UI code in favour of SwiftUI, instead preferring to build new UI with the tool most appropriate with the task at hand, and modifying existing UI components in whatever they were originally built in.

As a result of this approach, the Cascable app is a melting pot of all the above mentioned UI building techniques, and for the most part this works great. However, SwiftUI is a radical departure from UIKit in many ways, and the meeting point between SwiftUI and UIKit can be a little bit… tricky.

And that’s where we find ourselves today.

The Problem

Part of the Mac work is building out a robust set of menus and keyboard shortcuts. We’re using the “traditional” approach for this — building out the menus with action-based items that pieces of UI can choose to handle.

This blog post is going to use the specific example of applying a star rating to images. There are multiple places in the app the user might want to apply a rating to an image — in the image grid, in the single image viewer, and in a separate window/screen dedicated to viewing images.

In UIKit, a menu item can be defined like this then added to the menu bar:

let fiveStarRatingItem = UIKeyCommand(title: "★★★★★",
                                      action: #selector(applyFiveStarRating(_:)),
                                      input: "5")

Once the menu item is in place, a view controller can implement the item’s action to enable the menu item and perform an action when it’s chosen.

@objc func applyFiveStarRating(_ sender: UICommand) {
    selectedImage?.rating = 5
}

It can even change the menu item’s enabled status and other attributes (like having a checkmark next to it) dynamically. For example, let’s put a checkmark next to the current rating of the image.

func validate(_ command: UICommand) {
    if command.action == #selector(applyFiveStarRating(_:)) {
        let enableItem = (selectedImage != nil)
        let checkItem = (selectedImage?.rating == 5)
        command.attributes = enableItem ? [] : .disabled
        command.state = checkItem ? .on : .off
    }
}

This setup lets us only declare menu items for rating images once, and our image grid, single image viewer, and separate image viewer can all to react to the menu items appropriately without them all having to redeclare them, their titles, and their keyboard shortcuts.

At runtime, the system will walk the app’s responder chain when evaluating the menu item for display or for executing its action, and it’ll automatically be enabled and the view controller’s method called.

This approach is pretty much as old as time (menus worked like this in Mac OS X 10.0 back in 2001), and works great — we have the advantage of only having the declare the menu item and its keyboard shortcut once, and the items will automatically be enabled when they’re available. Lovely!

This all comes to a screeching halt when we get to SwiftUI, which doesn’t really expose the responder chain directly. So, how can we handle selector-based responder chain actions in SwiftUI?

Initial Solution: Explicit Forwarding

Since we’re a hybrid app that “starts” with UIKit, our SwiftUI is always displayed inside a UIHostingController, which is a normal view controller and can absolutely take part in the responder chain.

I’ll skip the journey and get straight to the initial solution: A coordinator object belonging to the UIHostingController that contains a basic store of handlers, and a SwiftUI view modifier that looks like this to register a handler with that coordinator:

Text("IOU 1x UI")
    .actionHandler(for: #selector(applyFiveStarRating(_:))) { command in
        selectedImage?.rating = 5
    }

The UIHostingController subclass can then handle our menu item’s validation and action methods, forwarding them along to the coordinator object to be delivered to the SwiftUI world.

override func validate(_ command: UICommand) {
    if menuItemCoordinator.hasHandler(for: command) {
        menuItemCoordinator.validate(command)
    } else {
        super.validate(command)
    }
}

@objc func applyFiveStarRating(_ sender: UICommand) {
    if menuItemCoordinator.hasHandler(for: command) {
        menuItemCoordinator.perform(command)
    }
}

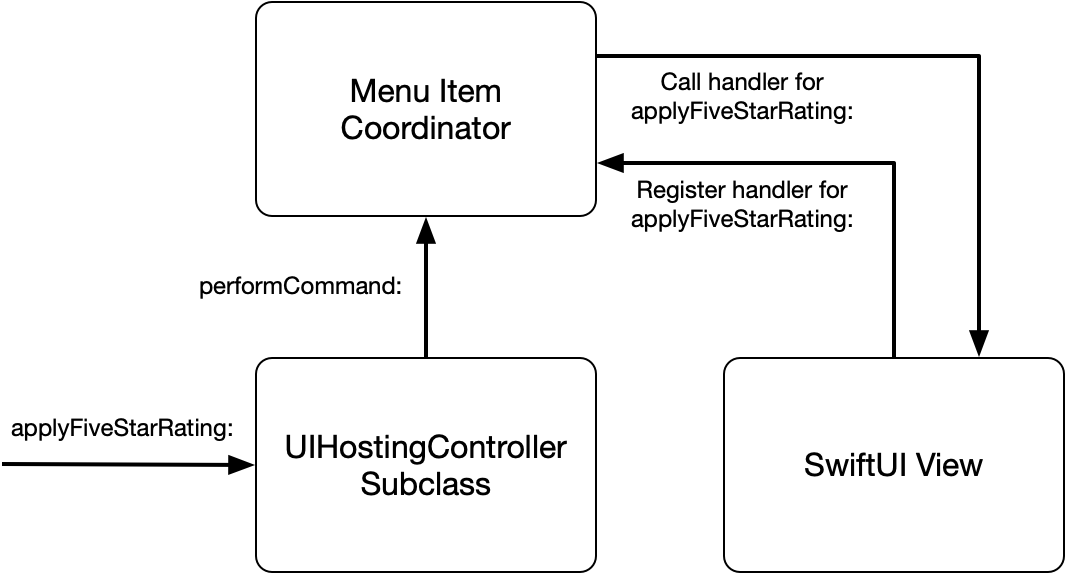
Or, in diagram form. Note that for every menu item we want to handle in SwiftUI, code needs to be added to the UIHostingController subclass to specifically handle it.

Problem solved forever.

…oh, you want more than one menu item? Ah.

This works great in theory, but the whole point of the responder chain is that it’s dynamic. If we’re building a “robust set of menus” for our app, we’d have to implement every single possible menu action in our UIHostingController subclass to then check whether the SwiftUI view has registered a handler for it and pass the action along (and explicitly disable the menu item if not, since implementing all these methods signals to the responder chain that we can handle them all).

It’d be really nice if we didn’t have to do that.

Final Solution: Objective-C To The Rescue!

The responder chain’s design allows us to redirect an action to a new target pretty simply. This override on our UIHostingController subclass will redirect our menu actions to the coordinator:

override func target(forAction action: Selector, withSender sender: Any?) -> Any? {
    if menuItemCoordinator.hasHandler(for: action) {
        return menuItemCoordinator
    } else {
        return super.target(forAction: action, withSender: sender)
    }
}

However, all this does is change the target — our coordinator object will still need to implement all the action methods. This doesn’t solve our problem at all — it just moves it!

Swift is interoperable with the Objective-C runtime, which uses dynamic message sending. It’s possible to “catch” a message (i.e., a method call) at runtime and point it somewhere else using a thing called NSInvocation, which represents an “instance” of a method call, combining the method’s signature, types, and particular parameters being sent. Once you “catch” an invocation, it can be inspected and redirected to a different destination.

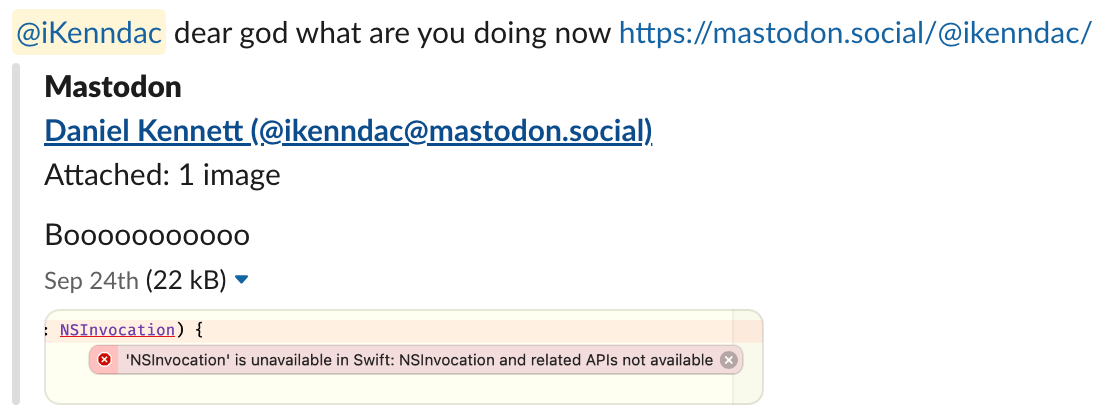
All we need to do is override forwardInvocation(_:) and… ah. Turns out Swift is mostly interoperable with the Objective-C runtime, but not completely.


Nooooooooo!

Welp, to solve our SwiftUI problem it looks like we’re going to have to write some honest-to-goodness Objective-C. Thankfully, it’s only a few lines.

Side anecdote: I posted that above screenshot to Mastodon when I was working on this, and almost immediately got this message from a friend — and it's still making me laugh several days later.

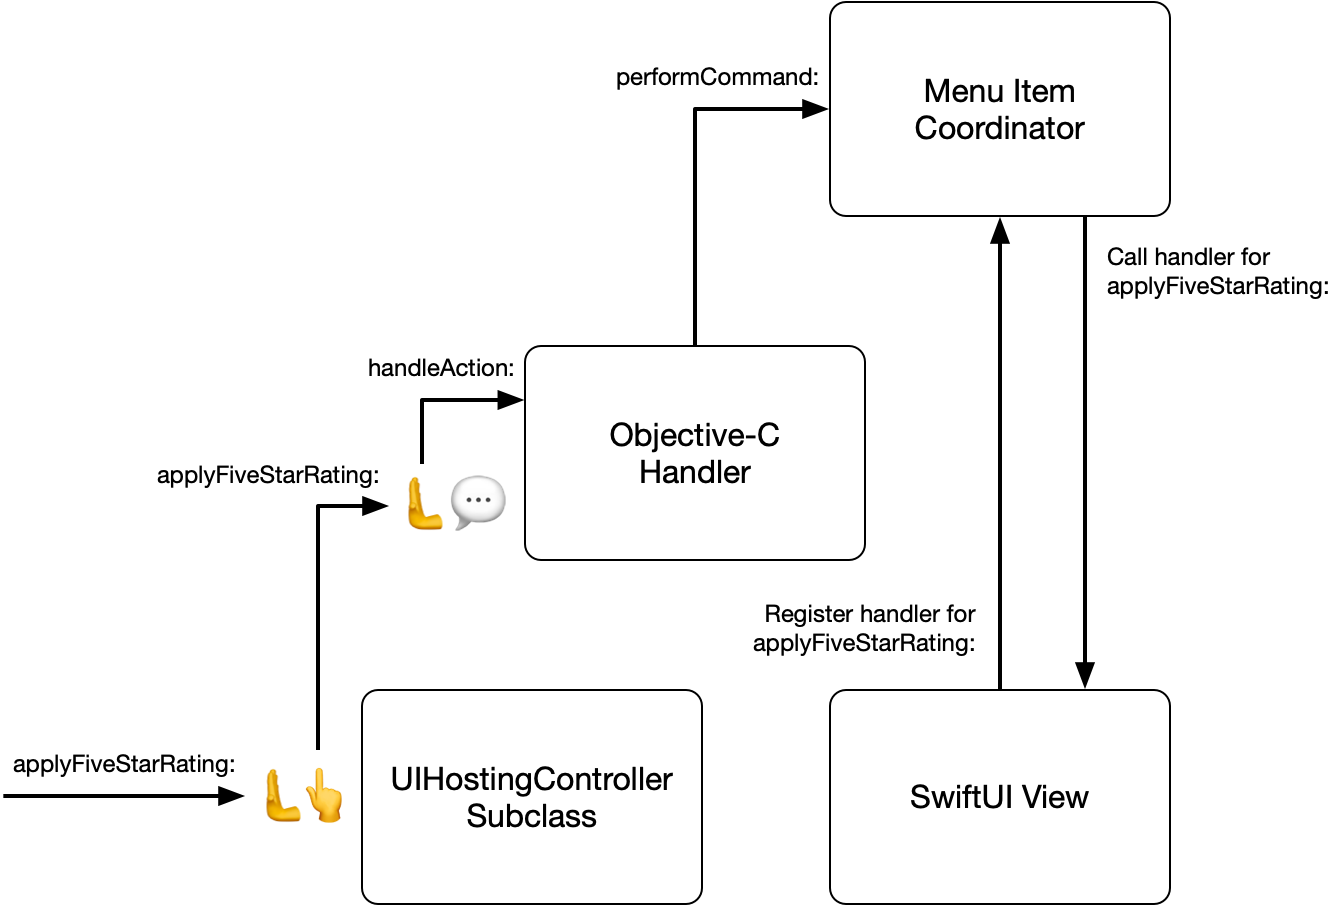
Rather than dump a pile of code in here, let’s go through what’s happening step-by-step:

1) The user chooses a menu item.

2) Because it’s in the responder chain, the UIHostingController subclass containing our SwiftUI will be asked for the target for the menu item’s action. We check our registered handlers, and if the SwiftUI view has registered one for that menu item, we redirect the action to our Objective-C object (which is stored in the actionHandler property on our coordinator). If we don’t have a registered handler, we let the responder chain carry on as normal with a call to super.

override func target(forAction action: Selector, withSender sender: Any?) -> Any? {
    if menuItemCoordinator.hasHandler(for: action) {
        return menuItemCoordinator.actionHandler
    } else {
        return super.target(forAction: action, withSender: sender)
    }
}

3) After the redirect, the responder chain will ask our Objective-C class if it can handle the action. We check the coordinator again (which is the actionTarget property) to confirm we can receive the action.

-(BOOL)canPerformAction:(SEL)action withSender:(id)sender {
    return [self.actionTarget canPerformActionWithSelector:action];
}

4) Once we confirm that we can perform the action, the responder chain will then send a regular Objective-C message (method call) to our Objective-C object. At this point, we get the opportunity to intercept the message. To do so, we must first override methodSignatureForSelector:.

-(NSMethodSignature *)methodSignatureForSelector:(SEL)aSelector {
    return [[self class] instanceMethodSignatureForSelector:@selector(handleAction:)];
}

The selector at this point will be the action’s selector, applyFiveStarRating:. A selector doesn’t contain any type information, but an NSMethodSignature object does — it’s a description of the parameter and return types of an Objective-C method call. What we’re saying here is “Hey, you’re looking to send the message applyFiveStarRating:, and here’s the types that’re needed for me to receive that message.”

5) Finally, the Objective-C runtime will attempt to deliver the message. If we’d implemented -(void)closePanelFromMenu:(UICommand *)sender explicitly, that’d be called. However, we don’t want to manually implement every single possible menu handler, so we didn’t. So, instead, we get the opportunity to intercept the method call. This part is the core of this entire thing.

-(void)forwardInvocation:(NSInvocation *)anInvocation {
    anInvocation.selector = @selector(handleAction:);
    [anInvocation invokeWithTarget:self];
}

An NSInvocation is a specific instance of a method call. It contains the selector (in this case, it’ll be applyFiveStarRating: when first passed to us), the method signature containing the types involved, a target for the message, and the actual arguments passed. This is where the actual redirection happens — here, we’re saying “For this invocation, instead use handleAction: on self.”

6) With our invocation successfully redirected, we’ll get a call to our catch-all action receiving method, which is just a regular Objective-C method definition. This method forwards the action along to our SwiftUI coordinator object.

-(void)handleAction:(UICommand *)command {
    [self.actionTarget performActionForCommand:command];
}

7) There’s no step three seven!

Basically, that Objective-C object redirects all incoming actions to handleAction: on-the-fly, removing the need to explicitly implement any of them directly. Since menu actions come with a UICommand object, we can still see the original action after the redirect and handle it appropriately. On AppKit, we’d have to keep hold of the original selector somehow, but it’s still perfectly doable.

Again, in diagram form. While the diagram is more complicated the one above, we don’t actually have to add more code for each menu item we want to handle in anything but the SwiftUI view that actually handles it, unlike with the previous solution.

One thing to note is that this approach undoes all of the optimisations that the Objective-C runtime has around message dispatch, plus the runtime has to construct the NSInvocation object that’s used during the redirect. This does, as you might imagine, slow down message delivery significantly. However, since we’re not in a performance sensitive section of code (it’s not like the user will be triggering hundreds of menu items per second), it’s alright here. There are other ways of achieving the same result without the performance penalty, which I may explore in a future post.

Conclusion

“Gee, that sure is 1,500 words on handling menu items,” you might be thinking, “but what’s the point?”

Well, with this, we can add an item to a menu in the menu bar:

let fiveStarRatingItem = UIKeyCommand(title: "★★★★★",
                                      action: #selector(applyFiveStarRating(_:)),
                                      input: "5")

…then handle it in SwiftUI:

Text("IOU 1x UI")
    .actionHandler(for: #selector(applyFiveStarRating(_:))) { command in
        selectedImage?.rating = 5
    }

…with no additional glue code in between. Pretty nice!

If you want to see this in action, there’s a working sample project over on GitHub. Enjoy!


May 13th, 2024

Early-Adopting the Apple Vision Pro from Outside the USA

Recently, on a trip to the USA, I bought an Apple Vision Pro. This wouldn’t usually be worth a blog post, but the Vision Pro isn’t available outside the USA at the moment and it’s rather complicated to buy, especially if you need corrective lenses (and my particular instance was even more complicated, as you’ll see below). I thought I’d share my experience and initial impressions, largely for posterity but perhaps to help other non-USA folk to get their own before it’s available in their region (which hopefully won’t be for long).

This was originally going to be a series of Mastodon posts, so forgive the less-than-usual level of polish on this post.

Demos & Buying

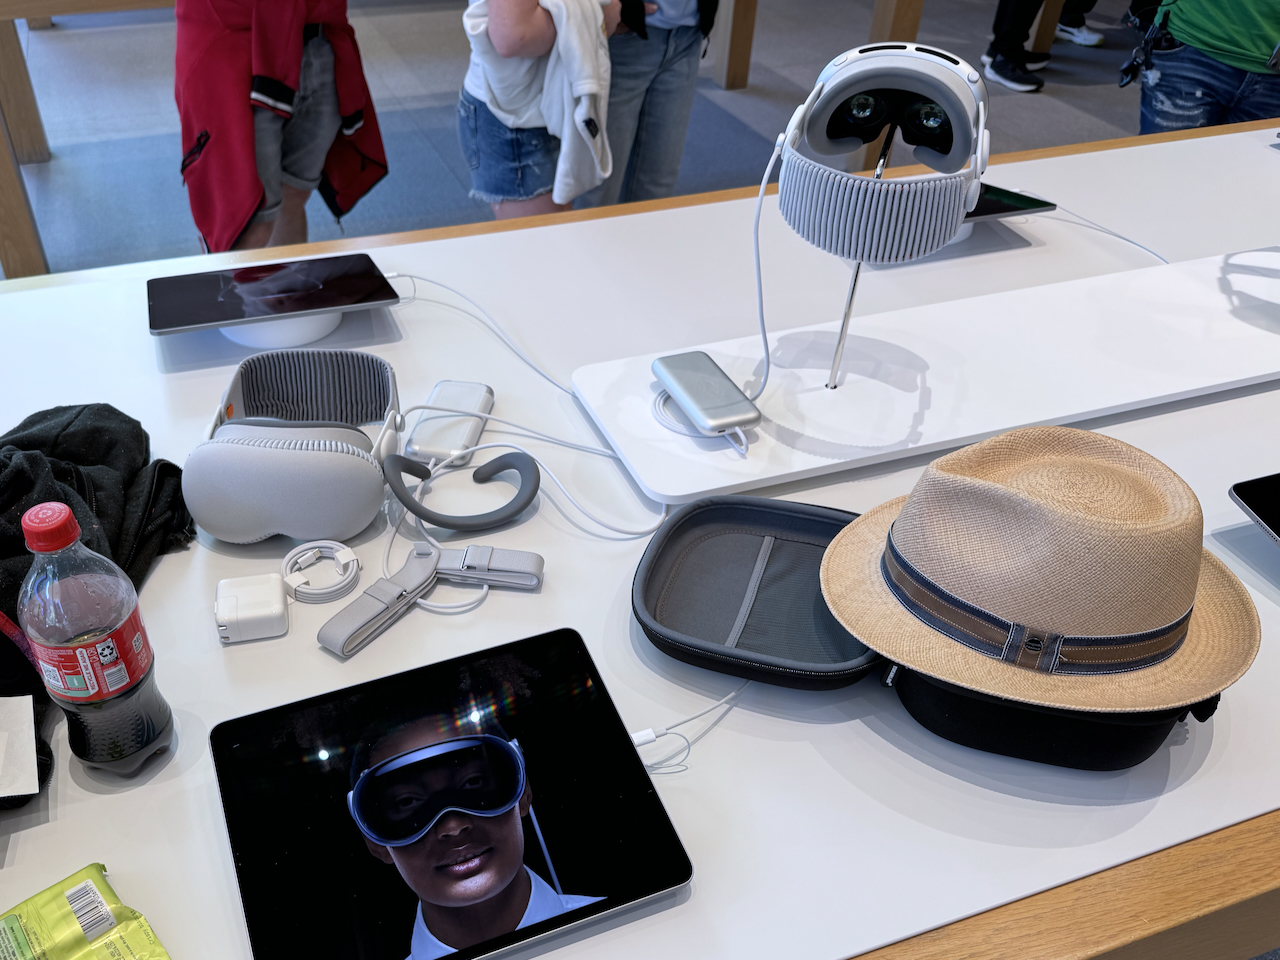
I was only in New York for five full days before moving on to Chicago for a few more, and I ended up doing two demos. On the first day, I went through the scripted demo then went away for a bit to think about whether I should get one. On the second day, I went back for another demo but this time spent the whole time slot trying on different face adapters to make sure I got the right fit.


Don’t I look super cool?

The iPhone face scanning thing suggested size 25W for me. After trying a few different sizes, I was between 13N and 23N, with 23N being slightly more comfortable and 13N having a better light seal. It’s really worth the time to do this to make sure you get the best fit, especially considering — in my case, at least — that the size suggested by the initial face scan wasn’t actually present in the final two contenders.

I walked out of the second demo with a Vision Pro with a 13N face adapter in the box, and a second 23N face adapter so I could try them both over a few days then return the one that ended up not being the best. I considered keeping them both, but for TWO HUNDRED DOLLARS for a face adapter that isn’t actually completely light-proof (when it’s bright, light bleeds right through the grey material)… well, no.

I didn’t get the Apple astronaut egg case, instead opting for a $20 case designed for the Meta Quest. It’s perfect for taking it places, and it’ll even fit in the top compartment my backpack. Is it as good as the Apple one? No. Is the Apple one $180 better? Also no.

Purchasing experience review: The Apple folks were very helpful, and I’m particularly appreciative of the staff member that sat with me for 30 minutes swapping face adapters back-and-forth.

Prescription Lenses

Unfortunately I can’t really see without my glasses, so I had to get some lenses for this thing before I could actually use it. Apple/Zeiss won’t just take your word for it to make a set of lenses, so I had to get a “proper” US prescription. Eye tests are particularly expensive in the Land of the Free, and I was recommended an online service called Visibly that does an online vision test to “verify” an existing prescription, effectively letting me launder my Swedish prescription into a US one. It cost $35 and was done in 20 minutes.

Shipping on these was a bit touch-and-go due to my short time in the USA. They should have arrived while I was still in New York, but they got delayed a couple of days — my total time from shipping to arrival was a calendar week (Monday to Monday). Thankfully I’d had them shipped to a friend who managed to get them turned around to me in Chicago the day before I left back home for Sweden. Phew!

Lens review: They’re lenses, and the magnetic click-in is pretty neat. For $150, they don’t come with a little protective case?!

Exchanging My Faulty Unit

Since getting the Vision Pro repaired from Europe is currently a no-go, I wanted to make sure that everything was OK before I left the country. Finally able to see the thing, I did a dead/hot pixel check and everything seemed fine, but when my wife was using it I noticed that the front screen looked a bit… wibbly? It’s hard to describe and photograph, but something wasn’t right. If there was a problem it was minor, and I didn’t want to spend the day carting the massive box around Chicago.


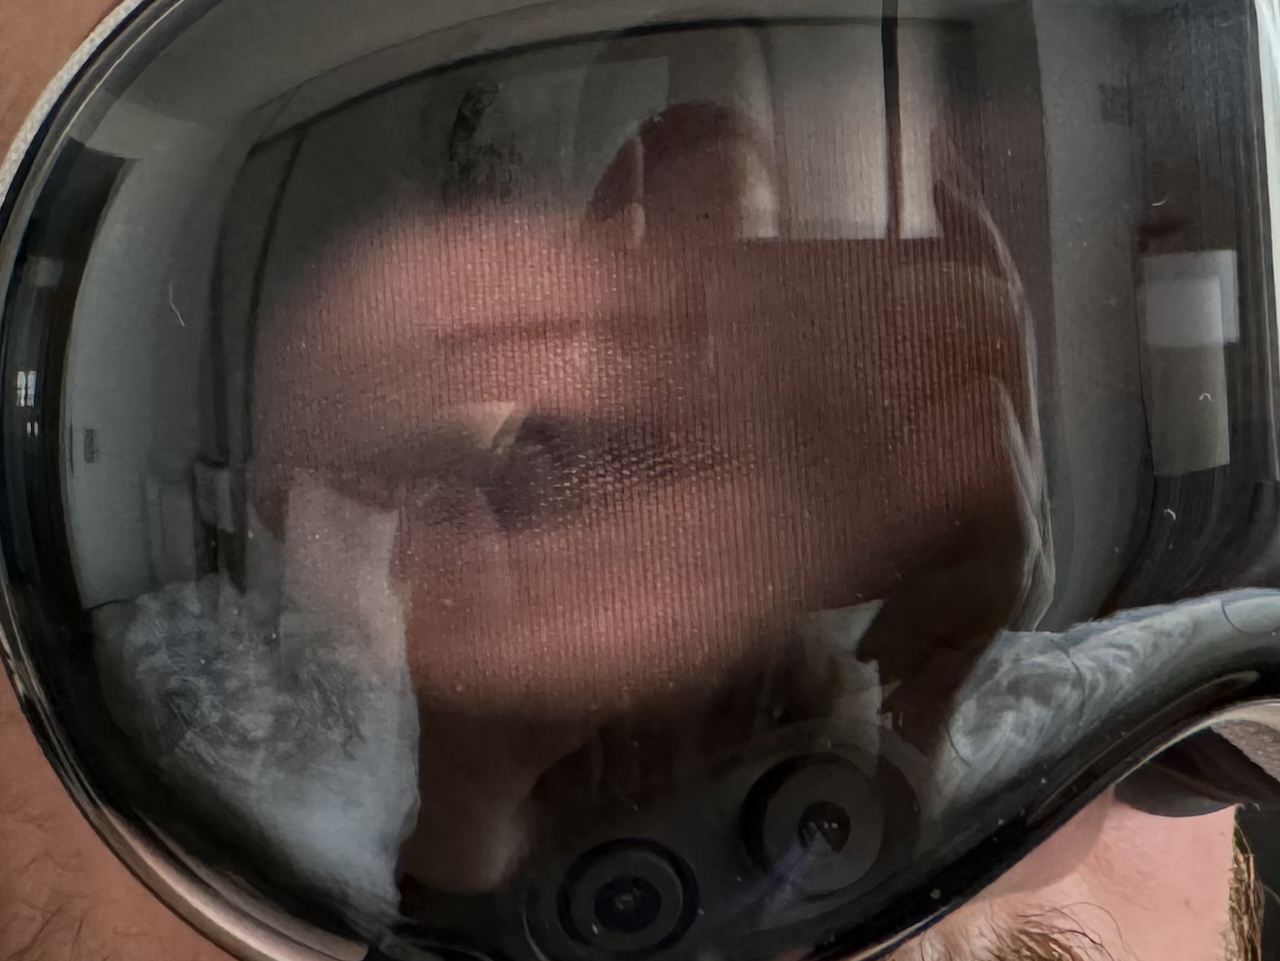
The best we could do to capture the weird screen problem. Those lighter speckles over my eye shouldn’t be there. This was manifesting in a line all the way across the screen — maybe the 3D-effect overlay was misaligned?

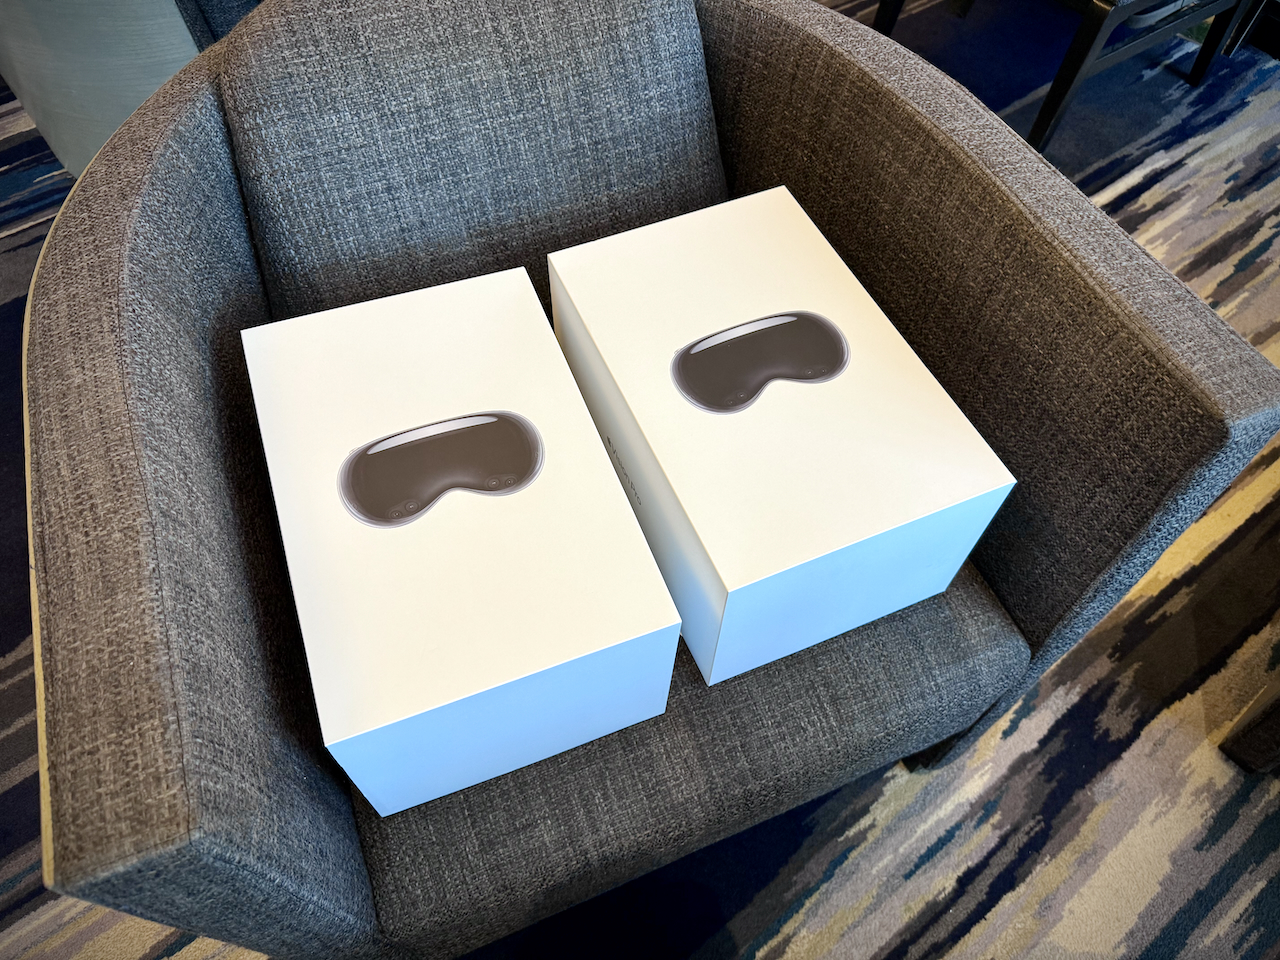
I needed to return the TWO HUNDRED DOLLAR face adapter I didn’t need anyway, so I ended up taking the Vision Pro and all of the included bits (but not the massive box) into the Chicago Apple Store so they could take a look. They took one look at it and went “Huh, that’s weird”. Long story short, they replaced it with a new one. Including the massive box.

And that’s how I ended up with two Apple Vision Pro boxes.

Replacement experience review: The Apple folks were extremely helpful, and very accommodating to the fact that I was under time pressure due to a booked boat tour of Chicago. They were very apologetic about the faulty unit, but I told them my “Shit happens, it’s how it’s handled that’s important” attitude to stuff like this which they seemed to appreciate. The potential for things like this is why I was putting so much effort into making sure everything is OK before going back home.

The replacement cost me $40 or so due to the sales tax being higher in Chicago than New York. I’m a little bit grumpy that having a faulty unit replaced within a week of buying it cost me money, but I guess that’s the USA for you. I did manage to end up with TWO Apple Polishing Cloths, so I guess that’s a plus.

Boat tour review: We did an architecture + lake 90 minute boat tour, and it was superb. Lovely day for it, too.

Buying Checklist

If you’re coming into the USA from elsewhere, the process is:

  • Book a demo at an Apple Store to try the Vision Pro out and confirm your fit.
  • Buy the Vision Pro (hopefully the store will have your size and configuration in stock).
  • If you need prescription lenses, use Visibly, a similar service, or a local optician to get a valid USA glasses prescription. The total turnaround time for Visibly was about an hour for me, but they do say it can take up to a day.
  • Once you have your prescription, order the lenses from Apple/Zeiss. Total turnaround for these for me was a week (Monday to Monday), but they say it can take up to ten days.
  • Once you have the unit and can see into it properly, verify that everything is working properly.
  • Exchange the Vision Pro if needed.

All in all, if you need prescription lenses you’ll need ten days or so to comfortably get everything sorted out. If you like to live dangerously, you can have the lenses shipped to a USA-based friend who can forward them along to you.

If you don’t need the lenses, things will be much much simpler.

Actually Using The Damn Thing

Alright, we’re hundreds of words into this post now and I’ve finally managed to be in possession of a working Apple Vision Pro that I can actually see. Hooray!

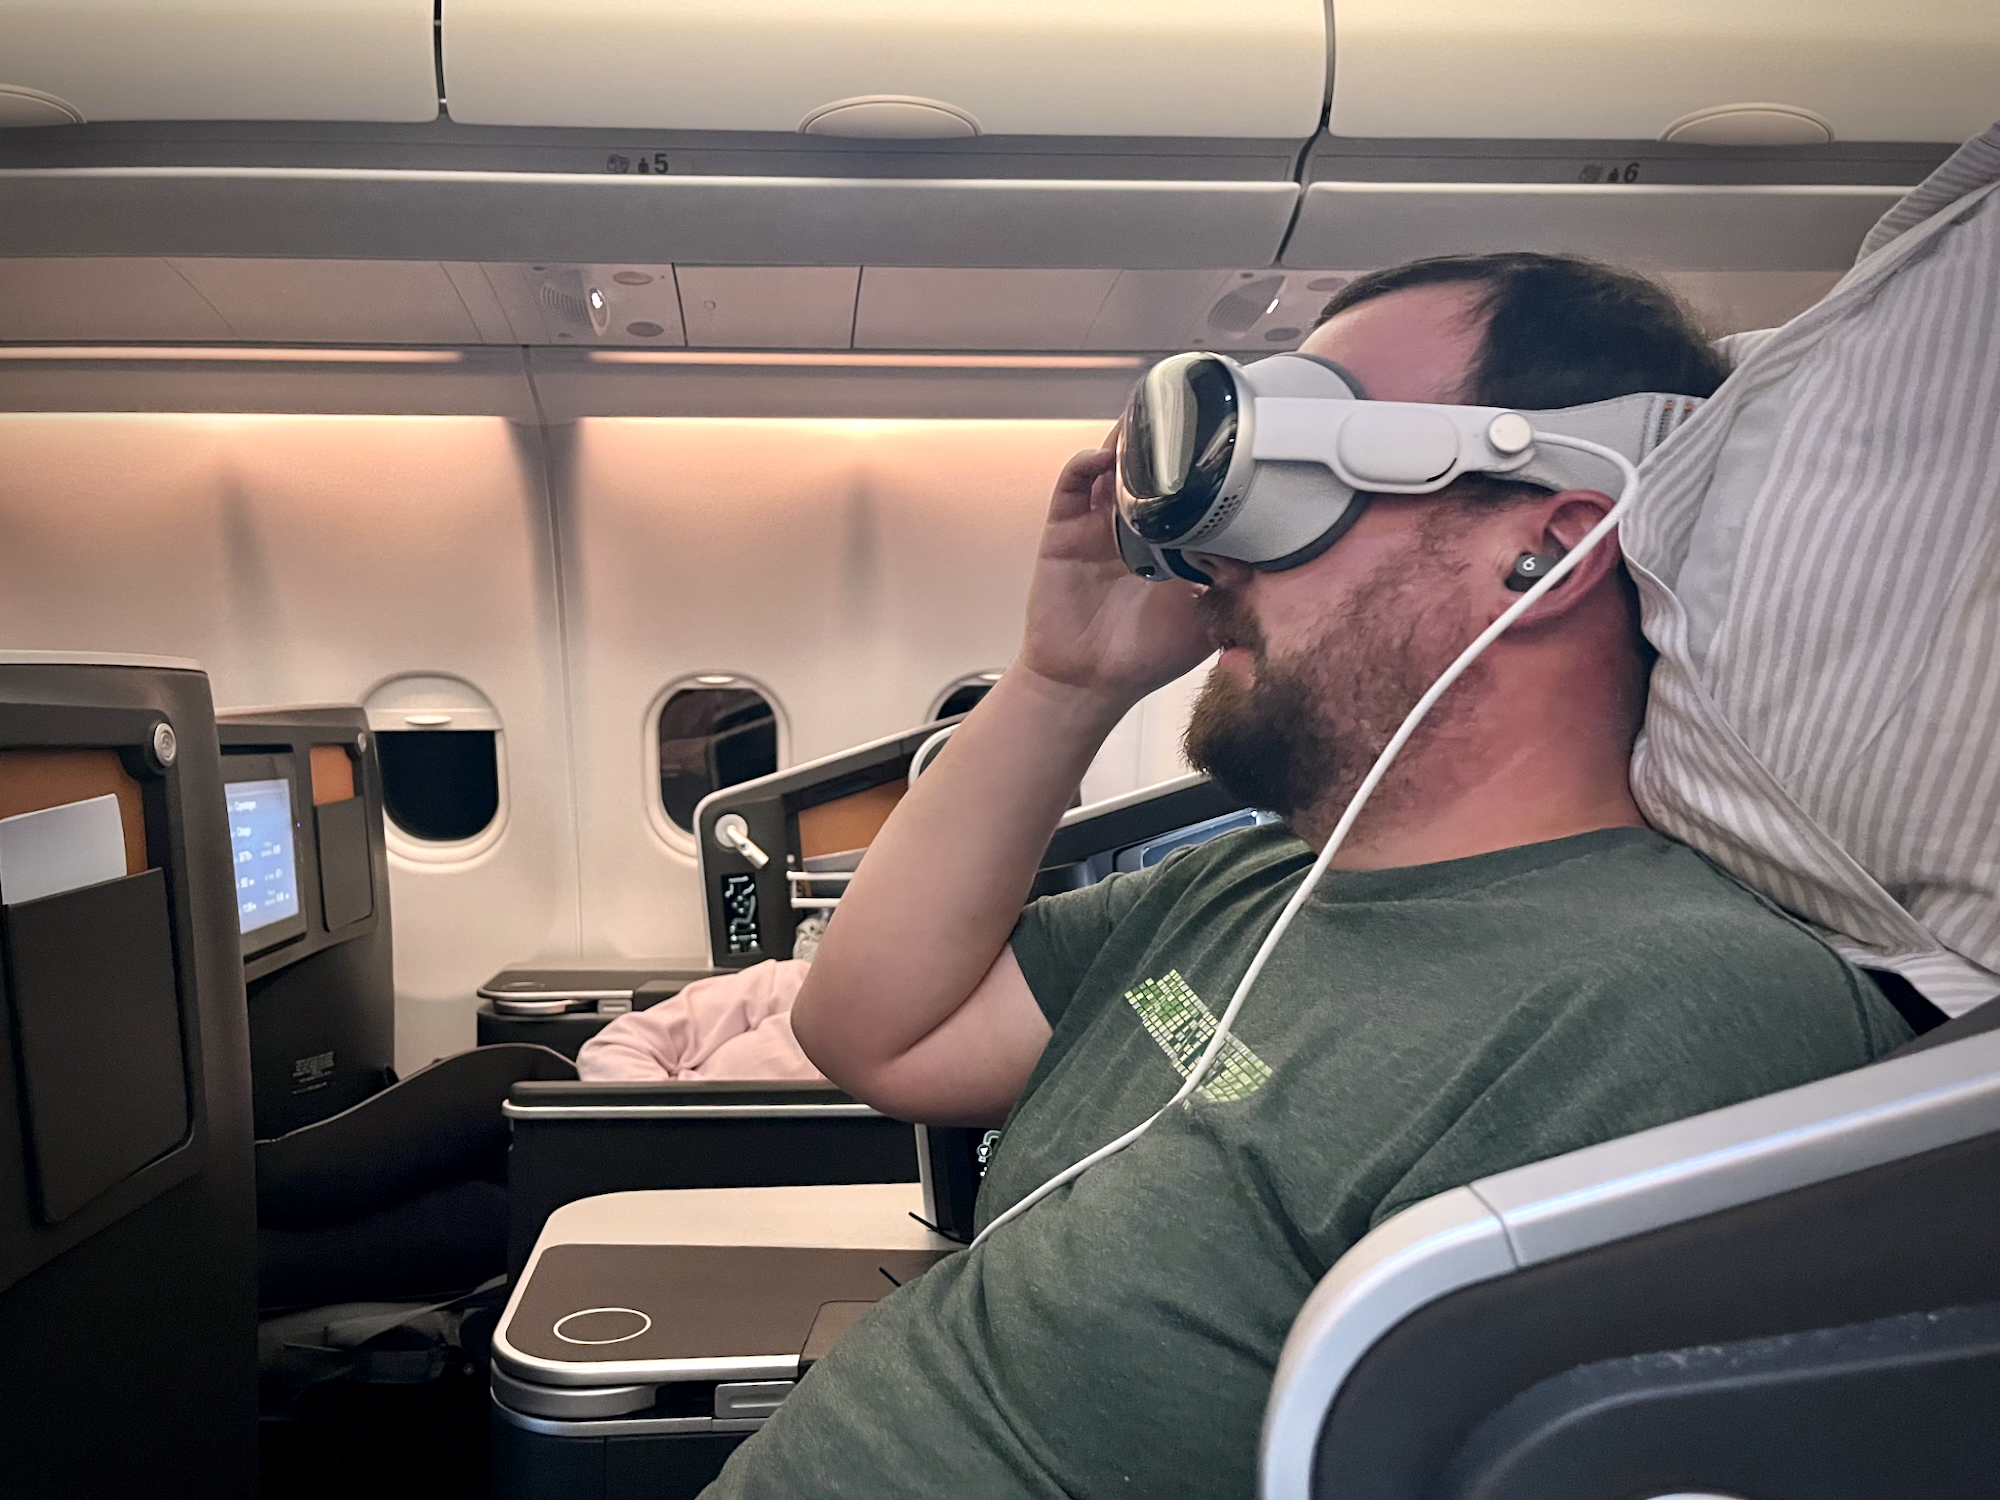
Of course, it’s time to be That Guy™ on the plane home.

I have to say, the in-flight use case is AMAZING. I was watching a “Live from Home” concert by a musician I like, and having a giant screen in front of you is really cool. However, being able to visually shut out the rest of the plane is where the real magic is — I’m happy enough using my iPad, but I get distracted by other screens around the cabin. Even if you can’t directly see them, the downside of these fancy 1000 nit displays is that they light up the ceiling like a Christmas tree, which I find really distracting especially when flickering and changing colour quickly.

Wearing the unit quickly caused confusion with a flight attendant who wasn’t sure if I could see them or not when trying to pick up an empty glass from my table. They made me jump, I pulled the unit off my head quickly which made them jump, and my wife found the whole thing hilarious.

A neat trick I found is that the “night” versions of the Vision Pro’s environments actually dim the whole space even if you only have the environment partially visible. This let me get rid of the visual noise from the cabin while still being able to see if there was someone standing next to me. Perfect!


I managed to “miss” the screenshot, but you can see how the partial environment blocks out most of the cabin while letting me see if someone is beside me.

I also found that the tracking stayed pretty accurate even when the cabin went dark, which was impressive.


When I was done watching, I removed the headset to this. Tracking had remained reliable, but I did lose hand masking.

Using on a plane review: Amazing. It does get warm in there after a bit, and there was some confusion from others trying to interact with me. Also I look like a bit of a dipshit.

Yes But What If You’re Not On A Plane

So. I’ve only really had this thing a few days so these are first impressions at best.

I won’t repeat the hardware points: It’s heavy, the battery life is bad, it should have been a dev kit. Sure.

Right now, in my opinion, the Vision Pro is an amazing piece of technology without a “killer app” on its own. I have some ideas I want to explore in the photography space that I think will turn out pretty cool, so maybe I can help with that? Who knows.

What I’m having most fun with at the moment is bringing other things into it. For instance, today I spent a couple of hours in my comfy chair playing games on my gaming PC via Steam Link with a controller instead of sitting at my desk upstairs. It was amazing! However, this is supposed to be a Vision Pro, and I’m not getting a lot of work done in here. Maybe we’ll see a pivot in the target use case as time goes on like we did with the Apple Watch.

What I’m not having fun with is the region restrictions for the App Store - you can only use a US Apple ID to make purchases, which means I don’t get my apps or my Apple TV/Music/Arcade subscription. I really don’t want to buy everything again, and I’m very hesitant to buy new things since (presumably) this restriction will be lifted soon once they start selling these things internationally, and my US Apple ID will no longer be needed. It was suggested to me that adding the US Apple ID as a family member via Family Sharing would work, and while it appears to have worked and the UI on both accounts is adamant that I should have access to everything, in practice nothing is actually working. Perhaps it’s due to the different billing regions.

As a non-US resident, getting this up-and-running has been very much an “it takes a village” affair — getting help with finding that Visibly service for my prescription (thank you various folks in The Slack™), then a friend willing to let me ship the lenses to them and forward them along when they were late (thank you Sam & M), then another friend to order me a Developer Strap (thank you Dave), then another friend helping me with a US billing address (thank you Michael) to set up a US Apple ID to download apps.

And the TWO HUNDRED DOLLAR face adapters aren’t even fully light-proof! (Sorry to keep bringing it up — I’m particularly baffled at how expensive these are and how they don’t actually do their job properly.)

Initial Conclusion

The fundamentals of the Vision Pro are really strong, I think. Sure, the whole experience is a bit empty at times due to holes in the software — both first- and third-party — but I’m pretty blown away by the whole experience. Well, my wife calls my visionOS Persona “Creepy Daniel” and the virtual Mac display feature is less sharp than I’d like. It is a very young product, after all.


“Creepy Daniel”

I’m fully aware that at a $$$ level the Vision Pro isn’t worth it and it won’t be a good investment in pure RoI terms. It’s not replacing my laptop for work or whatever, and as a user, I’ve basically spent $3500 to sit in a chair in my pyjamas and play games on a PC in the next room. As a developer, I’m going to get no customers for my current set of apps.

However, I want to learn 3D programming, and I want to explore the ideas I’ve had for my apps in a spatial environment like this. Sometimes, learning and trying new things can be their own justification, money be damned.

And hey, it’s great to use on the plane. Even though I look like a bit of a dipshit.


February 12th, 2024

Proof of Concept Project: Combining Swift and C# on Windows with SwiftToCLR

There are many ways to write “cross-platform” apps - ranging from going all-in on the cross-platform idea and writing a web app in something like Electron, to writing two completely separate apps that happen to look the same and do the same thing. And of course, the internet is full of… let’s say “vibrant” discussion on what’s the best way to do things.

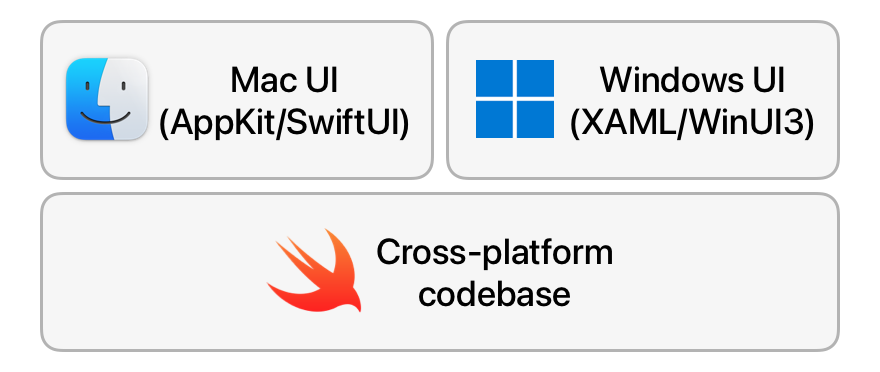
My personal preference is to write the UI layer in a native technology stack in order to take advantage of a particular platform’s look-and-feel, with the “core” logic in a cross-platform codebase that the native layer can interact with. In an ideal world, we’d be able to implement this incredibly complex tech stack:

A drawback of this approach is that it does tend to limit your choice of programming languages for the cross-platform codebase. Programming languages all tend to have their own ABIs, and you need to rely on there being a “bridge” available between the two languages you want to use. In practice, this often means finding an intermediate ABI that both languages can interoperate with - quite a lot of languages have compatibility with the C ABI, for instance.

Since I primarily work on Mac and iOS apps, I write code in Swift every day. It’s been getting a lot more love on the cross-platform front than its predecessor in the ecosystem, Objective-C (Swift even has official Windows builds!), and it’d be great if we could ship CascableCore in Swift to multiple platforms.

However, the challenge comes not necessarily from compiling our Swift code on Windows, but from using it from other languages. Specifically in this case, I’d like to write a C# app using WinUI 3 that uses our CascableCore camera SDK. However, there just isn’t an existing bridge between Swift ABI and the C#/CLR one.

Well, maybe there’s a solution. Swift recently introduced C++ interoperability… maybe we could use that to bridge between the two worlds?

How hard could it be?

That little question, dear reader, led me down quite the rabbit hole. This blog post is a brave re-telling of that story, tactfully omitting the defeats and unashamedly embellishing the victories — just as any story worth its salt does.

If you already know what C++/CLI and a CLR is and don’t need my life story, you can hop straight over to the SwiftToCLR proof-of-concept repository. The readme there is still pretty long, but it’s a more technical document with the aim of getting folks more familiar with the technologies at hand to get stuck in.

Otherwise, stick around! It’s been a… journey. An exciting, fun, frustrating, tedious journey. However, I learned a lot, and hopefully you’ll enjoy coming along for the ride.

What Are We Trying To Achieve?

My company has an SDK called CascableCore, which talks to cameras from various manufacturers (such as Canon, Nikon, Sony, etc) via the network or USB. Its job is to deal with each camera’s particular protocols and oddities as it presents a unified set of APIs to apps that use the SDK. This SDK is used by our own apps, as well as those from a number of third-party developers.

There’s nothing particularly platform-specific about this task — networks and USB are cross-platform by design — so CascableCore is a great candidate to be a cross-platform codebase. It’d give us the option to expand our apps to more platforms in the future, as well as expand the potential customer base for the SDK itself.

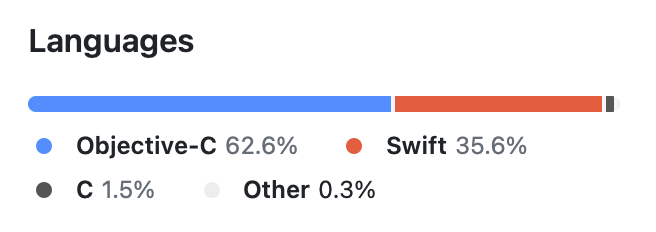
CascableCore’s codebase currently looks like this — a bunch of Objective-C and some Swift. All new code is written in Swift, but still — there’s a hefty amount of Objective-C in there:

Despite its GNU roots, Objective-C isn’t particularly multi-platform in the real world, so no matter what we do we’ll be rewriting a significant amount of code to go multi-platform — and, rationally speaking, C++ is probably not a bad choice. We could do that RIGHT NOW.

However, dear reader, I’ll let you in on a little secret if you promise not to tell anyone. Lean closer. Ready?

…I hate C++.

Don’t tell anyone, OK?

My dislike of C++ is, if I’m honest, mostly irrational — I’ve just seen one horrendous C++ template too many. But, we could just… not do that in our own code, y’know?

On the more rational side, though, we are a small company and our expertise is largely in Swift simply as a consequence of only having Mac and iOS apps at the moment. We’ve already dabbled in Swift on other platforms, too — Photo Scout’s backend is written in Swift/Vapor running on Linux servers, and it’s been a great success. Since most of CascableCore’s work is platform-agnostic, once the initial work is done we can (in theory) use our existing Swift expertise to maintain and improve CascableCore with only a relatively small additional cross-platform maintenance overhead.

And… since we’re being honest, it’s just plain fun to explore new technologies, especially in more esoteric ways. Even if we don’t end up shipping CascableCore in Swift on Windows, I learned a lot and (largely) had fun doing it. What’s the downside?

Anyway, I’d being keeping half an eye on the Swift on Windows story over the past few months/years until a few months ago this post on Mastodon pulled on a thread in my brain:

This ended up being a perfect storm of circumstances:

  • Swift on Windows seems to be decently viable now.
  • Swift had recently introduced the C++ interoperability feature, opening up possibilities for interacting with other languages.
  • I like to slow down a little and do interesting/”hack day” projects in December.
  • I really wanted a reason to justify getting a Framework laptop.

Not long later, my Framework laptop arrived and I was off to the races — a two-week timebox to explore this as I wind down for the Christmas break? Heck yeah.


I, er, went a little overboard on the unboxing photos.

The Proof-of-Concept Project

When putting together projects like this, it’s always nice to be able to use “real” code. Luckily, we have the CascableCore Simulated Camera project, which is a CascableCore plugin that implements the API without needing a real camera to hand. This is a perfect candidate for this project — it’s implementing a real, shipping API without the need for us to figure out network or USB communication on Windows. It’s everything we need and nothing we don’t. Also, happily, it’s already all in Swift.

What isn’t in Swift, unfortunately, is the CascableCore API itself. It was introduced before Swift, and has remained a set of Objective-C headers to this day. We’ll need to redefine these in Swift. Oh, and port StopKit, which is an Objective-C dependency.

Finally, we need a little bit of glue. CascableCore “proper” has a central “camera discovery” object that implements USB and network discovery, along with interfacing with plugins such as the simulated camera. We’re not bringing that over to the Windows proof-of-concept, so we need something in its place so we can actually “discover” our simulated camera on Windows.

Getting all this into place took a few days — the simulated camera was largely fine other than needing to remove some Objective-C features (such as Key-Value Observing) and use of Apple-only APIs (such as CoreGraphics). Porting StopKit and rebuilding the Objective-C API protocols into Swift ones took a couple of days, and the glue at the end a day or so.

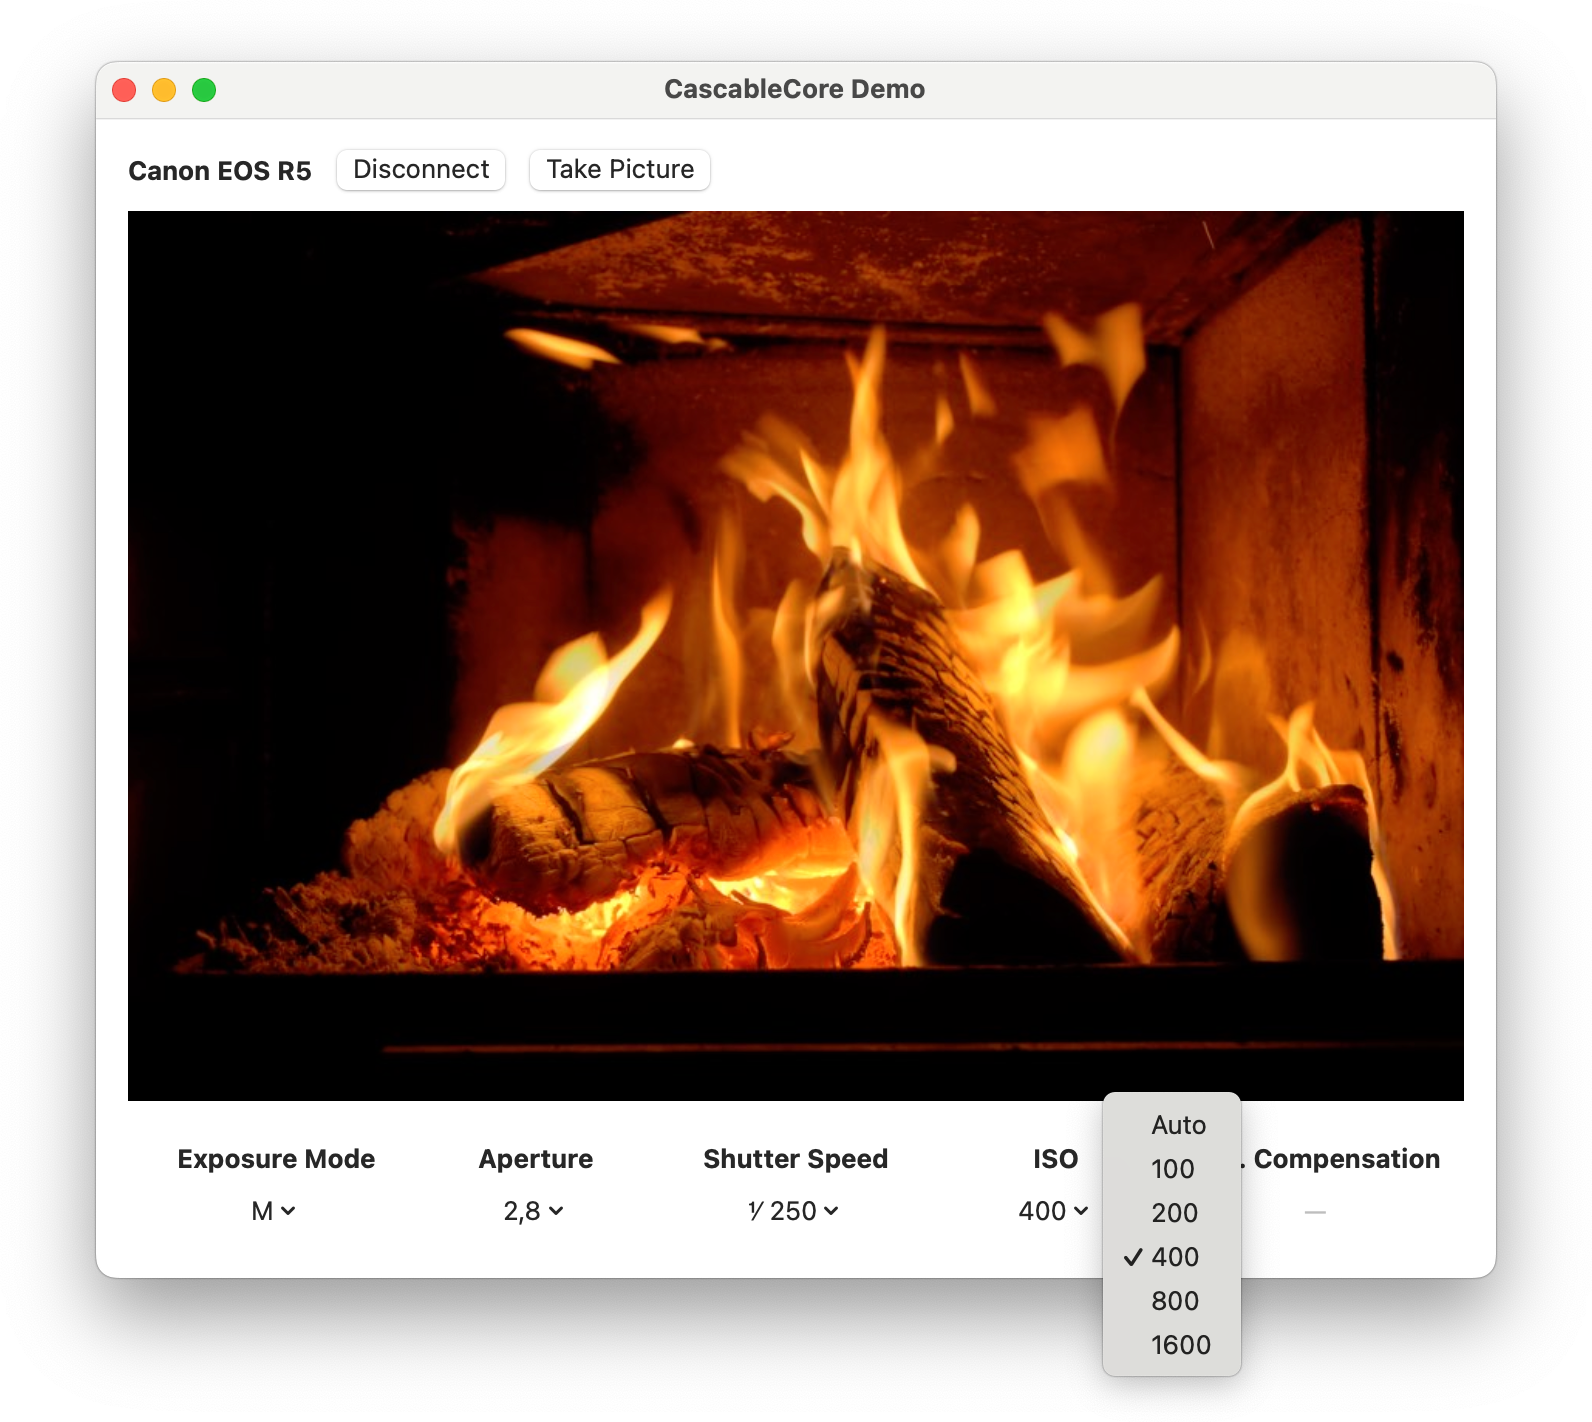
Let’s have a look at a little demo project on the Mac:

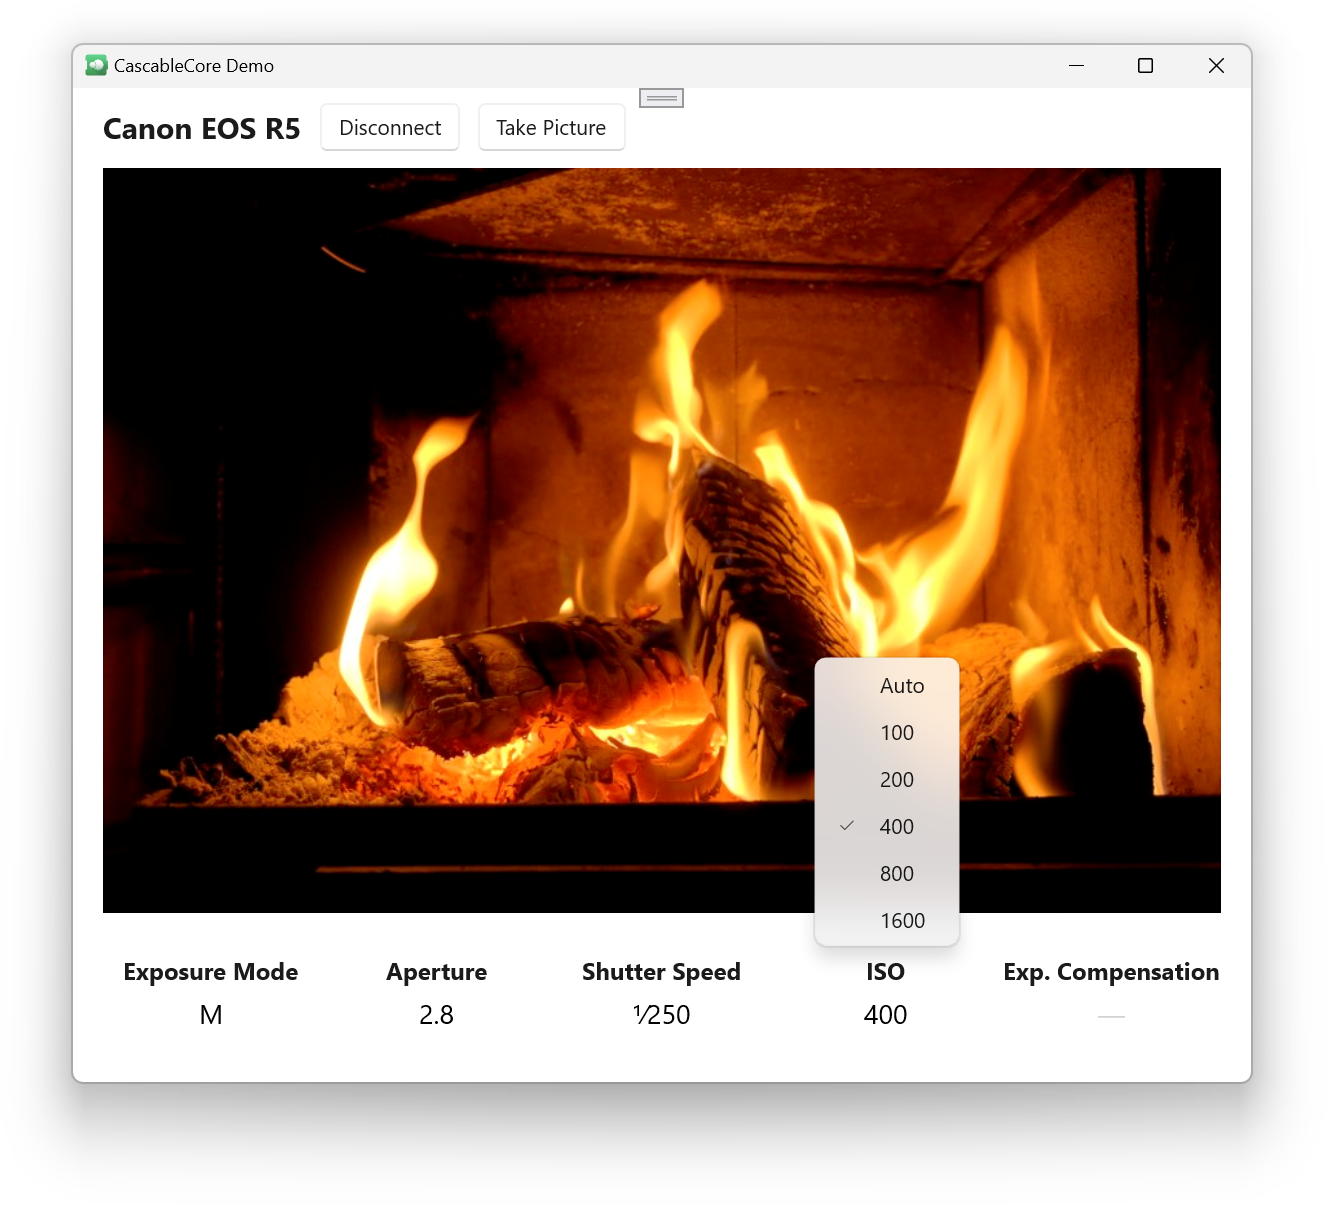
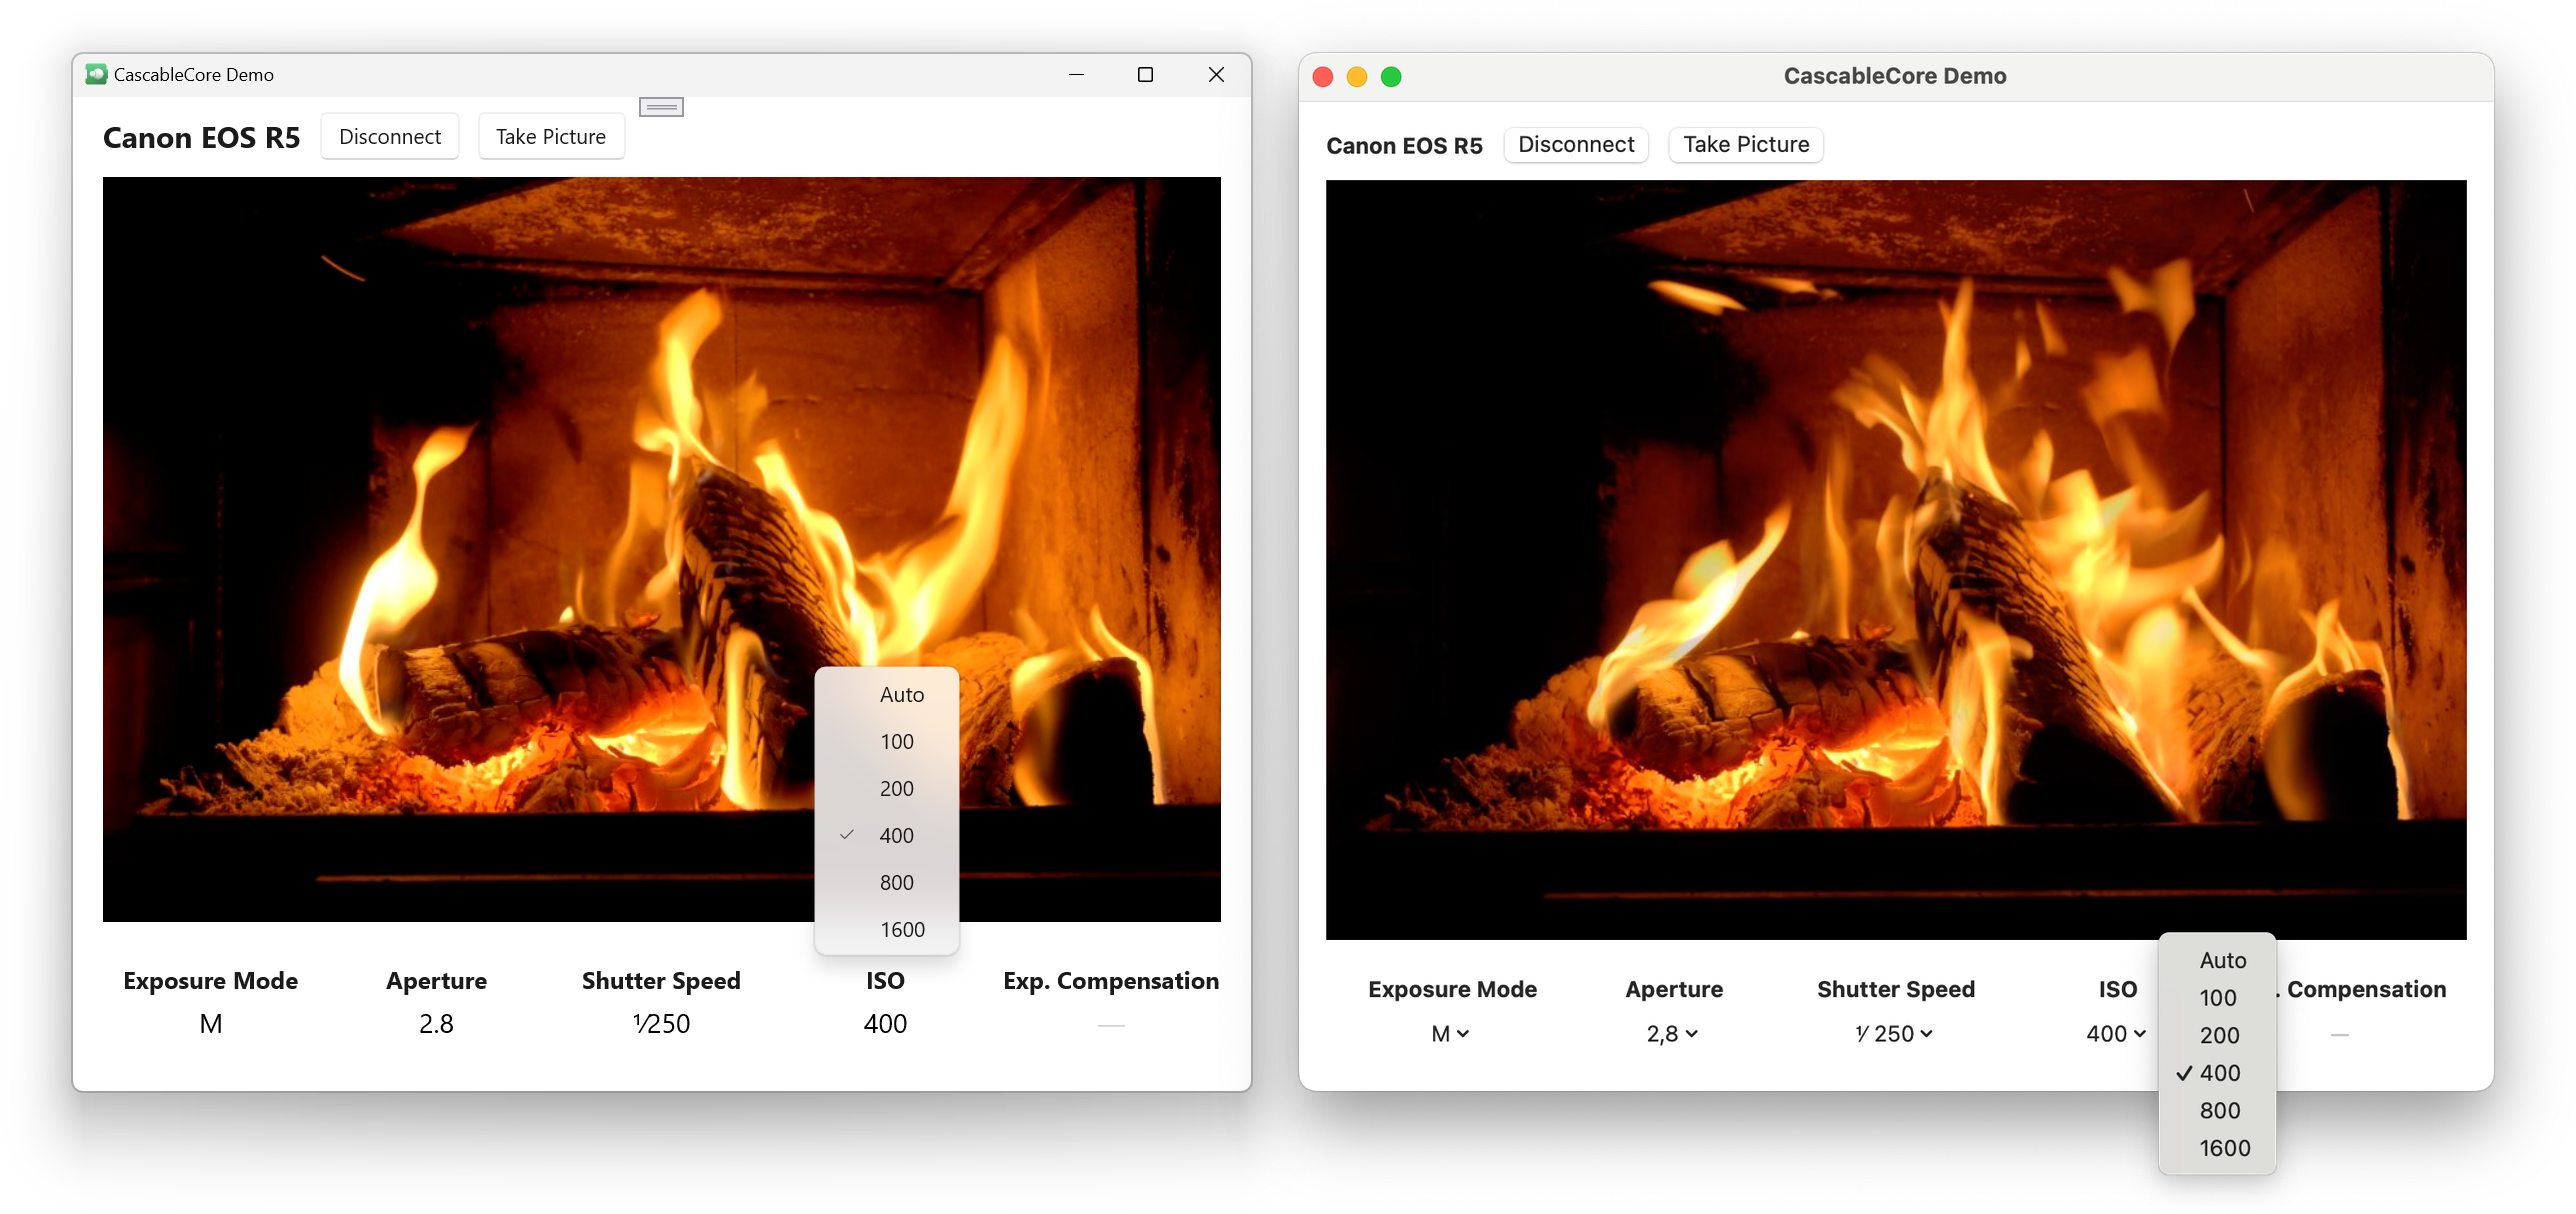
This little app discovers and connects to a camera, shows the camera’s live view feed, shows some camera settings, and lets you change them. It’s a simple enough app, but implements a decent chunk of the CascableCore API: issuing camera commands, observing camera settings, and receiving a stream of live view images. If we can get this working on Windows, we can get everything working.

Let’s try to build this demo app on Windows!

Figuring Out The Core Problem

The first step is to get the Swift code compiling on Windows, which was easy enough in our case (see above). The next is to instruct the Swift compiler to emit C++ headers for our targets:

swiftSettings: [
    .interoperabilityMode(.Cxx),
    .unsafeFlags(["-emit-clang-header-path", ".build/CascableCoreSimulatedCamera-Swift.h"])
]

I will note that the Swift Package Manager doesn’t officially support emitting C++ headers yet, hence the clunky unsafe build flag. This has been working fine for me, but the official way to do this is via another build system such as CMake.

At any rate, we now have a C++ header for calling into our Swift code! Now to Google “Calling C++ from C#” and… ah.

Telling the story of two days of Googling would be exquisitely boring, so I’ll skip ahead to why this is actually rather difficult after a quick foray into runtimes.

A Rumble of Runtimes

A runtime can be thought of as a “support structure” for your code, providing functionality at runtime like memory management, thread management, error handling, and more. Swift, for instance, uses ARC (Automatic Reference Counting) for memory management, and the runtime is the thing that actually does the allocation, reference counting, and deallocation of objects.

C# runs in the CLR (Common Language Runtime), which is a garbage-collected runtime that’s a lot more complex than the Swift one, providing additional things like just-in-time compiling.

The thing about a runtime - especially the more complex ones like the CLR - is that they need everything in the “bubble” they operate to conform to the same rules for everything to work correctly. The CLR’s garbage-collection works because all of the objects in there are laid out in a particular way and behave the same way. A random Swift object floating around inside the CLR wouldn’t be able to take part in garbage collection since the compiled Swift code has no knowledge of such a thing — and the converse is true, too: a random C# object floating around inside the Swift runtime wouldn’t be able to take part in ARC since it don’t have the ability to call the Swift runtime’s reference-counting methods.

There are two ways around this: exiting the bubble entirely and doing things manually, or “teaching” another language about your runtime.

Most runtimes do tend to have a way of “exiting” the bubble. C# calls this unsafe code, and Swift has a number of withUnsafe… methods. When in unsafe code, your memory management guarantees are gone (or exist in a very limited scope) and you, the programmer, are responsible for dealing with memory management yourself.

However, Swift’s C++ interop feature is pretty neat in that it actually, in a way, “teaches” C++ about Swift’s memory management. The Swift C++ interop header for the tiniest of tiny examples is what I describe as “5000 lines of chaos” - lots of imports and macros and templates that form a bridge from C++ into the Swift runtime, allowing you to use Swift objects directly in C++ while still taking part in ARC. Great!

The CLR also has a way of teaching C++ about the CLR’s memory management in the form of a special “dialect” of C++ called C++/CLI. Great!

Well…

Why This Is Actually Rather Difficult

We’re finally getting down to the core of the problem here. Let’s lay out some facts, including a couple more that I discovered during that two days of excruciatingly boring Googling mentioned above:

  • Swift’s C++ headers contain a lot of additional infrastructure that “teaches” C++ about Swift’s memory management.

  • NEW FACT! Swift’s C++ headers have a lot of Clang-specific features in them, to the point where they require Clang to build against them.

  • C++/CLI is a special dialect of C++ containing additional infrastructure that “teaches” C++ about the CLR’s memory management.

  • NEW FACT! C++/CLI can only be compiled by MSVC, the Microsoft Visual C++ compiler (or perhaps more accurately - Clang can’t compile C++/CLI).

This is a little bit like those party games where everyone makes a statement about someone else and you have to combine everything to figure out who’s lying. If you haven’t managed that yet:

  • MSVC can’t compile the Swift C++ interop header.

  • Clang can’t compile C++/CLI.

  • This means that we can’t create a C++/CLI wrapper from our Swift C++ interop header.

Crap.

Luckily, Clang’s compiled output is (at least somewhat) ABI-compatible with MSVC, so although MSVC can’t compile the Swift C++ interop header, it can link against the compiled output.

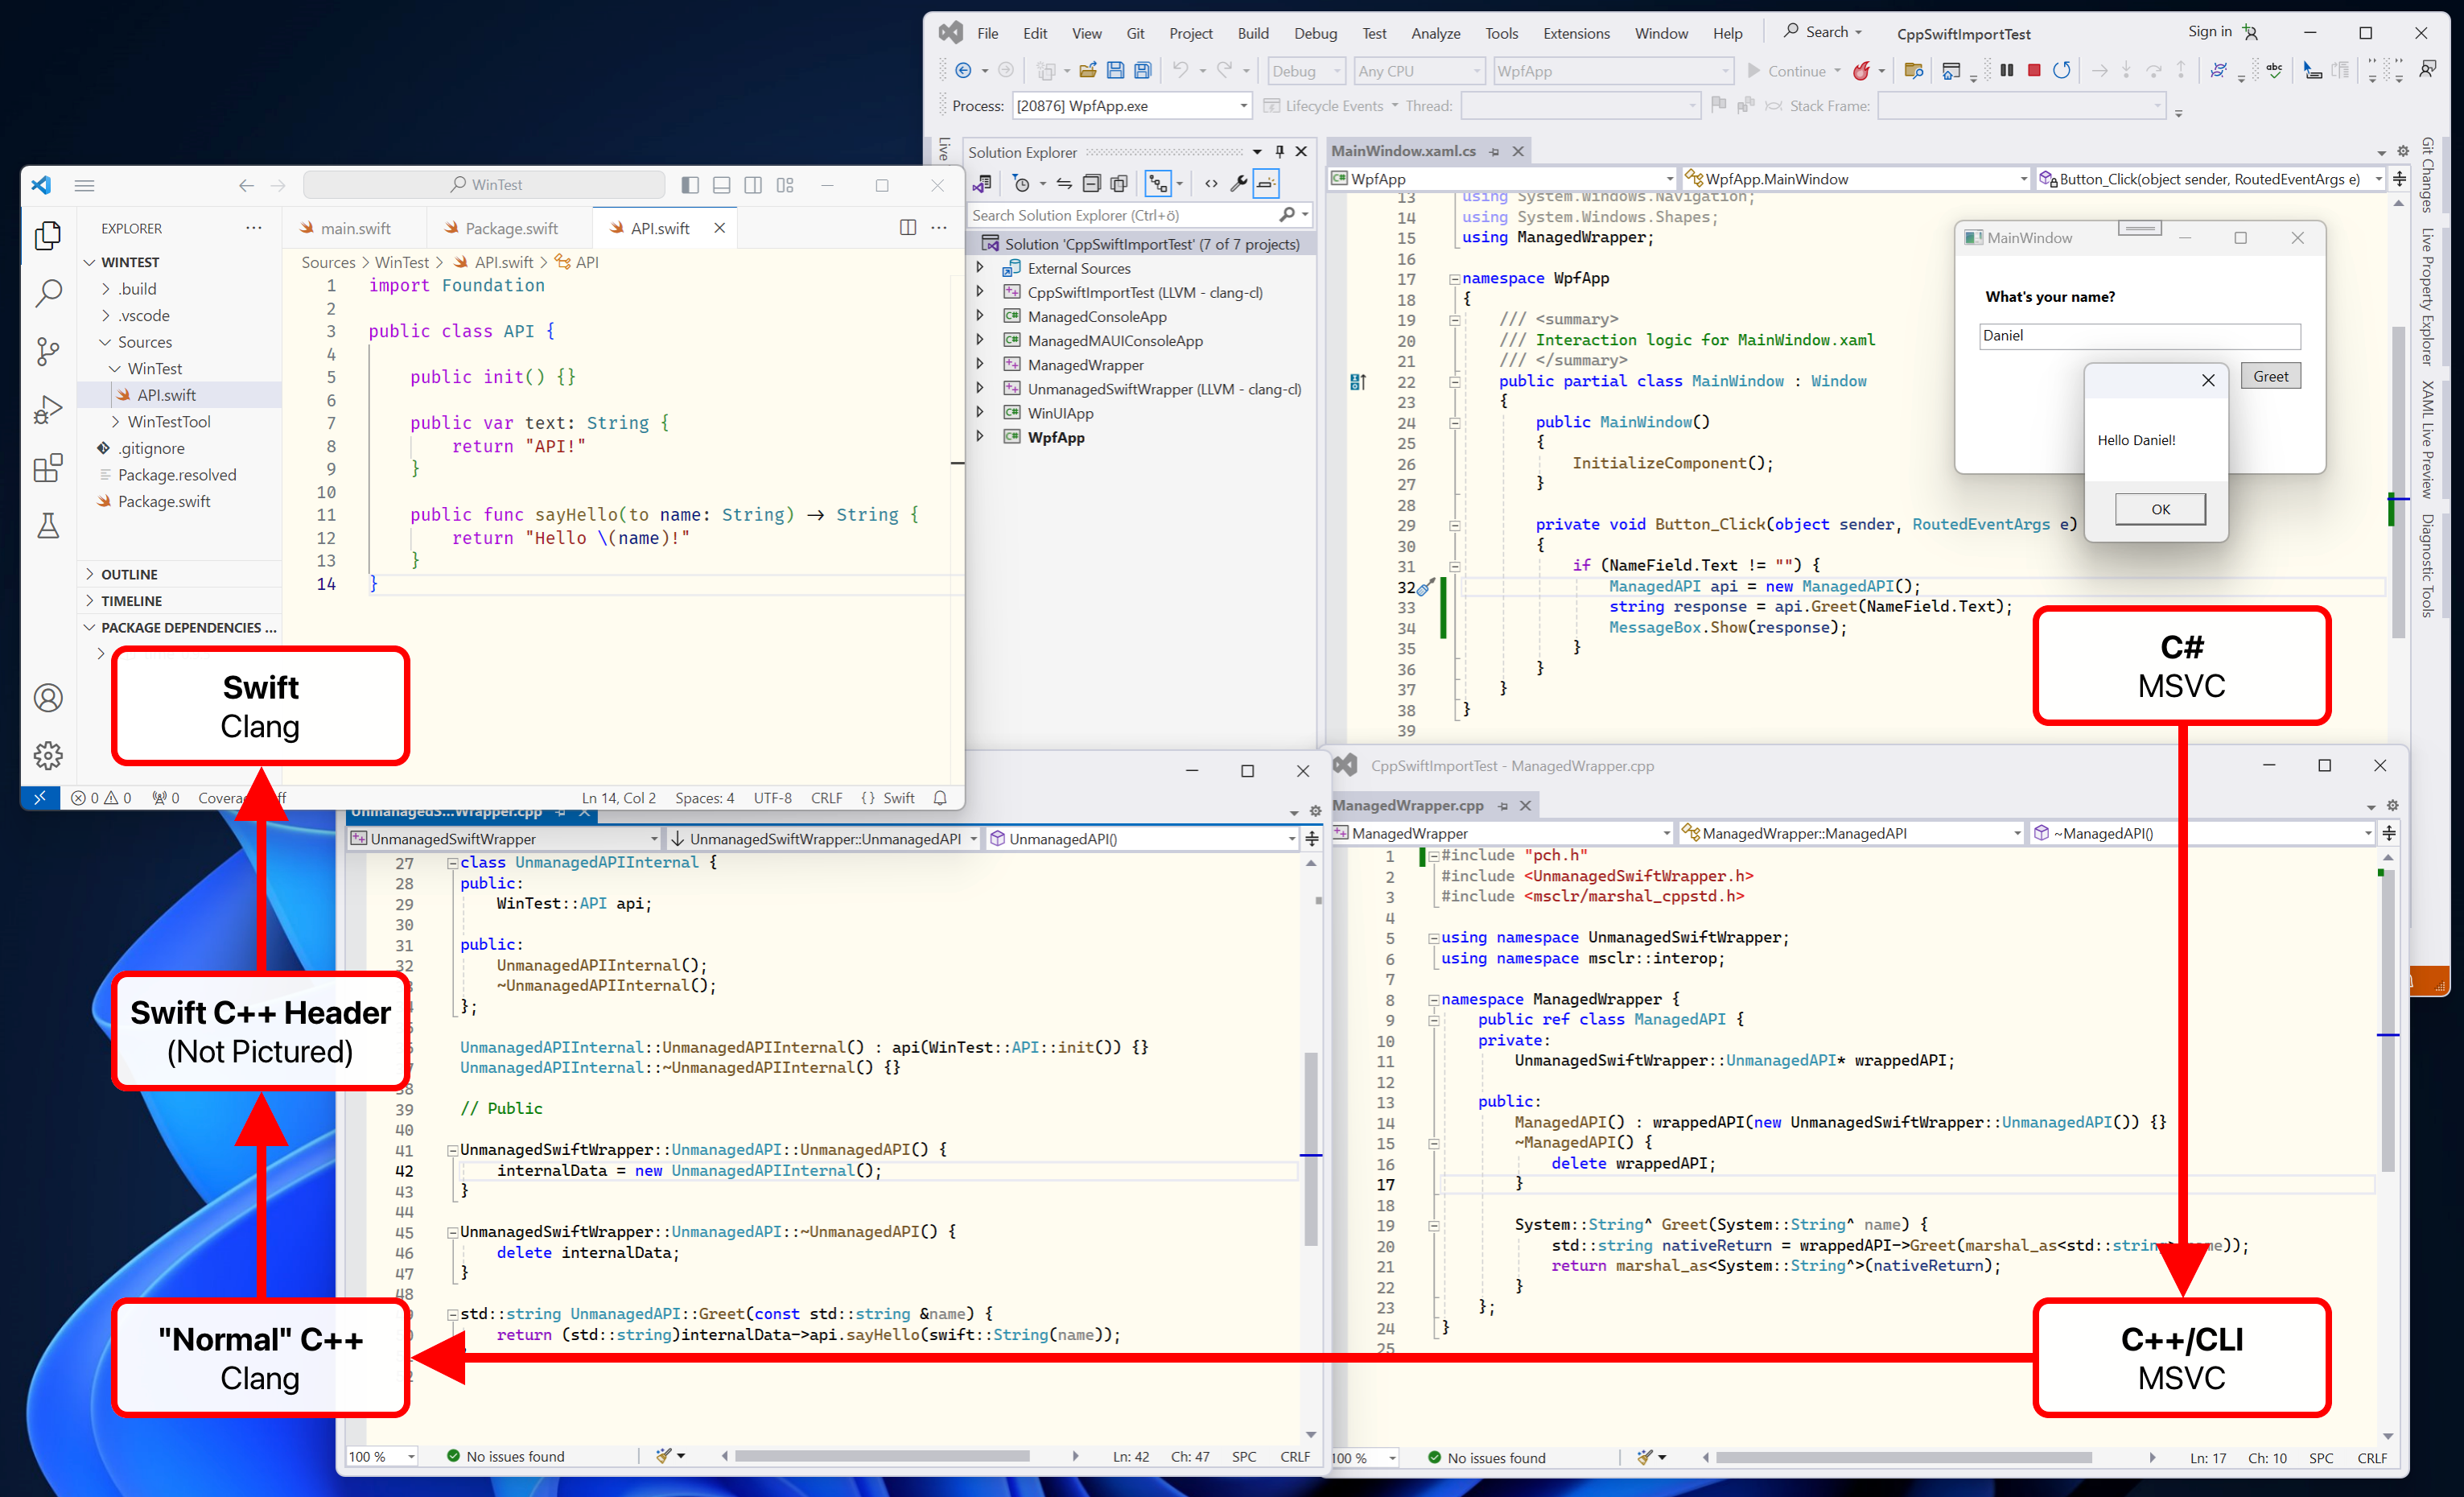
This, thankfully, opens a route through — we can make an additional wrapper layer, compiled with Clang, that wraps the generated Swift/C++ APIs in, er… I guess… “normal?” C++ that MSVC can deal with. The end-to-end chain would then be:

While this is a chain of four steps, we thankfully “only” need two wrappers:

  • We have our Swift code that’s compiled by Clang, giving us a compiled binary and a C++ header.

  • Wrapper 1: Compiled by Clang, wraps the Clang-generated Swift C++ interop header with a “normal” C++ one that MSVC can understand. The wrapper implementation calls the API defined in the C++ interop header.

  • Wrapper 2: Compiled by MSVC, wraps the “normal” C++ header with a C++/CLI one that gets us into the CLR, and therefore up to C#. The wrapper implementation calls the API defined in Wrapper 1.

  • We have our C# code, compiled by MSVC, running in the CLR. It calls the API defined in Wrapper 2.

This isn’t actually that difficult - it’s just very tedious. Each link in the chain has its own types, and they need to be translated in both directions (i.e., a C# string needs to end up as a Swift String when calling a method, then a Swift String being returned needs to end up as a C# string on the way back).

A simple, manually-made test project ends up looking like this:

It’s not pretty, but it works!

Making This Not Suck

Manually building two wrapper layers is, well, kind of a pain. For CascableCore it’d actually largely be a one-off cost — the API is fairly mature and stable, and we try not to change it unless we have to. Still, not fun.

Our case is fairly rare, though. Having to adjust two wrapper layers for every change you make as you work on Swift code is annoying enough to make you give up and not bother, so what can we do to make this better?

If you study the snippets of code in the screenshot above, a fairly strong pattern emerges even from such a small example.

For each “level”, we need to:

  1. Make a class that holds a reference to an object from the level below,

  2. For each method on that wrapped class, have a corresponding method in the wrapper that:
    • Takes appropriate parameters for the method being wrapped,
    • Translates them all into types appropriate for the level below,
    • Calls the wrapped method with the translated parameters,
    • If needed, translates the returned value into a type appropriate for the current level and returns it.
  3. there’s no step three!

That’s extremely repetitive and well-defined work, and it’s a perfect candidate for…

…drumroll please…

Automated code generation!

Introducing SwiftToCLR

SwiftToCLR is the main “result” of this proof-of-concept project, and the thing that took by far the most amount of time and trouble. I’ll spare you the journey here, but if you’re interested in it there’s a more detailed discussion over on the project’s GitHub repository.

SwiftToCLR is a command-line tool, written in Swift, that takes your C++ interop header from Swift (as well as a couple of other bits and pieces) and generates the header and implementation for both wrapper layers discussed above. The example usage here is on Windows, but it does work on macOS too.

Note: You may start to notice mentions of “unmanaged” and “managed” code here and there. This is a result of the project’s focus on the CLR — “managed code” is how the CLR refers to code running within the garbage-collected runtime, and “unmanaged code” is code running outside of that environment.

C:\> .\SwiftToCLR.exe CascableCoreBasicAPI-Swift.h
                      --input-module CascableCoreBasicAPI
                      --cxx-interop .\swiftToCxx
                      --output-directory .

Using clang version: compnerd.org clang version 17.0.6
Successfully wrote UnmanagedCascableCoreBasicAPI.hpp
Successfully wrote UnmanagedCascableCoreBasicAPI.cpp
Successfully wrote ManagedCascableCoreBasicAPI.hpp
Successfully wrote ManagedCascableCoreBasicAPI.cpp
C:\>

Since this was a timeboxed project, right now it only generates the source files (which can be compiled with Visual Studio by setting up a couple of simple targets). The most immediate and high-impact improvement to SwiftToCLR would be to extend it to actually build them too — just a single command to get compiled binaries to dump into your C# project would be amazing.

Let’s have a quick look at the layers here. Given the following Swift example:

public class APIClass {

    public init() {}

    public var text: String { return "API!" }

    public func sayHello(to name: String) -> String {
        return "Hello from Swift, \(name)!"
    }

    public func doOptionalWork(optionalString: String?) -> String? {
        if optionalString == nil { 
            return "I did some work"
        } else {
            return nil
        }
    }
}

The Swift/C++ interop header will be over 5000 lines. Here’s an excerpt of our class’ definition in there:

class SWIFT_SYMBOL("s:9BasicTest8APIClassC") APIClass : public swift::_impl::RefCountedClass {
public:
  using RefCountedClass::RefCountedClass;
  using RefCountedClass::operator=;
  static SWIFT_INLINE_THUNK APIClass init() SWIFT_SYMBOL("s:9BasicTest8APIClassCACycfc");
  SWIFT_INLINE_THUNK swift::String getText() SWIFT_SYMBOL("s:9BasicTest8APIClassC4textSSvp");
  SWIFT_INLINE_THUNK swift::String sayHello(const swift::String& name) SWIFT_SYMBOL("s:9BasicTest8APIClassC8sayHello2toS2S_tF");
  SWIFT_INLINE_THUNK swift::Optional<swift::String> doOptionalWork(const swift::Optional<swift::String>& optionalString) SWIFT_SYMBOL("s:9BasicTest8APIClassC14doOptionalWork2of14optionalStringSSSgAA0F4TypeO_AGtF");

  // (Various internal and private definitions skipped)
};

Given this header, SwiftToCLR will output the following “normal” C++ wrapper:

class APIClass {
public:
    std::shared_ptr<BasicTest::APIClass> swiftObj;
    APIClass(std::shared_ptr<BasicTest::APIClass> swiftObj);
    APIClass();
    ~APIClass();

    std::string getText();
    std::string sayHello(const std::string& name);
    std::optional<std::string> doOptionalWork(const std::optional<std::string>& optionalString);
};

…and the following C++/CLI wrapper:

public ref class APIClass {
internal:
    UnmanagedBasicTest::APIClass *wrappedObj;
    APIClass(UnmanagedBasicTest::APIClass *objectToTakeOwnershipOf);
public:
    APIClass();
    ~APIClass();

    System::String^ getText();
    System::String^ sayHello(System::String^ name);
    System::String^ doOptionalWork(System::String^ optionalString);
};

I won’t paste the entire implementation here, but here’s an example from the “normal” layer in which we’re translating optional strings in both directions. The code is particularly verbose here, but given it’s autogenerated code that is unlikely to ever be looked at, I think that’s alright.

std::optional<std::string> UnmanagedBasicTest::APIClass::doOptionalWork(const std::optional<std::string> & optionalString) {
    swift::Optional<swift::String> arg0 = (optionalString.has_value() ? swift::Optional<swift::String>::init(*(swift::String)optionalString) : swift::Optional<swift::String>::none());
    swift::Optional<swift::String> swiftResult = swiftObj->doOptionalWork(arg0);
    if (swiftResult) {
        swift::String unwrapped = swiftResult.get();
        return std::optional<std::string>((std::string)unwrapped);
    } else {
        return std::nullopt;
    }
}

So… great, right?! Let’s go! Wait… more roadblocks?

Limitations of Swift’s C++ Interop

The keen-eyed amongst you may have noticed that in my usage example above, I was giving SwiftToCLR a header file called CascableCoreBasicAPI-Swift.h. Why a “basic” API?

Swift’s C++ interop feature is still pretty young, and has a number of limitations that directly impact our CascableCore API. There’s a deeper discussion in the readme on the project’s GitHub repository, but the three that impact us the most are:

  • Protocols aren’t exposed through C++. CascableCore’s API is almost entirely defined in protocols.

  • Swift’s Data type isn’t exposed through C++. We use Data to hand image data over to client apps, including frames of the live view stream.

  • Swift closures aren’t exposed through C++. This is a huge one - CascableCore’s API uses callbacks extensively since working with cameras is intrinsically asynchronous. They’re used to observe changes to camera settings, receive frames of the live view stream, find out if a sent command was successful, and more.

So, what to do? All of these problems do have workarounds, with the closure limitation being particularly gnarly to combat. After a bit of pondering, I decided that they were outside of the scope of this project (especially considering the timebox I had). This is a long-term endeavour, and hopefully Swift’s C++ interop featureset will improve over time.

Instead, I built the “CascableCore Basic API”, which is a simplified API that wraps the “full” one (this project is full of wrappers, crikey):

  • Objects are defined as classes rather than protocols.

  • Data objects in Swift are exposed as “unsafe” methods to copy the data to a pointer via Data’s copyBytes(to:count:) method.

  • There are no callbacks/closures. To find changes, you need to poll (boooo!).

It’s clunky, but it works!

Holy Crap Are We Finally Writing C#?

I have to admit, there were times where I thought I’d have to abandon this project. A month into my two week timebox, every corner I turned brought up a new problem. Some clear and understandable (“Oh wait, optionals!”), others less so (“Why does this code run fine in a swift test but crash when called from C#?”).

However, one day everything finally “clicked” and suddenly this demo app was coming together fast. Holy crap, it works!!

I tried to write the demo app as I should, so I abstracted away the polling (boooo!) with a couple of classes — PollingAwaiter and PollingObserver — that vend events for the app to observe as if the polling limitation wasn’t present.

Otherwise, the Windows demo app is pretty bog-standard, which is exactly what I hoped the outcome would be. It’s written in C# using XAML and WinUI 3 for the UI, and the whole thing is a standard Visual Studio app project. There’s nothing special about it at all, other than having to link to Swift.

Hiding under this boringness are a trove of unanswered technical questions. Again, these are discussed more in the project’s GitHub repository, but some of the larger ones:

  • Why do we get very weird crashes when our Swift code is built for static linking? (Sidebar: You really must explicitly mark your targets as .dynamic in your package manifest to get SPM to build dynamic binaries (i.e., .dll files), otherwise you’ll lose days to chaos as I did.)

  • How do we best solve the problem of the lack of closures?

  • What’s the real-world performance impact of translating every parameter through two wrapper layers? System::Stringstd::stringswift::String and back is hardly ideal — especially when arrays get involved — and I didn’t have to time to run meaningful performance measurements.

  • When run in this context (i.e., a C# app managing the process’ lifecycle), Swift code doesn’t get a working main dispatch queue (or runloop, or…). This is largely expected (dispatch_get_main_queue() has some relevant notes in its documentation), but it’d be very useful to be able to sync the C# app’s UI thread with the main dispatch queue.

Conclusion

So, what became of this experiment? Well, I did manage to build the same app on macOS and Windows with the same underlying Swift codebase, which I’m incredibly happy about!

I’ve learned a ton, and I feel like I now have a reasonably well-informed opinion of Swift on Windows (which was the primary “business” goal of this project, I suppose).

Swift is undoubtedly an “Apple platforms-first” language, particularly the tooling. Like with Swift on Linux, we get a second-class Foundation (although that’s actively being worked on right now). The Swift plugin for Visual Studio Code works on Windows and is pretty great, if it wasn’t for the fact that no matter what I try, sourcekit-lsp.exe continuously spins at 100% CPU usage unless I disable code completion. Building our project with SPM’s default configuration gives a ton of .o files to manually assemble, only to get inscrutable crashes deep in the runtime (explicitly flagging everything to be a .dynamic library fixes both of these).

On all platforms, the Swift/C++ interop feature set is extremely limited — the lack of closures in particular is a particularly big one. That polling workaround I implemented will not make it to production.

However.

None of that changes the fact that once I’d overcome these hurdles, I was able to take a Swift codebase that can be compiled for iOS, macOS, and Windows and build a meaningful demo project in C# on top of it in just a couple of days. Once it’s up-and-running, it’s amazing.

We don’t be dropping everything to build Windows versions of CascableCore and our apps just yet — we have a lot of other work on our plate. However, my experience was very confidence-inspiring, and I can genuinely see a path to shipping real products to real users using a cross-platform CascableCore and this hybrid C#/Swift approach.

I’m also very excited about the future of Swift on Windows, and will be staying up-to-date with what’s going on. There’s also a number of meaningful improvements that can be made to SwiftToCLR right now, and hopefully I’ll be able to chip away at those as time goes on. If this project can push things in a positive direction even slightly, I’ll consider that a huge bonus.

If you find this project interesting, please do head over the the GitHub repository and take a look. The readme there goes a lot more in-depth to the technical details of this thing, and contains instructions for compiling and diving into the code yourself — everything mentioned above is open-source.

As always, I’m @iKenndac on Mastodon and am happy to chat there (although please do note my policy of ignoring unsolicited private mentions — talk to me in public!) about this — especially if you’re experienced with any of the approaches taken here. I’d love to hear your feedback!

Special Thanks

I’d like to thank a couple of folks who’ve been particularly inspiring and helpful for this project. They’ve helped me navigate a tricky and unbeaten path, for which I’m very grateful:

  • Michael Thomas: This whole thing started when I saw a post of his on Mastodon that pulled a thread in my mind that cost me a new laptop and over a month of my life. I do love the laptop, though, and this project has been a ton of fun.

  • Brian Michel works at The Browser Company, and is part of a team building a whole web browser in Swift on Windows! Their approach is different to this one, but equally as interesting. You can see some examples of their work on GitHub.


September 5th, 2023

Server-Side Swift For Small Startup Success: Additional Reading

This year at iOSDevUK, I gave a talk on using Swift on the Server with Vapor to build an app’s backend in Swift.

You can download the slides here.

This post contains some links to additional resources.

The Basics

  • Vapor is the Swift framework used in the projects mentioned.

  • Photo Scout is the app used in most of the examples.

Technical


February 9th, 2023

Introducing Photo Scout!

I’m really excited to announce Photo Scout to the world! It’s going into a prerelease TestFlight period starting from today, with a public release sometime in spring or early summer.

The tagline of Photo Scout is “You tell us where. We tell you when.” It’s an app for anyone that likes to take photos — give it a set of criteria, and it’ll tell you (with push notifications, if you want) when you can take that photo. It goes beyond just weather and golden hours — you can place the sun in a particular place in the sky, match against phases of the moon, and more (with more coming). There’s some really amazing creative potential!

Actually, rather than trying to list out what it can do, why don’t I tell you why:

You can find out more about the app and sign up to be notified when you can join the TestFlight over on the Photo Scout website. You can also follow along with development on the app’s Mastodon account or on my personal Mastodon account. The TestFlight will stay fairly small for the first week or two to make sure the servers don’t fall over, but if you ask nicely on Mastodon you may well get in early too!

How Photo Scout Came To Be

The last time I released a completely new app was Cascable back in 2015. The first commit into that project was nearly ten years ago! There’ve been other apps along the way — notably Pro Webcam — but they’ve all been built around that core technology stack of working with DSLR/mirrorless cameras.

I have a note on my computer full of random feature ideas for Cascable that’ve been gathered over the years. Some of them are sensible, some of them are ridiculous, and some of them are good ideas but not for that app. One of them has been there for a long time, and has always stuck with me:

It’d be cool if the app could notify me when I could take a picture of the milky way

I really liked the idea, but it wasn’t the right fit for an app for remote controlling and transferring images from a camera — so in the note it stayed.

In 2020-2021 or so, a few desires coalesced:

  • The desire to learn something new.

  • The desire to expand Cascable’s target market with an app that doesn’t need an expensive external camera to use.

  • The desire to start growing the size of Cascable (the company).

That idea met all of those desires, especially since I actively wanted such an app… then, what started as the odd “Hey, what do you think about an app that…” conversation with friends slowly gained momentum through UI mockups, market research, an engineering prototype, then finally a point of no return — it was time to invest serious time and money into giving this a go!

What Next?

The plan is as follows:

  • A smaller TestFlight phase starting from today to make sure the app’s servers don’t fall over with more than a couple of users.

  • Then, over the coming weeks, increase the TestFlight size and add features and polish for a public release sometime in spring or early summer.

Everything about this project is built using knowledge brand new to me. It’s almost entirely SwiftUI, which is new for me. I’ve approached the app in a completely new, design-first way, which is new for me. It has a backend written in Swift with Vapor, both of which are new for me. It has AR components with some custom 3D programming, which is… well, you get the picture.

I’ve learned a lot — at times it felt like being at university again! — and there’s a lot about Photo Scout that I’m really pleased with (it has a theme song?!). Over the coming weeks as the TestFlight progresses and opens up to more people, I’ll be writing some articles on here about some of the things I thought turned out really well, and some things that were more challenging.


So! If Photo Scout looks interesting to you, do take a look at the site and sign up if you want to take it for a spin, and get in touch on the app’s Mastodon account or on my personal Mastodon account if you’re interested in this earlier “Oh God the servers are on fire” phase.


January 13th, 2023

Identity Crisis

This post is included in the iKennd.ac Audioblog! Want to listen to this blog post? Subscribe to the audioblog in your favourite podcast app!


Prologue

This post is less of a “blog post” and more of… I dunno, a chapter of a memoir (were I important enough to have such a thing). It was originally written over several weeks in the latter months of 2022 as a way to unjumble the last few years of my life and to have it down somewhere, at least — one of the largest regrets I have of my Dad passing (other than the fact that he, er, died in the first place) was that he died before I was old enough for him to share the stories of his life with me. Every time I hear a snippet about my Dad from someone who knew him before I was born — “After he fled Cuba during the Revolution, he–” Excuse me?! — it’s kinda wild. So, boring as my life is so far compared to parts of his, I have a desire to document it so future people who care about me won’t have the same sorrow.

This was going to stay in scruffily-scrawled fountain pen ink shoved into a drawer until some poor soul has the task of clearing out all of my crap when I’m gone, but slowly the idea of putting it up here has become less awful over time. Nobody likes to share their low points (much less this widely), but people I respect tell me there’s strength in failure, and I’d like to draw a nice, clean line under this whole affair so I can focus on the next thing.

So, below you’ll find 5,000 words or so — or, on the audioblog, 36 minutes or so — about the past four years of my life as an indie developer a small business owner. Enjoy!


If we take a look at my career so far, we can see two things. First — somehow — I’ve been a professional developer for over seventeen years now, which is kind of incredible. The second is that out of those seventeen years, only four and a half of them were actually at a “regular” job.

For the rest of the time, I’ve made my way through life identifying as an “indie developer”, despite the fact that neither KennettNet (my first company, 2005–2012) or Cascable (my second company, 2015–) were ever really one-man enterprises. However, they were small companies for which the bulk of the development work was done by me (although even that isn’t true for some significant time periods). Still, in the early days of KennettNet, I struck lucky and wrote an app that sold well with very little non-development (read: marketing) work. I wrote the app, signed up for a payment provider, listed it on VersionTracker and away I went — truly an “indie developer”.


It’s not official until you have a sign.

2011–2015

When KennettNet failed — a long story for another day — I got a job at Spotify and, for the most part, enjoyed my time there. I worked on fun challenges and shipped things I was (and still am) proud of, but grew increasingly frustrated that my career progression there seemed to be circling into a funnel towards management. I firmly hold the belief a good developer should be able to progress through their career entirely doing development work if they want to — effectively becoming an artisan of their craft, as dated as that may sound. At Spotify, I never wanted to play the game of checking the progression boxes they wanted everyone to check to progress through the system. “I’m a developer — just let me be good at my job!”, I’d bluster. Thanks to being afforded the chance to work on some impactful projects I did manage to make salary and career progress based off the back of my work, but it was always a struggle without my nicely-checked boxes.

As a “car guy”, one of the more fantastical weekends of my time at Spotify was being flown out to San Francisco with a friend-slash-colleague for a hackathon at TechCrunch Disrupt. Over a very blurry twenty-four hours, we mashed together the Spotify app with Ford’s then-fledgling Sync AppLink platform to create a tech demo of Spotify in a car. I’d somehow managed to completely miss that TechCrunch Disrupt was somewhat of a Big Deal™, so I sauntered onto the stage and somehow managed to give a successful live tech demo with speech recognition before we headed to the airport and slept the entire flight home.

Side anecdote: The plan was for my friend and I to give the demo together, but he ended up not doing it due (if I recall correctly) to nerves and/or tiredness. Since I had no idea of Disrupt's significance, I was just "Sure whatever it's just a tech demo, who cares" and did it on my own. My friend was rather upset that I forgot to mention his name on stage — I promise it wasn't on purpose, I was very tired and had no idea of the significance of that particular stage.

Back at Spotify, folks were pleased with the demo and I wanted to build car integrations more and more. Of course Spotify should be in every car! I pestered the people I could pester, and always got the same answers anyone working in a large corporation has heard a thousand times — lots of empty words surrounding the core underlying ones of “budget” and “priorities”.


Almost as soon as I’d fixed the financial shitstorm that the failure of KennettNet caused, I started getting the “indie itch” again and started to plan an unpaid sabbatical to give it a bash. After yet another rebuttal on doing car integrations, I signed the paperwork — I was going to be indie again!

The next day, a higher-up who had once been my direct manager ran over to my desk.

“What’s this I hear about your leave? I thought you wanted to do car stuff?”
I explained that I’d heard the word “priorities” one too many times.
“Sign this.” An Apple NDA.

A few months later, Apple announced that Spotify would be one of the first third-party apps to have CarPlay integration, and we shipped it later that year. In the meantime, a car integrations team had been started at Spotify (which for a little while was literally just me and a product owner). I worked on lots of interesting things, and got to travel to and work directly with engineers from a number of car manufacturers. It was an absolute blast.

Unfortunately, my unwillingness to play the career progress game came back to bite me eventually. I put my heart and soul into the projects I worked on, working really hard to make them be the best I could. That worked for a while — being the “passionate engineer” meant that my ability to produce results and largely be left to “get on with it” counterbalanced things like my less than professional reaction to learning a project had been canned the Monday after I lost an entire weekend to making sure it’d pass certification on time — but in the end I wasn’t going anywhere without that “Give three or more presentations at employer branding events” checkmark on my progression sheet.

All this time, the “indie itch” never went away. As I saw much greener engineers get promoted ahead of me because they were better at playing the game, it became strong enough that I dug out my abandoned sabbatical paperwork, resubmitted it, and tried again. Finally, I was free to be an indie developer again. To develop. No more bureaucracy getting in the way of being a great developer. Hell. Yes.


Leaving Spotify with a box of crap from my desk.

2019

The first version of the Cascable app was released in 2015, and had been trundling along as I developed features and experimented with business models in an effort to increase revenue — which slowly but surely climbed as time went on. Every major update I vowed to allocate more time to marketing tasks, and every major update it got pushed aside for more development work and polish. It wasn’t perfect, but the app’s sales combined with some part-time client work here and there made ends meet nicely.

This continued until early 2019, when SanDisk approached the company to add support for one of their hardware accessories to the app. I was thrilled to be approached by such a well-known brand (and the marketing opportunities that’d bring), but adding the support would mean a big rebuild of the app’s photo management features. It needed doing anyway, though, and this rebuild ended up being the tentpole of the next big update — Cascable 4.0!

I was convinced this would be the big one. The new photo management feature was leagues ahead of the old one, and things were turning out great. Unfortunately, rendering grids of images turned out to be a lot more complex than I’d expected — and then, I got the golden email. I was going to WWDC 2019! What a perfect deadline.

After some discussion with my wife, I went all in… and it was brutal. Twelve-hour days, seven days per week through March, April, and May. But at least it’d be temporary. My wife took over all of my household tasks and I brought my work computer home to cut out the commute — I’d roll out of bed, sit at the computer for twelve hours, then roll back into bed to sleep. But at least it’d be temporary. Personal care and grooming went to hell (although hygiene thankfully survived — I was scruffy but clean), as did the perception of time.


My “regular” profile picture against one taken in May 2020. It’s remarkable what good lighting and a smile can hide — but the clues are certainly there.

It nearly killed me, but I shipped it. Thank Christ it was temporary! I was so proud of the release — it was some of my best work to date, and with a SanDisk partnership to boot. I shipped the app, then flew off to San Jose for WWDC for a wonderful time. Being an indie developer is great!


Unfortunately, the worst possible thing happened — absolutely nothing. Nobody gave a shit. Apart from some press coverage focused on the SanDisk integration, Cascable 4.0 had the worst launch in the history of the app. Nobody cared, and sales didn’t budge. My best development work to date — in my whole career — and nobody cared.

This would do bad things to someone in a good state of mind, but after months of soul-crushing and unhealthy levels of work fuelled by the promise of an uplift? It was nearly a death blow. Burnout hit hard, and I could barely even bring myself to think about the app, let alone work on it. I did what I always do in times of trauma — I withdrew into myself. Everywhere you look — my blog, my social media, the release notes of the app — you’ll see a sharp falloff from mid-2019 or so.

Spring 2020

I started to recover from the burnout in early 2020, with client work supporting the business as I regrouped and started to think about the future again. Although the 4.0 release had been catastrophic, I was fortunate that the status quo remained — app sales alone didn’t support the company, but they were healthy enough (and not decreasing) that part-time client work continued to fill the shortfall. Despite the setback, the roof over my head wasn’t in danger and the company had client work and an internal roadmap in place that’d take me well into the summer.

The COVID-19 pandemic delivered the one-two punch of the bottom falling out of the event photography industry (and thus app sales), and the bottom falling out of our major client’s industry (and thus client income). My recovery collapsed, and I was pretty certain that my indie career was absolutely done for. Again. At least I’d have a pandemic to blame for it this time.

Out of sheer desperation, I managed to pull a completely new app out of nowhere and get it to market — and, crucially, revenue — in no time flat. That app was Cascable Pro Webcam, an app that lets you use a ‘real’ camera as a webcam. Its existence is very much in response to the slew of people working from home for the first time, and the increased demand for (and subsequent shortage of) webcams. I was worried that it was a cash grab at first, but the app turned out great — it was fun to write a Mac app again — and sold well. Let’s call it a “rapid reaction to a turbulent market”, then. At any rate, it (and a COVID relief grant from the government) absolutely saved the company from folding. It even got covered by TechCrunch!

Able to breathe once more, it was clear that part of me hadn’t made it through the panic unscathed. I just couldn’t do it any more — something had to change, and my health was plummeting. The most troubling thing of all, though, was that I couldn’t quite put my finger on what I couldn’t do any more or exactly what it was that needed changing. Cascable had being going on for five years at this point, and other than a brief moment in 2018 where it got far too close to the end of its runway, the combination of app sales and client work had always kept it healthy. Even the panic that produced Pro Webcam showed that I could fight and adapt if needed. With the additional revenue stream of that app, the company was even more resilient. So what’s the problem?

Summer 2020

This ate at me until one day in late summer, I found myself packing a month’s work of clothing, technology, and HomePods into a car some complain isn’t suitable for a long weekend, saying goodbye to an outwardly supportive wife with unmistakeable fear in her eyes, and heading deep into the mountains of southern France. I tend to — especially when it comes to extreme decision-making — be better at solving problems from the outside, and you can’t get much more ‘outside’ than a three-day drive to a month-long AirBnB rental promising no concerns other than keeping the pain au chocolat consumption under control. With the day-to-day running of the company out of my mind, the hope was to be free enough to figure out what the problem was, and what I could do to fix it.


When luggage space is at a premium, the HomePod still makes the cut.

As days of European motorways slid past the window, trepidation blossomed into terror. What if the only way to save my health — mental or otherwise — was to shut down Cascable and move on to something else? Could I ever recover from burnout so severe that I’m fleeing to the opposite end of the continent to try to even understand it? Another episode of the Scrubs podcast would drown that out, at least for the time being.

As motorways gave way to mountain passes, my soul started to calm a little.


Guillestre is one of my favourite places in the world. It’s a small village nestled in a valley in the Alps, surrounded by peaks on all sides — although there’s nothing particularly special about it. There’s not much to do, and there are more spectacular views to be found. However, I know it well enough to get around and know some of its nooks and crannies, and the sleepy village pace of life forces you to slow down. It’s very calming.


“Nothing particularly special”.

Once settled in, I started a daily-ish journal to try and get my head in order, first trying to reconcile reality with my state of mind. It wasn’t lost on me that I’d jumped into my two-seater sports car and pissed off to the south of France for a month to try and “figure things out” — I privilege I’m very lucky to be afforded. This, of course, just made me feel worse. My days would swing wildly — I’d be joyful and proud of my achievements one day, then come crashing down the next, admonishing myself for my poor mental and physical health. “It’s a wonder you still have a wife that can bear to look at you,” a particularly low point reads.

As this all started to unravel, my hopes were fading that I could ever reach a solution that didn’t involve shutting down the company. This was more than just burnout — my mental and physical health were so bad that it was clear that Cascable was actively harmful to me. But why?

Eventually, I did arrive at some sort of breakthrough. My entire life, I’ve identified myself as a developer, as a coder. And, trite as it sounds, I care deeply about the pieces of code that I write — it is, after all, the sum of my life and experience as a developer up to the point it’s written. This is workable enough in a larger workplace — other people get to handle the direction of the company and which products to make, and the developers get to put their energy into their craft. Of course on a larger scale development time is just another investment, and those same “other people” can just as easily change course and cancel your projects. However, in a larger company you can grumble at management and move on to the next thing you’re handed. Having a deep, emotional connection to an entire business and its day-to-day details is, well, not a good thing.

The deeper realisation was that the dual-income approach had an implicit tension that was hard to resolve. If neither app sales or client work completely supported the business, everything would have undue pressure put onto it — onto me as the person that had to fix both. “This update must increase revenue.” “I must find a client soon.” I can’t work on one thing without worrying about the other, and that’s not sustainable — and I’m constantly annoyed that client work is taking time out of working on updates that could earn more money and reduce the need for client work in the first place.

Additionally — and getting right down to the core of my identity — is that I considered having to take client work as a failure. My goal is to be an “indie developer”, and selling programming hours to someone else, to me, is a failure of that goal. When I’d grumbled about this in the past, my ever-supportive wife had pointed out that to be able to work 50% on my own projects and 50% for someone else is an incredible achievement that many would love to be able to do. She’s right, of course. Hell, when people ask me how to “go indie”, my answer is to find part-time work to fund the endeavour — unless you have a year or two of salary sitting in the bank, what else can you do? Furthermore, I know multiple people running their own businesses — programming and not — that use consulting hours as an additional income stream to support the business. It’s an intelligent and pragmatic way to run a small company, and I don’t look down on anyone that runs things this way.

And yet. Despite all of this rationality… it nags me. It pulls me down. It grips its tendrils into my being with a single, debilitating word: “failure”.

After weeks of solitude and introspection, I was finally starting to understand… but still had nothing in the form of solutions.

More tendrils. “Failure”.


Thankfully, the exploration of my physical health was a simpler affair. I describe Guillestre as “not particularly special”, but it’s smack bang in the middle of one of the most beautiful regions on Earth. An eMTB rental place opened a few years ago, and during my stay I’d been renting a bike 2-3 times per week. I’d explored the valley by bike plenty of times before, but having an eMTB unlocked routes previously unavailable to me — particularly in my physical state at the time. Almost every time I went out, I’d round a new corner and exclaim “HOLY SHIT” to nobody in particular as a new vista flooded into view. Early in the trip I’d picked one of the peaks and decided that it’d be fun to actually get up there — two weeks later, when I did manage it, it took my breath away so sharply that I had to get off the bike and fight back tears for a moment. If anyone asks, it was the altitude.

The pure joy this brought me gave very clear answers very quickly. Neglecting my health was robbing myself of the joy of exploring the outdoors as well as making my entire life worse. Reversing that course would be a huge step in helping everything else.

Towards the end of one particularly enjoyable ride, I was blasting along a trail when, out of nowhere, the bike was no longer underneath me and trees were whipping by at a terrifying rate. I awoke in a crumped pile at the bottom of a tree halfway down a ravine with my Apple Watch wailing and on the brink of calling the emergency services. I nearly let it. A few minutes of exploratory movements slowly ruled out a broken leg, and I started the agonising clamber back up to the path — made significantly more challenging by finding the bike halfway up. eMTBs are heavy at the best of times, but with a failed front tyre and what feels like a broken leg that’s somehow still working, it was agony. Once at the path, I carried the bike very slowly — and in a lot of pain — off the side of the mountain and called for help.

Luckily, I escaped what should have been broken bones and and airlift to hospital with “only” a hairline-fractured rib and extreme bruising down the side of my torso, hip, and leg. Even the bike survived largely unscathed — a couple of new spokes and it was good to go. Revisiting the crash site revealed what had happened: a moss-covered rock had caught a spoke in the front wheel, ripping the bike out from under me and sending me flying down the ravine, which thankfully was just “extremely steep” rather than “a vertical cliff”. I’d bounced off a large, flat rock before colliding with a cluster of small trees. Had the rock been pointy, things would have been a lot worse. Had the trees not been there, I’d have gone much further down into the ravine, possibly into the river at the bottom. Finally, the data on my bike computer showed that I’d been going much faster than was sensible for the trail, which is something an eMTB is great at doing.

Lessons learned, I hopped back onto a bike as soon as I was physically able — I couldn’t let myself get scared away from something that brings so much joy.


Three weeks after my arrival — and a few days after my crash — I hobbled out of the car and onto the platform of the local train station to greet the sunrise and the overnight train that was carrying my wife.

Over the following days I recounted my three weeks of solitude, sharing the joys of the bike rides and the darkness of the bad days, trying my best to make the jumble of thoughts somewhat coherent. This process started to help them arrange themselves better in my mind, and ever so slowly, a way out started to form.

A couple of days before our return to Sweden, we came down from the mountains for a day trip to Monaco to eat a horrendously fancy lunch and people-watch rich folk (it’s fun — try it some time!). The novelty of an (admittedly delicious) €80 fish lunch while watching impossibly well-dressed socialites abandon their Ferraris in the street, safe in the knowledge a valet would appear out of nowhere to deal with them obviously set my mind free, because on the drive home my wife and I had one of those conversations that end up defining the trajectory of your life.

The road slowly ascended up into the mountains, clinging to the side of a large riverbed. At other times of the year, the banks swell with snowmelt cascading down towards the Mediterranean ocean. Today, a tiny trickle is barely visible. The river, the road, and my car are enveloped by cliffs hundreds of metres high on either side, swallowing the light from the sunset and leaving just greyscale everywhere the car’s headlights can’t reach. As civilisation dwindles, my way out has become clear:

  1. I must make an effort to improve and prioritise my physical health. An obvious one to get started.

  2. I must let go of my identity as an “indie developer” and the attachment I have to individual pieces of coding work — particularly the idea that “code quality” and “commercial success” have absolutely anything to do with one another. I need to think and act like a small business owner, not a developer, and be at peace that decisions made in that mindset may be at odds with what a developer might want.

  3. I must resolve the tension that paid client work brings to my own aspirations of what being a successful small business owner looks like. This means no longer accepting paid client work because I have to — client work must make sense for the company’s expertise and products. If a piece of client work doesn’t suit the company’s strengths or make the company stronger, it shouldn’t be accepted. If I can’t do this within six months, I need to throw in the towel and shut down the company.

Greyscale gives way to complete darkness as the road narrows and gets even twistier. Together, we come to a conclusion that’s as clear as the stars above — in order to move forward, I have to let go of the identity I’ve held for myself for nearly twenty years, and learn to change how I define my own self-worth. To let go of what previously defined whether I’d done a good job or not. To somehow not take it personally when my best programming work doesn’t result in commercial success. On top of all that, I needed to figure out how to allow the company to survive without selling half of its time to external clients within six months.

The Herculean nature of my “way out” probably should have crushed my spirits even more. However, simply finding an answer was such a breakthrough that it felt like half the challenge was already overcome.

The mountain pass had long lost any semblance of civilisation. Street lights were a distant memory, and we’re crawling up hairpins at 20 km/h — my little car slowly scaling the mountain. I feel free. The way forward is going to be tough, but at the very worst it’ll be over in six months.

Summer 2022 — 18 Months Later

“Alright, I think it’s time to make a decision.”

My wife and I are trying to find answers that weren’t there in note-covered cards strewn across our dining room table. A laptop displays market research and mock advertising as I tap through a prototype app I’d hacked together over the course of a couple of weeks.

“At some point, we need to abandon this idea or jump in with both feet and go for it. The core question is: Is this idea good enough to invest a lot of time and,” — I switch over to a spreadsheet labelled Estimated MVP Costs — “a lot of money in to see if it’ll actually work?”


In the eighteen months or so since returning from that trip to France, things have been, slowly but surely, recovering. The most meaningful event was a successful partnership with a camera manufacturer to integrate them with the Cascable app. This, on top of the financial contribution, helped me successfully switch my mindset — for the most part — away from “developer” to “business owner”, and I’m able to take a more pragmatic approach to my decision making. Alongside the camera manufacturer integration, we did a very large overhaul of an ageing component of the app. Much like the disastrous Cascable 4.0 update in 2019, this was a modernisation of an existing feature-set. Unlike 2019, there was no pressure for it to increase revenue — it was done because it needed doing, and that was all. Business Owner Daniel decided it was time to revamp the app’s App Store presence, so a decent investment was put into making sorely-needed new screenshots, video, and marketing copy.

Since then, sales have risen and combined with more B2B revenue from CascableCore, the company is able to focus 100% of its time to Cascable projects. It’s hard to pinpoint exactly what caused app sales to rise — perhaps this time the revamp of an existing feature was meaningful to revenue. Perhaps the better App Store presence has boosted things. Perhaps my attitude shift and the confidence boost from landing the camera manufacturer deal has let me move forward in a better way. Most likely, it’s a little of each.

I’m not perfect, of course. I continue to repeatedly declare that I’m going to dedicate more time to making marketing content, and I repeatedly fail to do so. I’m trying, though! Old habits die hard. The tendrils of failure continue to pop up now and then and assert their grip — every time I see another indie post success or brag about sales, they slither into my soul for a moment — but by now I can largely brush them away, and they’re controlled enough that I can identify them as a personality trait that can likely be soothed with counselling.

The freedom gained from letting go of the “this single app must earn all of the revenue and if it doesn’t I’m a failure” mindset has allowed me to poke at an idea for a new app that’s been rattling around in my head for years. Indie Developer Daniel would have just jumped right in and started writing code, but Business Owner Daniel is here now. We did market research with user surveys and questionnaires, feeling out the market a little. We put together sample marketing, figuring out who this might be marketed towards and what features would be important to them. We had screenshots and adverts before a single line of code was written — and then I wrote a small prototype to make sure the idea would, you know, actually work technically. Nearly twenty years at this, and I’ve never done it this way ‘round before — usually it’s code first, find the market later. If that’s not a great example of “success can hide a lot of failures”, I don’t know what is.


“The core question is: Is this idea good enough to invest a lot of time and,” — I switch over to a spreadsheet labelled Estimated MVP Costs — “a lot of money in to see if it’ll actually work?”

A moment of nervous silence.

“Yes. I think it is.”

More silence.

“Me too.”

Epilogue & Loose Ends

Physical Health

A few weeks after returning from France, I drummed up the courage to go into a gym and ask about a personal trainer with the goal of getting into a routine to turn my momentum around and slowly start improving my health. By sheer happenstance, I got paired with a trainer whose attitude towards the craft inspired me so much that my intended few weeks just kept on going — I’m continuing training to this day. Thanks to her, I did a mountain bike race last year, and am working towards doing it again this year with an even better time. This is far beyond any goal I’d originally set, and I still can’t quite believe it myself.


I was trying to pull off a “determined” look, but ended up with “bemused”.

Excellent Humans

Thanks to my tendency to turn in on myself during times of pain, a number of people were immeasurably helpful to me without actually realising the magnitude of what I was going through. I have a tradition of reaching out to people who have had an especially meaningful impact on my life at the end of each year so they’ve all largely been thanked in person, but still:

  • Thank you to the folk who helped me with negotiating the camera manufacturer partnership in 2020/21 — your business acumen saved my bacon.

  • Thank you to Claude for fishing me out of a ravine with a broken ego and a broken bike.

  • Thank you to my personal trainer who guided me through a world full of people very much Not Like Me to get me on the right health path (and then somehow to a race).

  • Thank you to various friends and strangers who, with no knowledge of my situation, performed perfectly innocuous kind gestures that happened to be incredibly meaningful.

  • And of course, thank you to my wife who — even at the best of times will put up with my shit — stood by me as a I broke down, had the strength to let me leave for three weeks of solitude thousands of kilometres away, then helped me put myself back together again. Words, gifts, acts, nor cold hard cash could ever communicate my gratitude.

Final Word

If you made it this far, thank you! As I mentioned at the beginning, publishing this (kind of against my better judgement still) is aimed to draw a line under these past few years so I can leave the sorrow behind and take the lessons forward.
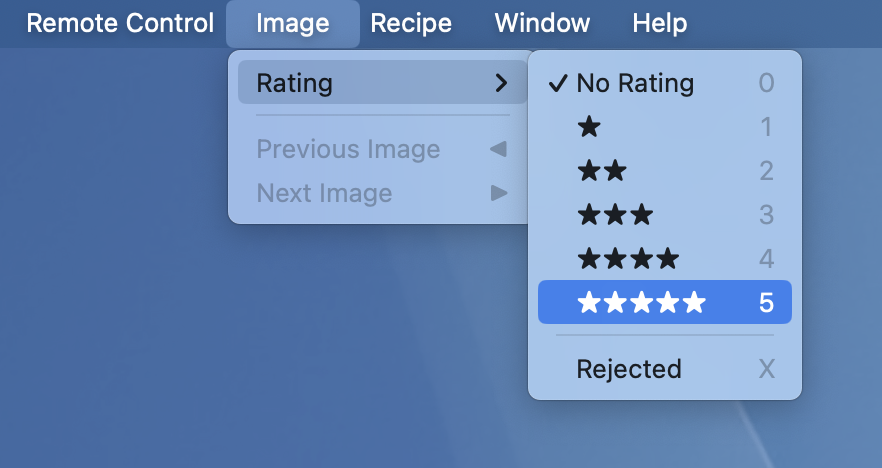
At the time of writing (well, typing it up), I’m fully focused on the new app idea mentioned above, and the aim is to launch a limited beta test of it around the end of January or so. I’m excited! If you’d like to follow along, you can do so by following me on Mastodon. I also plan to post some of the more interesting technical things on this blog — back to business as usual, finally.


July 5th, 2020

Vacation In Saudi Arabia

Back in February, just before the world went entirely to shit, I went on holiday to Saudi Arabia. The experience was pretty incredible, and one I’ve decided to write about alongside some of my favourite photos from the trip.

You can read the post in full over at Vacation In Saudi Arabia on my photos subsite. Enjoy!


April 5th, 2020

Successfully Working From Home: It's All About Boundaries!

As the COVID-19 social distancing settles in, the novelty of working from home is starting to wear off and, even worse, we’re starting to realise that instead of the awesome feeling of “I’m always at home!”, we’re starting to suffer from… “Which also means… I’m always at work!”

Working from home can very easily end up eveloping our entire lives, making it feel like there’s no escape. It starts when you decide “Oh, since I’m not commuting, I can spend that extra time working!”, and ends when you’re sitting in bed checking work emails at midnight.

A few years ago, I worked from home fulltime for towards a year. Here are my tips for staying sane, staying productive, and most of all, staying healthy. As you’ll see, everything revolves around a critically important theme: boundaries.

Disclaimer: I’m not a mental health expert, and this entire set of tips is within giant “in my experience” and “I find that…” modifiers. Please take inspiration here if you can, but don’t force yourself to this way of working.

Another Disclaimer: This post is aimed at people who work using computers and are trying to transition into healthily working from home in a childless environment.

Problem 1: Boundaries In Workspace

The great thing about travelling outside your home to work is that it puts “work” in a completely separate physical space — which makes it really easy for your brain to map it to a separate mental space as well. It’s important to be aware that your “work space” is both the physical place where you perform your work, and the mental place in which your mind exists while doing it.

Travelling to work moves you to a new place physically, and gives your mind a comfortable routine that allows it to prepare for the workday ahead. In a similar way, travelling home from work leaves your work behind both physically and mentally — giving your mind a chance to wind down and relax.

This all falls completely to pieces when you’re working from home and your workplace is a laptop on your dining room table. There’s no physical or mental separation between home and work — and if you can’t leave work behind mentally, you’ll find yourself “quickly checking Slack” while dinner is cooking or “just looking at this email” before bed, and you’ll completely lose that separation that’s so important.

Luckily, there are many things we can do to help our minds keep work and life separate, even within the home.

Find an “office” in your home, and always call it by that name

This is easier in a house with spare bedrooms than in a one-bedroom apartment, but it can be done anywhere. Having a single, dedicated office space in your home for work will really help maintain boundaries — giving you place to “go to work”, and perhaps more importantly, leave. Even if you put your laptop on your dining room table to work, tape off that part of the table with something that won’t damage it. That is your office.


I currently have this ridiculous setup at home, because I brought my work computer back from my main office. My “office” is now the left-hand side of this desk.


Taping off a corner of table creates a completely valid office.

Once you have an office (or an “office”), be strict! The only thing you do in the office is work. When it’s time to work, go to the office, and when it’s no longer time to work, leave. If you share your home with other people, sit down and have a disscussion with them to explain that your office at home should be treated as if it’s your office at work — when you’re there, you should be treated as if you were in an office somewhere else. “Sorry, I’m in the office right now — I’ll do that when I get back home.” is a completely valid thing to say.

If you work with a computer, keep your home computer and your work computer separate… even if they’re the same computer

Now you have your physical location sorted, it’s time to work on your mental space.

If you’re lucky enough to have more than one computer, this is easy. However, if you do only have the one, this can be achieved by creating a new user on your computer and dedicating it to work. Only put work stuff on your work computer/user, and only non-work stuff on your home computer/user.

This artificial boundary provides two benefits: It doesn’t clutter your home computer/user with work stuff (and vice versa), and it makes transitioning from one to the other a physical action in getting up and moving to the other computer, or clicking a button or two to specifically tell it “I want you to be in work mode now”. This physical action will help your mind separate the two things as well.


My wife says my work picture is the less professional of the two… BUT I’M WEARING A TIE!

A particularly nice thing to do — especially if you’re sharing one computer with yourself — is to configure a different colour scheme for your home and work computer/user. It’s amazing how different the same machine can feel with a different colour scheme, and it’ll help your mind settle in and focus on what you’re doing.


Having a very clear visual distinction between your computer being in “home” mode and “work” mode can help your mind do the same.

Problem 2: Boundaries In Time

I’ll get this out of the way early: The idea that you can counter a drop in productivity by working more hours per day is a fallacy. If you would typically do an 8 hour workday in the office, doing more hours than that at home won’t help if you’re suffering a productivity drop. You’ll still get less work done, and you’ll feel like shit because you hurt your work-life balance for no reason.

In order to keep a healthy work-life balance when both are happening in one building, you need to be strict with your time boundaries as well as your workplace ones. This actually goes both ways — it’s important not to let your work time take over your home time, but it’s equally as important to not let your home time take over your work time.

What does this mean?

Well, it may be tempting to take a little 30 minute break from work during the day to, say, do the laundry. So, off you go, breaking your physical workspace boundary in the process. As you’re doing the laundry, you notice that the utility room is a bit dusty, so you whip out the vacuum — it’s only an extra 5 minutes, right? Well, since I have the vacuum out…

The next thing you know, it’s an hour later. No biggie, right? You’re working from home! You’ll just work an extra hour into the evening!

This sounds harmless, but how would you feel if you worked an extra hour at your normal workplace? It’s never a nice feeling, and you get home more tired and more grumpy than you normally would have. Dinner ends up being later, giving you less time in the evening to unwind before bed.

I’m not normally a fan of slippery-slope arguments, but this is one of them. It’s so easy to just blur the lines “just this once”, but as time goes on, things blur together until you have no separation between work and life at all — you just kinda “do stuff” all day, then sleep, then do the same the next morning.

Let’s see what we can do to help ourselves:

Be as strict with time as you usually are

If you normally get to work at 9am, take an hour lunch, then go home at 5pm, keep that routine up at home. When it’s time to go home, either turn off that computer and leave it in your office, or log out of your work account and log in to your home one as you bring your computer “home” with you from work. As with maintaining your workplace, if you live with other people, explain to them how important it is that your work times are respected. Continuing to use phrases like “I’m at work right now, I’ll do it when I get home.” really help here.

If you get tempted to sneak in some quick housework or something else that’s suddenly possible because you’re physically at home, try not to get distracted by that when it pops into your mind. Instead, write it down on a little “To-do when I get home” list — if you finish work early, you can “go home” early and get those things done!

Replace your normal commute with a stationary one

It’s tempting to decide to give yourself more work or more home time in lieu of a commute, but your commute is an important part of your day — allowing your mind to get ready for work, and to wind down afterwards.

  • If your normal commute consists of sitting on public transport as you listen to podcasts/music/etc, you can continue to do that. Searching for “train view” on YouTube provides multi-hour long videos like this one — you can still stare out of the window of the train even if you’re stuck at home!

  • If you exercise by the form of walking or biking, you can do that too. Biking indoors can be expensive — you need an exercise bike or a “turbo trainer” to mount your real bike to. Jogging or walking on the spot is easier without needing extra equipment, but do be careful not to hurt yourself.

Problem 3: COVID-19

This is a bit of a special section, since it’s hyper-specific to the time this is being written. It’s difficult to write “tips” for this without getting preachy, so I’ll keep it brief:

It’s understandable that you’re anxious right now, and scared. There’s so many things going on that you can’t control, and a thousand people in your Twitter/Facebook/Slack linking articles every few minutes.

  • Heightened anxiety right now is to be expected, and reduced productivity along with it. That’s OK.

  • Try to filter the information firehose a little — by muting those particularly noisy people on social media, by avoiding areas of the internet full of speculation, by looking up news from a source that focuses on your local area, and so on.

  • While working, try to switch off the firehose entirely. Get rid of Twitter, Facebook, Slack channels dedicated to COVID-19, the lot. You can keep up-to-date and safe without up-to-the-second feeds scrolling past all day long.

  • While not working, try to focus on helping those you can help, rather than dewlling on those you can’t. Keeping yourself healthy means you can help keep your family and friends healthy — calling a family member to help keep spirits up will do far more good for both of you than sitting on your computer fretting about the death toll in a country halfway around the world away.

Conclusion

Maintaining a healthy work-life balance is difficult when both of those things happen in the same place. I’ve found that successfully maintaining that balance, with healthy productivity when working and healthly time away when you’re not requires that you’re very strict in a few areas:

  • You must be strict about where you work and where you don’t.

  • You must be strict about when you work and when you don’t.

Some of the suggestions here sound silly on the surface, but they have an important underlying idea: maintaining a strict separation between home and work, and retaining that buffer between the two with a stationary commute.

Being healthy also requires that you keep in mind the most important sentence in this entire post: The idea that you can counter a drop in productivity by working more hours per day is a fallacy. Especially in the beginning, you’ll have horribly unproductive days. And that’s completely OK. Turn off your computer at 5pm, leave work behind, and try again tomorrow. You got this!


April 2nd, 2019

When Should I Head Home From WWDC?

This question comes up every year, and I’ve seen it floating around Twitter today.

When should I head home from WWDC?

WWDC runs from Monday morning to Friday afternoon, but it’s mostly “done” by lunch time on Friday, with a few labs running into the afternoon. Most answers I see debate between heading home on Friday afternoon or Saturday morning.

I imagine it’s too late now since most people have probably booked their flights already, but allow me to propose an alternative.

Fly home on Monday. Especially if you’re heading back to Europe.

Let me explain.

You’ve just spent a week smack dab in front of a huge firehose of new information and exciting features. Your brain is still processing it all, and is full of exciting ideas of how you’ll spend the time between WWDC and the next public iOS release in the autumn.

Basically, you won’t rest until September.

Last year, instead of flying home right away I headed over the hills from San Jose to Santa Cruz, and spent the weekend basically doing nothing that required brainpower. I went biking on a rented bike, and took an open top train on a tour through the countryside.

Those two days were the best professional days of my entire 2018. Chilling out and letting the week’s craziness sink in at its own pace was a wonderful end to the week — instead of my WWDC week memories being capped with a stressful run to the airport and losing my weekend so I could be back at the office on Monday, it was capped with mountain biking and trains and sitting on a beach watching the sun go down.


Thanks to some local knowledge from a friendly hotel staff member, I was able to sit and watch the sun go down over the Pacific without a single other person in sight. A perfect relaxing end to one of the craziest weeks in the iOS dev calendar.

It’s incredibly important to look after your mental health, and crunching through the summer for the next iOS release is often draining. Just taking a couple of days to relax and let the new stuff settle in before hitting Xcode can do wonders.

Of course, this won’t be for everyone. However, I urge you to consider it! Hotels outside of the WWDC bubble are significantly cheaper, and if you’re travelling for your employer a lot of official company travel policies even say you’re not supposed to travel for work on weekends1!

Last year was the first time I tried this out, and I’m fairly sure this will be a standard tradition of mine going forwards. I didn’t even get a ticket last year — I was just in town for socialising and AltConf.

This year I did get a ticket, and I hope to see you there! Even better — I hope to see you chilling out somewhere the weekend after!

  1. Much to the annoyance of managers, I’ve found. I’ve had to push back multiple times to managers trying to make me travel on weekends “because it’s cheaper”.