Core Audio is one of the trickier frameworks in the Mac and iOS arsenal, but is incredibly powerful once you manage to tame it. I’ve been spending some time at Spotify getting to grips with it, and have released some Core Audio code as part of the open-source CocoaLibSpotify library.
CocoaLibSpotify is an Objective-C wrapper around the libSpotify library, which is a C API providing access to Spotify’s service for music streaming, playlists, etc etc. A more advanced example of what you can do with (Cocoa)LibSpotify is my open-source Viva Spotify client.
CocoaLibSpotify contains a class called SPCoreAudioController that deals with getting audio data from libSpotify, through a Core Audio AUGraph and to the system audio output. The class also provides an easy way of customising the graph, and this post discusses the basics of Core Audio, AUGraph, and customising SPCoreAudioController with a 10-band graphic equalizier.
Note: While this post discusses Spotify technologies, I wrote this because I enjoy the topic at hand and thought it’d be nice to share. The opinions expressed here may not represent those of Spotify, etc etc.
Push vs. Pull
Core Audio and libSpotify have two opposing methods of dealing with audio data.
-
libSpotify uses the “push” method, which basically means it says “Here is some audio data, you should play it!”
-
Core Audio uses the opposite “pull” method, which means it asks “I need to play some audio, can I have some?”
This means that, unfortunately, we can’t simply hook libSpotify up to Core Audio and get playback happening. Instead, we need to store the audio provided by libSpotify into a buffer which we’ll then read from when Core Audio requests some audio data.
To solve this in an elegant manner, CocoaLibSpotify includes a ring buffer, which is a special kind of buffer that allows data to be read and written to is without reallocating memory, which can be expensive.
Audio Units and AUGraph
Core Audio uses a concept of “units” when working with audio. Each unit carries out a single task, such as applying an effect or actually playing the audio. AUGraph then provides a way to chain Audio Units together, much like how an amplifier stack works in the physical world.
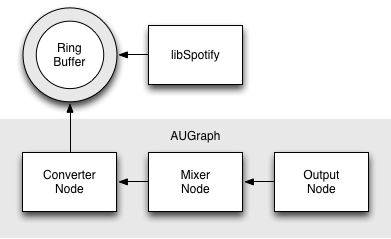
To simplify this for most use cases, CocoaLibSpotify includes a class called SPCoreAudioController, which implements an AUGraph with three nodes:
-
Converter Node: Takes audio as delivered from libSpotify from the ring buffer and converts it into the canonical format used by Core Audio.
-
Mixer Node: Mixers are normally used to mix audio from multiple sources, but here it’s used simply to provide the ability to control volume separately from the system volume, since the audio output unit on iOS doesn’t provide volume control.
-
Output Node: This node takes the completed audio and delivers it to the system’s default audio output.
Once this is up-and-running, SPCoreAudioController is managing an audio chain that looks like this:

Customising SPCoreAudioController
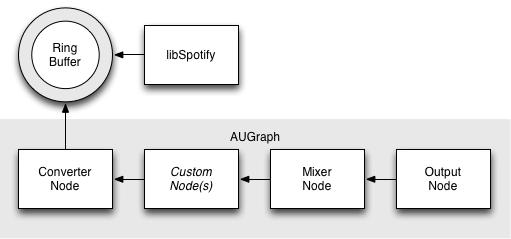
If you want to customise audio playback, SPCoreAudioController includes a handy pair of methods that allow you to insert any AUNode you like into the AUGraph without having to manage the whole graph, making the chain look like this:

So, let’s provide an example that inserts a 10-band graphic EQ into the graph:

Note: The completed sample project can be found on GitHub here.
First, create a new class subclassing SPCoreAudioController - the sample project calls it EQCoreAudioController - then override -connectOutputBus:ofNode:toInputBus:ofNode:inGraph:error:.
In this first example, set up a description of the EQ Audio Unit then have the graph add a node matching that description before getting a reference to the Audio Unit itself so we can set properties on it. Then, it initializes the Audio Unit and sets it to a 10-band EQ.
@implementation EQCoreAudioController {
    // Keep the node and unit around so we can reference them anytime.
    AUNode eqNode;
    AudioUnit eqUnit;
}

-(BOOL)connectOutputBus:(UInt32)sourceOutputBusNumber
                 ofNode:(AUNode)sourceNode
             toInputBus:(UInt32)destinationInputBusNumber
                 ofNode:(AUNode)destinationNode
                inGraph:(AUGraph)graph
                  error:(NSError **)error {

    // A description for the EQ Device
    AudioComponentDescription eqDescription;
    eqDescription.componentType = kAudioUnitType_Effect;
    eqDescription.componentSubType = kAudioUnitSubType_GraphicEQ;
    eqDescription.componentManufacturer = kAudioUnitManufacturer_Apple;
    eqDescription.componentFlags = 0;
    eqDescription.componentFlagsMask = 0;

    // Add the EQ node to the AUGraph
    AUGraphAddNode(graph, &eqDescription, &eqNode);

    // Get the Audio Unit from the node so we can set properties on it
    AUGraphNodeInfo(graph, eqNode, NULL, &eqUnit);

    // Initialize the audio unit
    AudioUnitInitialize(eqUnit);

    // Set EQ to 10-band
    AudioUnitSetParameter(eqUnit, 10000, kAudioUnitScope_Global, 0, 0.0, 0);

    //... continued in next code snippet.
At this point, our EQ is set up and inserted into the audio controller’s graph. All that’s left to do now is hook it up to the provided source and destination nodes so audio gets piped through it:
    // ... continued from previous code snippet.

    // Connect the output of the provided audio source node to the input of our EQ.
    AUGraphConnectNodeInput(graph, sourceNode, sourceOutputBusNumber, eqNode, 0);

    // Connect the output of our EQ to the input of the provided audio destination node.
    AUGraphConnectNodeInput(graph, eqNode, 0, destinationNode, destinationInputBusNumber);

    return YES;
}

@end
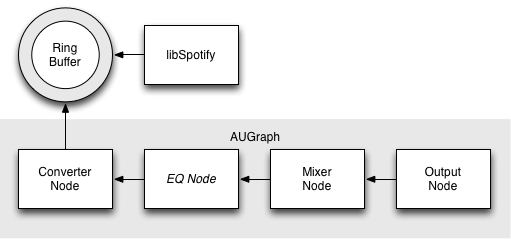
That’s it! The EQ node is now inserted into the AUGraph managed by SPCoreAudioController, which now looks like this:

It’s important to do cleanup as well so we don’t leak memory and cause problems. SPCoreAudioController provides -disposeOfCustomNodesInGraph: to be overridden for just this purpose:
-(void)disposeOfCustomNodesInGraph:(AUGraph)graph {

    // Shut down our unit.
    AudioUnitUninitialize(eqUnit);
    eqUnit = NULL;

    // Remove the unit's node from the graph.
    AUGraphRemoveNode(graph, eqNode);
    eqNode = 0;
}
Finishing Up & Adding UI
Now we have an EQ inserted into our Core Audio graph, we need to control the levels! To do this, the sample project implements the following method in EQCoreAudioController, which applies up to ten band values.
-(void)applyBandsToEQ:(NSArray *)tenBands {

    if (eqUnit == NULL) return;

    // Loop through our bands and update them.
    for (NSUInteger bandIndex = 0; bandIndex < MIN(10, tenBands.count); bandIndex++) {

        Float32 bandValue = [[tenBands objectAtIndex:bandIndex] floatValue];
        AudioUnitSetParameter(eqUnit, bandIndex, kAudioUnitScope_Global, 0, bandValue, 0);
    }
}
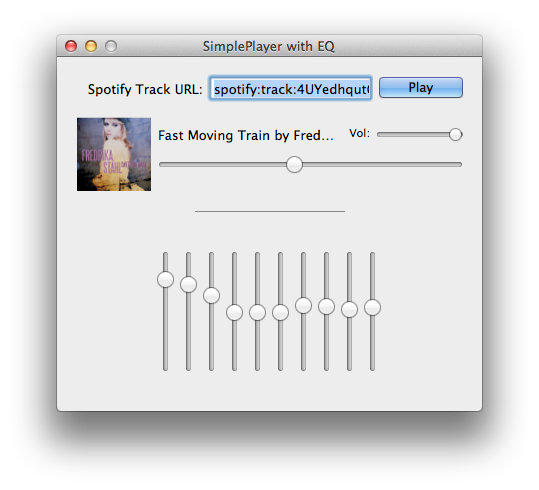
The sample project then has ten continuous vertical sliders all hooked up to different IBOutlets but calling the same IBAction. It’s best to set your sliders to range between -12.0 and +12.0 (this is the range iTunes uses in its EQ) otherwise the distortion gets a bit unbearable!
-(IBAction)eqSliderDidChange:(id)sender {

    NSMutableArray *bands = [NSMutableArray arrayWithCapacity:10];

    [bands addObject:[NSNumber numberWithFloat:self.eqSlider1.floatValue]];
    [bands addObject:[NSNumber numberWithFloat:self.eqSlider2.floatValue]];
    [bands addObject:[NSNumber numberWithFloat:self.eqSlider3.floatValue]];
    [bands addObject:[NSNumber numberWithFloat:self.eqSlider4.floatValue]];
    [bands addObject:[NSNumber numberWithFloat:self.eqSlider5.floatValue]];
    [bands addObject:[NSNumber numberWithFloat:self.eqSlider6.floatValue]];
    [bands addObject:[NSNumber numberWithFloat:self.eqSlider7.floatValue]];
    [bands addObject:[NSNumber numberWithFloat:self.eqSlider8.floatValue]];
    [bands addObject:[NSNumber numberWithFloat:self.eqSlider9.floatValue]];
    [bands addObject:[NSNumber numberWithFloat:self.eqSlider10.floatValue]];

    [self.audioController applyBandsToEQ:bands];
}
Further Reading
Learning Core Audio: A Hands-On Guide to Audio Programming for Mac and iOS by Chris Adamson and Kevin Avila.