Note: If you got here via a web search for handling UIKit menus or responder chain actions in SwiftUI and don’t need/care about the context here, you can jump straight to my GitHub repo containing the sample project, which has a much more succinct readme.
We’re currently in the process of bringing my indie company’s main app, Cascable, to the Mac using the Mac Catalyst technology.

An early build of Cascable for Mac, an iOS app ported to the Mac with Catalyst.
Cascable isn’t a particularly huge app in terms of lines of code (around 90,000 lines of Swift and 57,000 lines of Objective-C), but it is getting pretty large in terms of time. Cascable 1.0 shipped in 2015 and has evolved from there, travelling through various iOS UI trends — starting in the era of Storyboards and visual editing, through autolayout’s visual format language, the expanded auto layout APIs for expressing constraints in code, and finally into SwiftUI.
We’re not in any particular hurry to throw away and rebuild our perfectly working UI code in favour of SwiftUI, instead preferring to build new UI with the tool most appropriate with the task at hand, and modifying existing UI components in whatever they were originally built in.
As a result of this approach, the Cascable app is a melting pot of all the above mentioned UI building techniques, and for the most part this works great. However, SwiftUI is a radical departure from UIKit in many ways, and the meeting point between SwiftUI and UIKit can be a little bit… tricky.
And that’s where we find ourselves today.
The Problem
Part of the Mac work is building out a robust set of menus and keyboard shortcuts. We’re using the “traditional” approach for this — building out the menus with action-based items that pieces of UI can choose to handle.
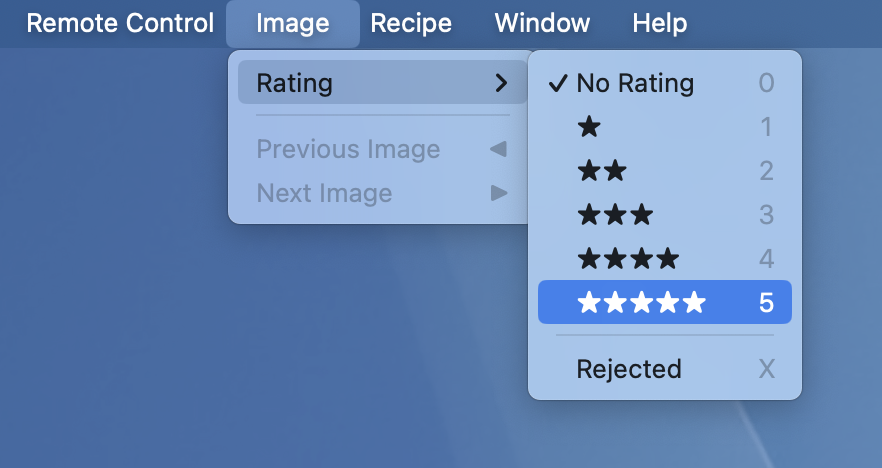
This blog post is going to use the specific example of applying a star rating to images. There are multiple places in the app the user might want to apply a rating to an image — in the image grid, in the single image viewer, and in a separate window/screen dedicated to viewing images.
In UIKit, a menu item can be defined like this then added to the menu bar:
let fiveStarRatingItem = UIKeyCommand(title: "★★★★★",
                                      action: #selector(applyFiveStarRating(_:)),
                                      input: "5")
Once the menu item is in place, a view controller can implement the item’s action to enable the menu item and perform an action when it’s chosen.
@objc func applyFiveStarRating(_ sender: UICommand) {
    selectedImage?.rating = 5
}
It can even change the menu item’s enabled status and other attributes (like having a checkmark next to it) dynamically. For example, let’s put a checkmark next to the current rating of the image.
func validate(_ command: UICommand) {
    if command.action == #selector(applyFiveStarRating(_:)) {
        let enableItem = (selectedImage != nil)
        let checkItem = (selectedImage?.rating == 5)
        command.attributes = enableItem ? [] : .disabled
        command.state = checkItem ? .on : .off
    }
}
This setup lets us only declare menu items for rating images once, and our image grid, single image viewer, and separate image viewer can all to react to the menu items appropriately without them all having to redeclare them, their titles, and their keyboard shortcuts.
At runtime, the system will walk the app’s responder chain when evaluating the menu item for display or for executing its action, and it’ll automatically be enabled and the view controller’s method called.
This approach is pretty much as old as time (menus worked like this in Mac OS X 10.0 back in 2001), and works great — we have the advantage of only having the declare the menu item and its keyboard shortcut once, and the items will automatically be enabled when they’re available. Lovely!
This all comes to a screeching halt when we get to SwiftUI, which doesn’t really expose the responder chain directly. So, how can we handle selector-based responder chain actions in SwiftUI?
Initial Solution: Explicit Forwarding
Since we’re a hybrid app that “starts” with UIKit, our SwiftUI is always displayed inside a UIHostingController, which is a normal view controller and can absolutely take part in the responder chain.
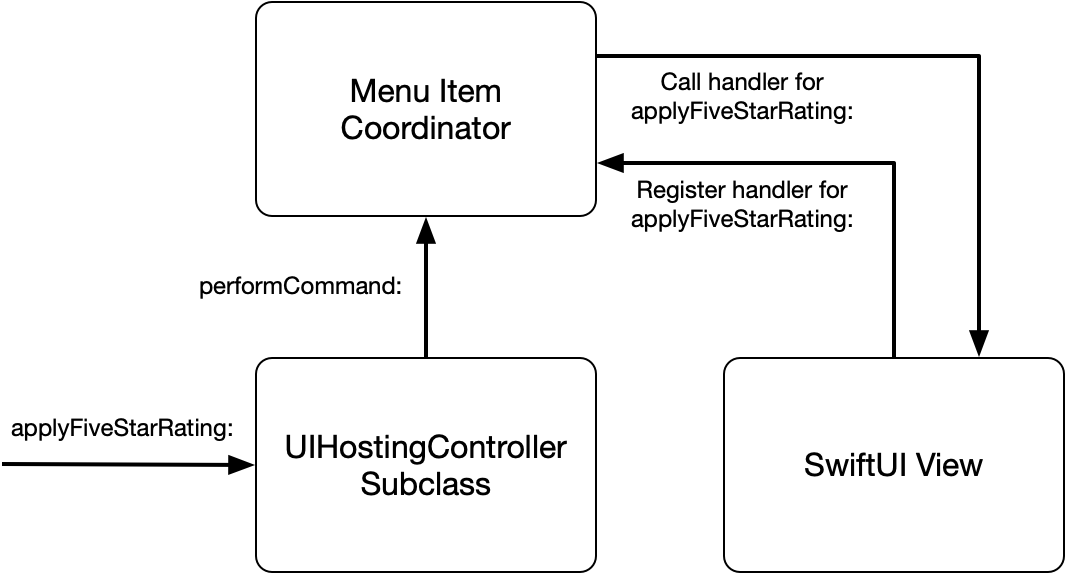
I’ll skip the journey and get straight to the initial solution: A coordinator object belonging to the UIHostingController that contains a basic store of handlers, and a SwiftUI view modifier that looks like this to register a handler with that coordinator:
Text("IOU 1x UI")
    .actionHandler(for: #selector(applyFiveStarRating(_:))) { command in
        selectedImage?.rating = 5
    }
The UIHostingController subclass can then handle our menu item’s validation and action methods, forwarding them along to the coordinator object to be delivered to the SwiftUI world.
override func validate(_ command: UICommand) {
    if menuItemCoordinator.hasHandler(for: command) {
        menuItemCoordinator.validate(command)
    } else {
        super.validate(command)
    }
}

@objc func applyFiveStarRating(_ sender: UICommand) {
    if menuItemCoordinator.hasHandler(for: command) {
        menuItemCoordinator.perform(command)
    }
}
Or, in diagram form. Note that for every menu item we want to handle in SwiftUI, code needs to be added to the UIHostingController subclass to specifically handle it.
Problem solved forever.
…oh, you want more than one menu item? Ah.
This works great in theory, but the whole point of the responder chain is that it’s dynamic. If we’re building a “robust set of menus” for our app, we’d have to implement every single possible menu action in our UIHostingController subclass to then check whether the SwiftUI view has registered a handler for it and pass the action along (and explicitly disable the menu item if not, since implementing all these methods signals to the responder chain that we can handle them all).
It’d be really nice if we didn’t have to do that.
Final Solution: Objective-C To The Rescue!
The responder chain’s design allows us to redirect an action to a new target pretty simply. This override on our UIHostingController subclass will redirect our menu actions to the coordinator:
override func target(forAction action: Selector, withSender sender: Any?) -> Any? {
    if menuItemCoordinator.hasHandler(for: action) {
        return menuItemCoordinator
    } else {
        return super.target(forAction: action, withSender: sender)
    }
}
However, all this does is change the target — our coordinator object will still need to implement all the action methods. This doesn’t solve our problem at all — it just moves it!
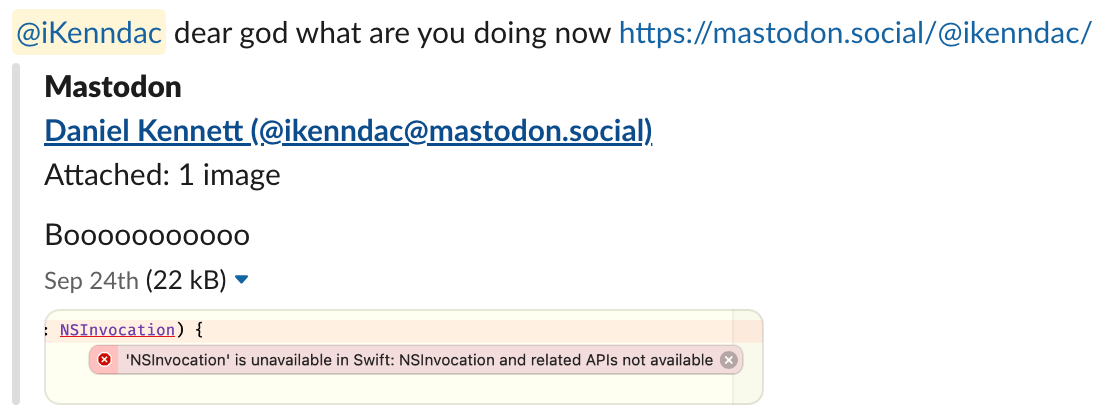
Swift is interoperable with the Objective-C runtime, which uses dynamic message sending. It’s possible to “catch” a message (i.e., a method call) at runtime and point it somewhere else using a thing called NSInvocation, which represents an “instance” of a method call, combining the method’s signature, types, and particular parameters being sent. Once you “catch” an invocation, it can be inspected and redirected to a different destination.
All we need to do is override forwardInvocation(_:) and… ah. Turns out Swift is mostly interoperable with the Objective-C runtime, but not completely.

Nooooooooo!
Welp, to solve our SwiftUI problem it looks like we’re going to have to write some honest-to-goodness Objective-C. Thankfully, it’s only a few lines.
|
Side anecdote: I posted that above screenshot to Mastodon when I was working on this, and almost immediately got this message from a friend — and it's still making me laugh several days later.
|
Rather than dump a pile of code in here, let’s go through what’s happening step-by-step:
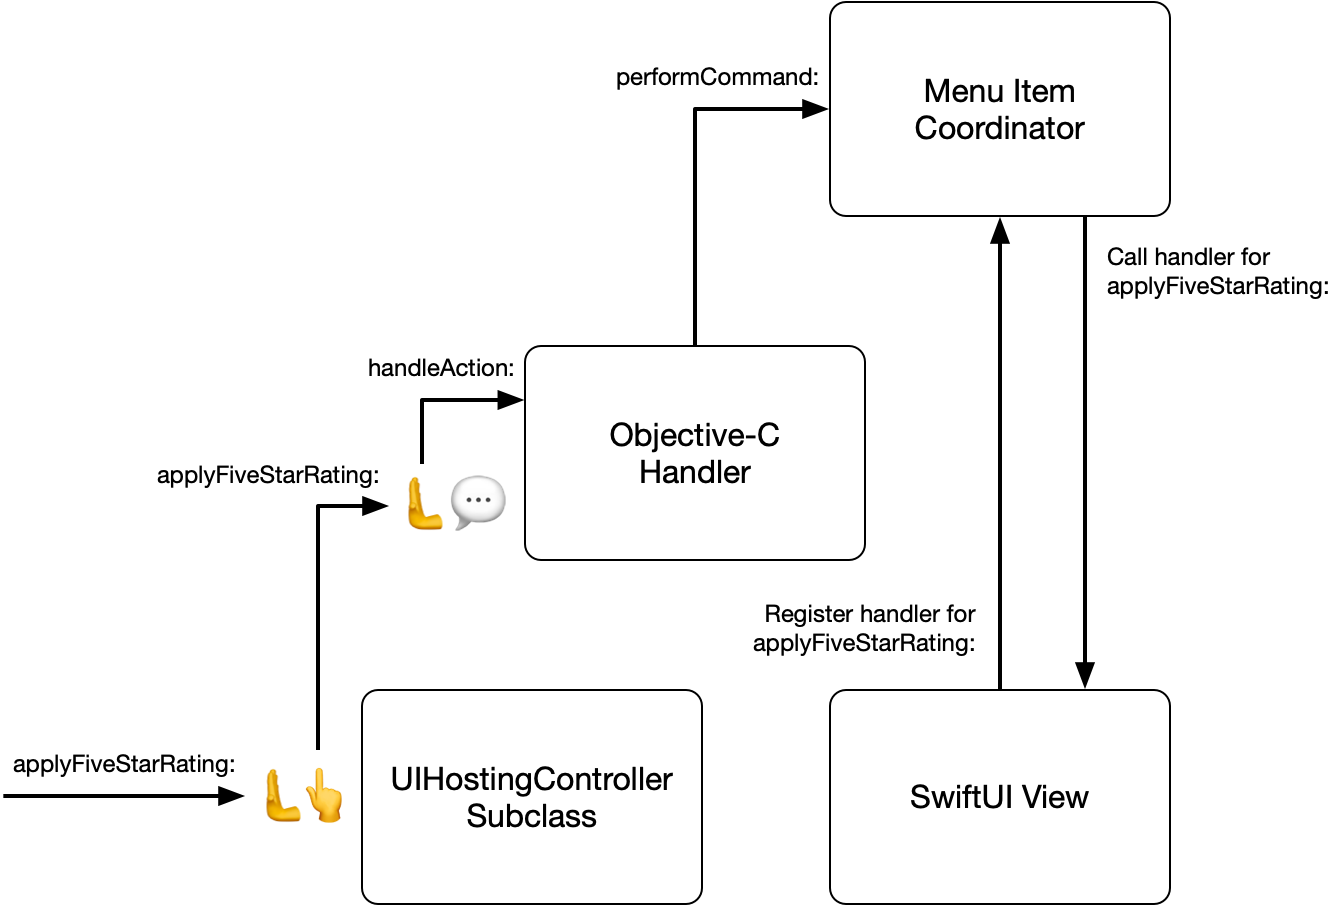
1) The user chooses a menu item.
2) Because it’s in the responder chain, the UIHostingController subclass containing our SwiftUI will be asked for the target for the menu item’s action. We check our registered handlers, and if the SwiftUI view has registered one for that menu item, we redirect the action to our Objective-C object (which is stored in the actionHandler property on our coordinator). If we don’t have a registered handler, we let the responder chain carry on as normal with a call to super.
override func target(forAction action: Selector, withSender sender: Any?) -> Any? {
    if menuItemCoordinator.hasHandler(for: action) {
        return menuItemCoordinator.actionHandler
    } else {
        return super.target(forAction: action, withSender: sender)
    }
}
3) After the redirect, the responder chain will ask our Objective-C class if it can handle the action. We check the coordinator again (which is the actionTarget property) to confirm we can receive the action.
-(BOOL)canPerformAction:(SEL)action withSender:(id)sender {
    return [self.actionTarget canPerformActionWithSelector:action];
}
4) Once we confirm that we can perform the action, the responder chain will then send a regular Objective-C message (method call) to our Objective-C object. At this point, we get the opportunity to intercept the message. To do so, we must first override methodSignatureForSelector:.
-(NSMethodSignature *)methodSignatureForSelector:(SEL)aSelector {
    return [[self class] instanceMethodSignatureForSelector:@selector(handleAction:)];
}
The selector at this point will be the action’s selector, applyFiveStarRating:. A selector doesn’t contain any type information, but an NSMethodSignature object does — it’s a description of the parameter and return types of an Objective-C method call. What we’re saying here is “Hey, you’re looking to send the message applyFiveStarRating:, and here’s the types that’re needed for me to receive that message.”
5) Finally, the Objective-C runtime will attempt to deliver the message. If we’d implemented -(void)closePanelFromMenu:(UICommand *)sender explicitly, that’d be called. However, we don’t want to manually implement every single possible menu handler, so we didn’t. So, instead, we get the opportunity to intercept the method call. This part is the core of this entire thing.
-(void)forwardInvocation:(NSInvocation *)anInvocation {
    anInvocation.selector = @selector(handleAction:);
    [anInvocation invokeWithTarget:self];
}
An NSInvocation is a specific instance of a method call. It contains the selector (in this case, it’ll be applyFiveStarRating: when first passed to us), the method signature containing the types involved, a target for the message, and the actual arguments passed. This is where the actual redirection happens — here, we’re saying “For this invocation, instead use handleAction: on self.”
6) With our invocation successfully redirected, we’ll get a call to our catch-all action receiving method, which is just a regular Objective-C method definition. This method forwards the action along to our SwiftUI coordinator object.
-(void)handleAction:(UICommand *)command {
    [self.actionTarget performActionForCommand:command];
}
7) There’s no step three seven!
Basically, that Objective-C object redirects all incoming actions to handleAction: on-the-fly, removing the need to explicitly implement any of them directly. Since menu actions come with a UICommand object, we can still see the original action after the redirect and handle it appropriately. On AppKit, we’d have to keep hold of the original selector somehow, but it’s still perfectly doable.
Again, in diagram form. While the diagram is more complicated the one above, we don’t actually have to add more code for each menu item we want to handle in anything but the SwiftUI view that actually handles it, unlike with the previous solution.
One thing to note is that this approach undoes all of the optimisations that the Objective-C runtime has around message dispatch, plus the runtime has to construct the NSInvocation object that’s used during the redirect. This does, as you might imagine, slow down message delivery significantly. However, since we’re not in a performance sensitive section of code (it’s not like the user will be triggering hundreds of menu items per second), it’s alright here. There are other ways of achieving the same result without the performance penalty, which I may explore in a future post.
Conclusion
“Gee, that sure is 1,500 words on handling menu items,” you might be thinking, “but what’s the point?”
Well, with this, we can add an item to a menu in the menu bar:
let fiveStarRatingItem = UIKeyCommand(title: "★★★★★",
                                      action: #selector(applyFiveStarRating(_:)),
                                      input: "5")
…then handle it in SwiftUI:
Text("IOU 1x UI")
    .actionHandler(for: #selector(applyFiveStarRating(_:))) { command in
        selectedImage?.rating = 5
    }
…with no additional glue code in between. Pretty nice!
If you want to see this in action, there’s a working sample project over on GitHub. Enjoy!