This post is included in the iKennd.ac Audioblog! Want to listen to this blog post? Subscribe to the audioblog in your favourite podcast app!
| Apple Podcasts | Overcast | Castro | Pocket Casts | Direct Feed |
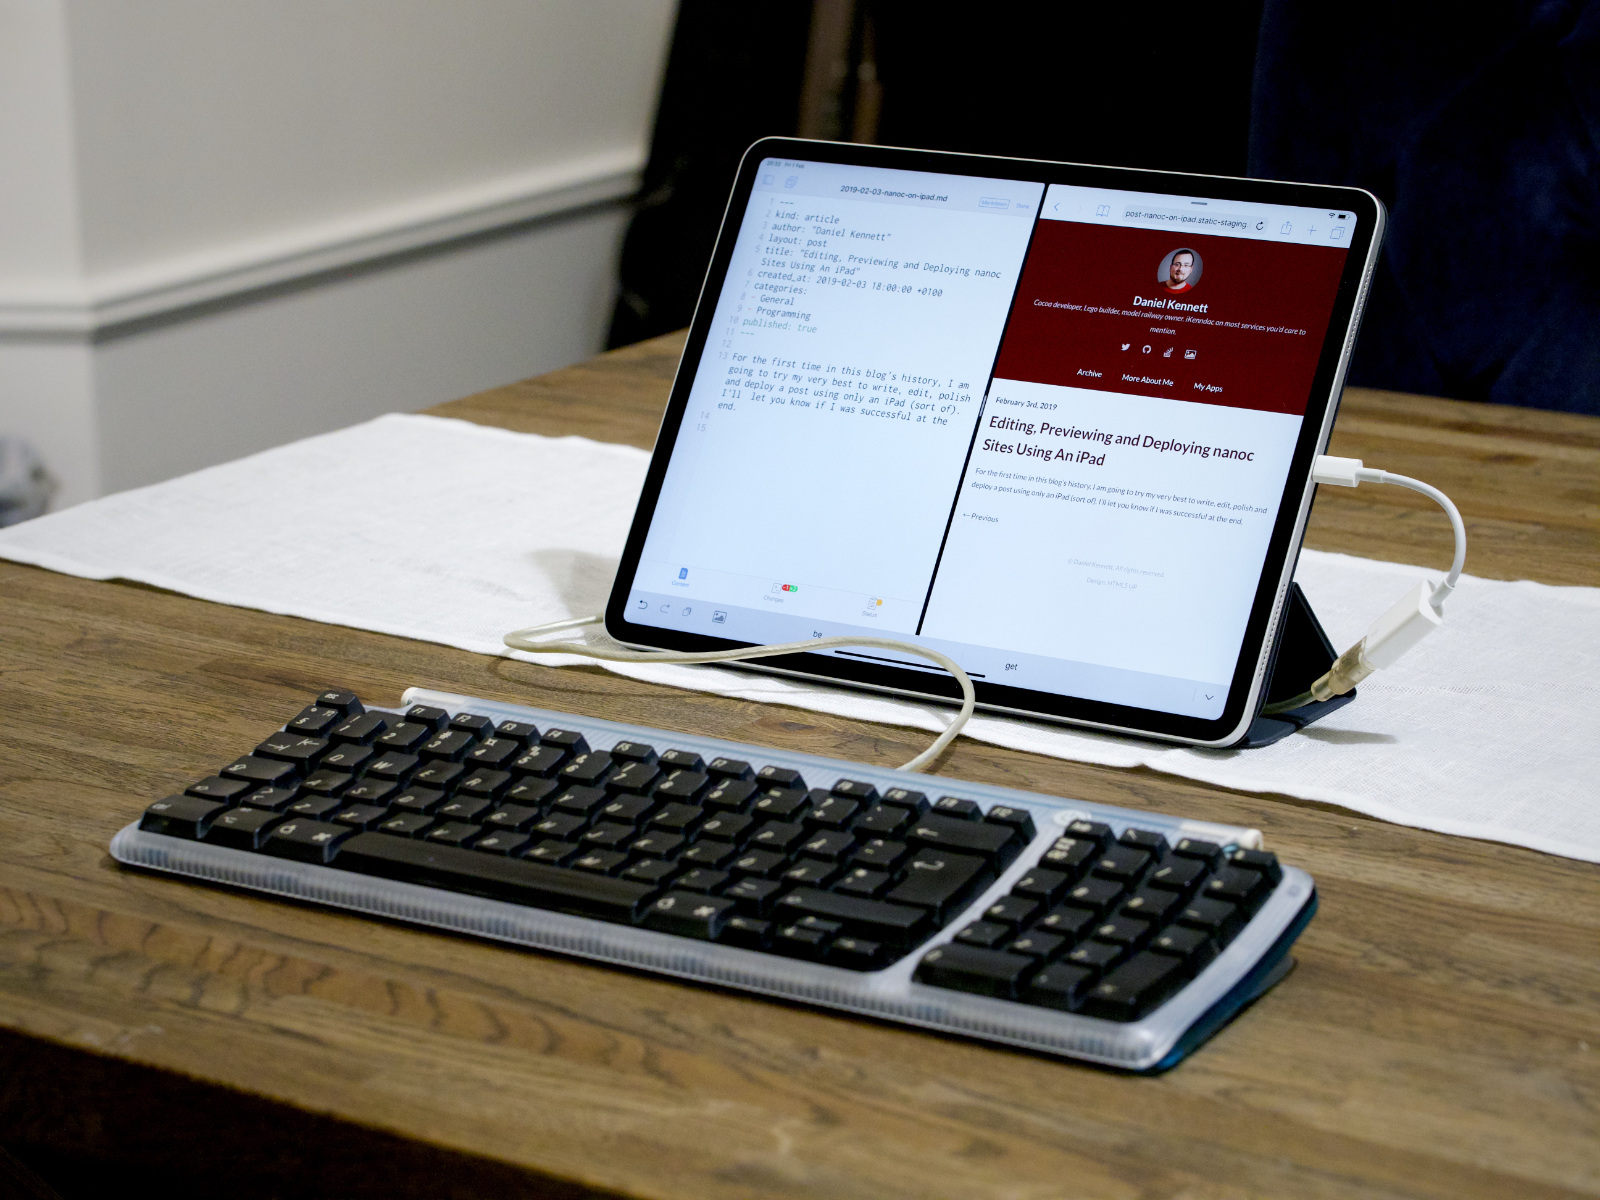
For the first time in this blog’s history, I am going to try my very best to write, edit, polish and deploy a post using only an iPad (sort of). I’ll let you know if I was successful at the end!
Unfortunately, the power button on the iMac G3’s keyboard does nothing on an iPad.
The unfortunate reality of the iPad right now (in early 2019) is that for many workflows, it simply isn’t viable as a replacement for a “real” computer. For the workflows that can be done entirely on an iPad, those that manage to do so end up allowing us to modify an old joke:
How can you tell if someone uses an iPad as a laptop replacement? Don’t worry — they’ll tell you!
This isn’t to belittle their achievements — building a viable workflow for any serious task that requires more than one app on the iPad is a real challenge, and people are damn right to be proud of their collections of Shortcuts and URL callback trees.
However, slowly but surely the iPad is getting there as a desirable computer for getting work done. Personally, the 2018 iPad Pro crossed over this line for a couple of reasons, and for the first time in the iPad’s history, it’s a computer I want to carry around with me and use for “real” work.
Self-Inflicted Development Hell
Unfortunately for me, I’m a developer. Because of that, when I see a problem, I come up with a developer solution. Most people have been able to write articles for their blog on their iPad for years - they just use Safari to log into Squarespace, Wordpress, or whatever else they’ve chosen and write away.
My blog, however, uses nanoc. Nanoc is a program that takes a pile of files, processes them, and spits out another pile of files that happens to be a website. I then upload this pile of files to my webserver, and my article is live!
To do this, I simply open my terminal, cd into the directory of my blog, then run bundle exec nanoc to generate… and we can see why this doesn’t work on an iPad.
Developer Solutions to Developer Problems
So, what do I really want to do here? I want to be able to:
-
Write blog posts on my iPad.
-
Preview them on my iPad to check for layout problems, see how the photos look, make sure the links are correct, etc.
-
Once I’m happy with a post, publish it to my blog.
Step one is easy enough - I find a text editor and type words into it. However, step two is where we fall over pretty hard. Many editors can preview Markdown files, but they only preview them “locally” - they don’t put the preview into my website’s layout, won’t display photos, and generally won’t parse the custom HTML I put into my posts sometimes.
To achieve this, we really need to be able to put the locally modified content through nanoc and display the output through a HTTP server. This is easy peasy on a traditional computer, but not so on an iPad.
Here we arrive at why I’m only sort of writing this post using an iPad — while I am sitting here typing this post on an iPad, I have a computers elsewhere helping me along a little bit. My solution has:
-
A continuous integration (CI) server watching my blog’s repository for changes, then building my blog with
nanocfor each change it sees. -
A static web server set up to serve content from a location based on the subdomain used to access it.
As I’m writing this, I’m committing the changes to a branch of my blog’s repository - let’s say post/nanoc-on-ipad. Once I push a commit, my CI server will pick it up, build it, then deploy it to the web server. I can then go to http://post-nanoc-on-ipad.static-staging.ikennd.ac to view the results. It’s not quite a live preview since my blog is ~400Mb of content and the build server takes a minute or two to process it all, but it’s enough that I can write my blog post with Safari in split view with my editor, and I can reload occasionally to see how it’s going.
My Setup
The first thing we need to do is get a CI server to build our nanoc site. I won’t actually cover that directly here - there are lots of CI services available, many of them free. Since nanoc is a Ruby gem, you can set up a cheap/free Linux-based setup without too much fuss.
I’m using TeamCity running on a Mac mini, mostly because I already had that set up and running for other things. TeamCity has a pretty generous free plan, and I get on with how it operates pretty well.
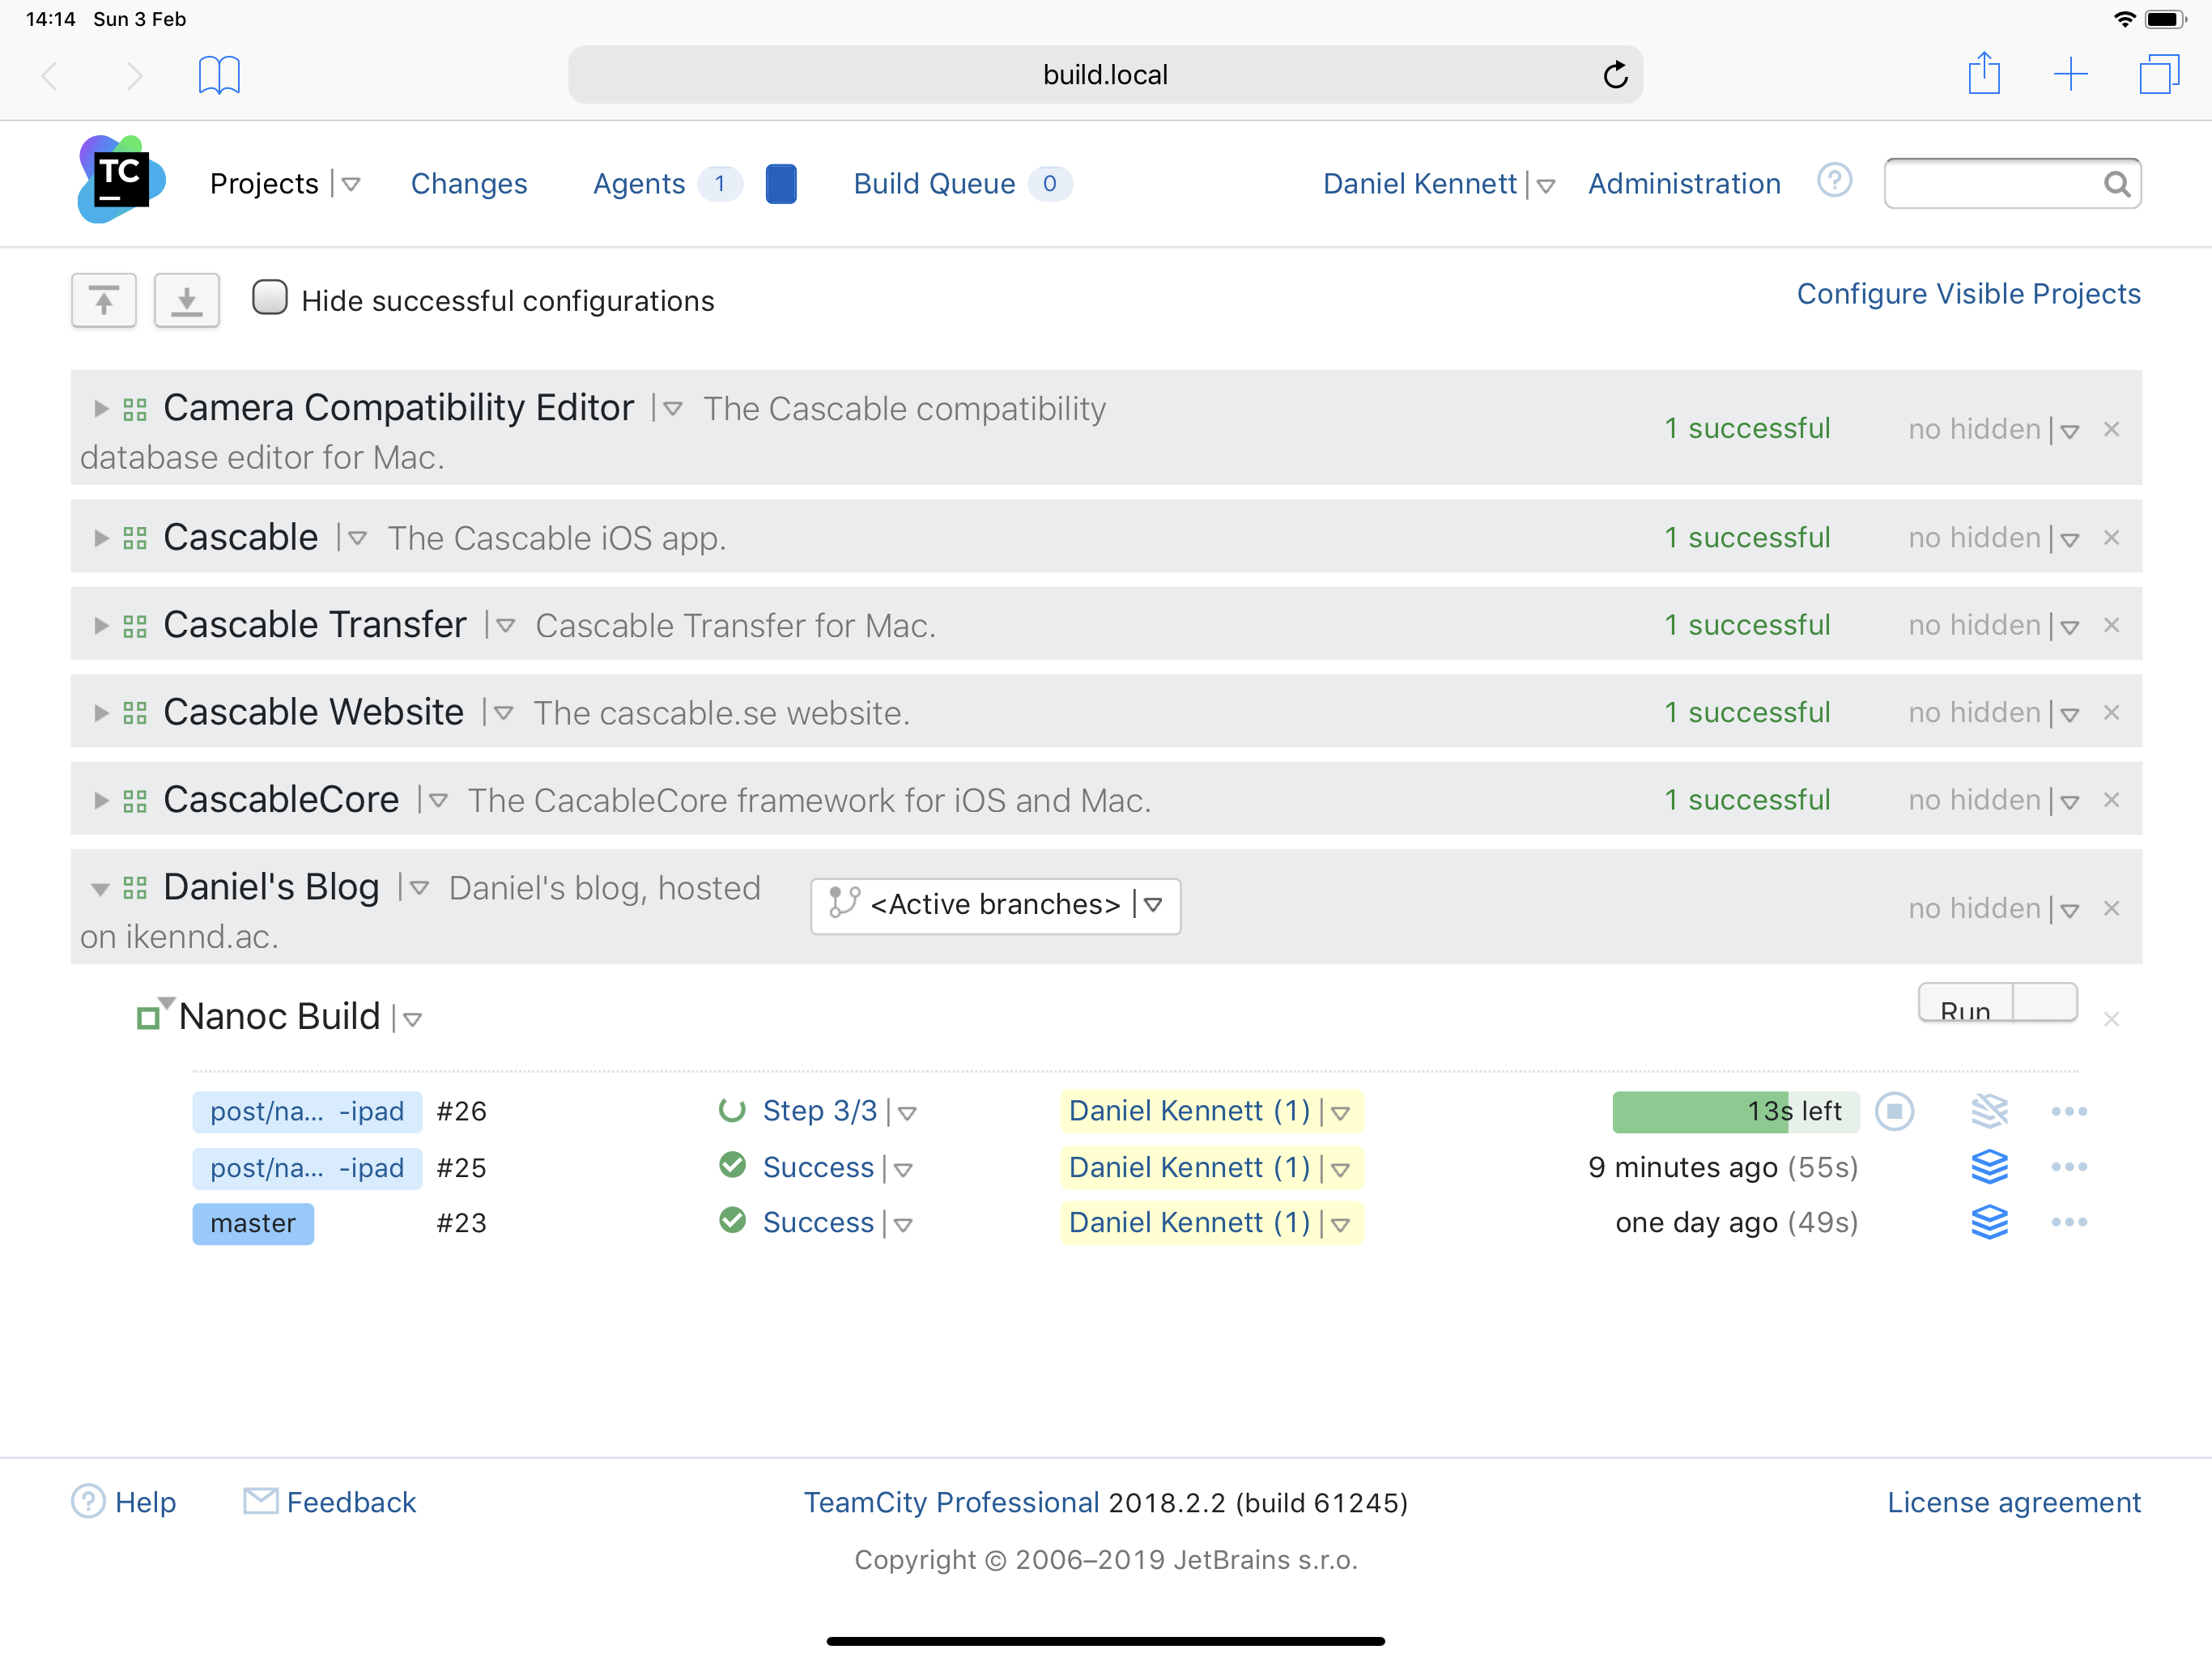
TeamCity’s web UI on iPad isn’t quite perfect, but it functions just fine.
The second thing we need is a web server. Now, when I suggested the idea of serving content based directly on the domain name being used, a web developer friend of mine made a funny face and started talking about path sanitisation, so I spun up a new tiny Linode that does literally nothing but host these static pages for blog post previewing. I set up an Ubuntu machine running Apache for hosting.
Now for the fun part!
Linking It All Together
We’re going to be taking advantage of wildcard subdomains so we can preview different branches at the same time. For my personal blog it isn’t something I’ll use that often, but it’s handy to have and is definitely cooler than just having a single previewing destination that just shows whatever happens to be newest.
In your DNS service, add an A/AAAA record for both the subdomain you want to use as the “parent” for all this, and a wildcard subdomain. For example, I added static-staging and *.static-staging records to ikennd.ac and pointed them to my server.
Next, we want to make Apache serve content based on the entered domain. Manually (or even automatically) adding Apache configuration for each branch is too much like hard work, but we can use mod_vhost_alias to help out out. It’s not a default module in the Apache version I had, so a2enmod vhost_alias to enable it.
My configuration looks like this:
DocumentRoot /ikenndac/public_html/content

<Directory /ikenndac/public_html/content>
    Options None
    AllowOverride None
    Order allow,deny
    Allow from all
    Require all granted
</Directory>

<VirtualHost *:80>
    ServerAlias *.static-staging.ikennd.ac
    VirtualDocumentRoot /ikenndac/public_html/content/%0/
    ErrorLog /ikenndac/public_html/static-staging.ikennd.ac.error.log
    CustomLog /ikenndac/public_html/static-staging.ikennd.ac.access.log combined
</VirtualHost>
That VirtualDocumentRoot line is the important part here. If I go to http://my-cool-blog.static-staging.ikennd.ac, thanks to that %0 in there, Apache will look for content in /ikenndac/public_html/content/my-cool-blog.static-staging.ikennd.ac.
Once this is set up and running, our web server is ready! The final part is to get the content from our CI build onto the web server in the right place.
nanoc has the deploy command, but as far as I can figure out, it doesn’t support dynamically setting the destination directory, so we can’t use that. Instead, my blog’s repository contains a script to do the work:
# Get the current branch name
BRANCH_NAME=`git rev-parse --abbrev-ref HEAD`

# Replace anything that's not a number or letter with a hyphen.
SANITIZED_BRANCH_NAME=`echo "${BRANCH_NAME}" | tr A-Z a-z | sed -e 's/[^a-zA-Z0-9\-]/-/g'`
SANITIZED_BRANCH_NAME=`echo "${SANITIZED_BRANCH_NAME}" | sed 's/\(--*\)/-/g'`

# Build the right directory name for our HTTP server configuration.
DEPLOY_DIRECTORY_NAME="${SANITIZED_BRANCH_NAME}.static-staging.ikennd.ac"

echo "Deploying ${BRANCH_NAME} to ${DEPLOY_DIRECTORY_NAME}…"

# Use rsync to get the content onto the server.
rsync -r --links --safe-links output/ "website_deployment@static-staging.ikennd.ac:/ikenndac/public_html/content/${DEPLOY_DIRECTORY_NAME}/"
A couple of notes about using rsync to deploy from CI:
-
Since CI runs headless, it’s unlikely you’ll be able to use a password to authenticate through
rsync- you’ll need to set up SSH key authentication on your HTTP and CI servers. I won’t cover that here, but there are tutorials aplenty for this online. -
If your CI still fails with auth errors after setting up SSH key authentication, it might be failing on a The authenticity of host … can’t be established prompt. If deploying to your HTTP server works from your machine but not in CI, SSH into your CI server and try to deploy from there.
Deploying the Final Result
The beauty of this process that that we’ve been deploying the entire time! If you follow git flow and your master branch only ever has finished content in it, you could point your main domain to the same directory that the CI server puts the master branch and you’re done! If your master branch isn’t that clean, you could make a new deployment branch and do the same there.
My “public” blog is hosted from a completely different machine than the one the CI publishes to, so that’s currently a manual step for me. However, it we be easy enough to modify my static-staging-deploy.sh script to rsync to a different place if it detects that it’s on the deployment branch.
Conclusion
Phew! This was a bit of a slog, but the outcome is pretty great. With everything connected together, I can work on my iPad and get a full-fat preview of my blog as I write. No “real” computer required (except the one running the CI server and the other one running the HTTP server)!
I kind of want a mouse…
It’s not perfect, of course. Like many “I can do real work on my iPad!” workflows, it’s a pile of hacks — but I’m at least part of that club now!
The real downside to this is the latency between pushing a change and it showing up online. This is mostly caused by my setup, though:
-
My CI server isn’t on a public-facing IP, which means GitHub webhooks can’t reach it. This means that the server has to poll for changes, adding quite a lot of time until the build actually starts.
-
It takes the CI server towards a minute to build my blog and deploy it to the HTTP server. The vast majority of this time is taken with processing all the photos and videos that have accumulated here over the years — splitting that out to a separate repository will significantly reduce the amount of time it takes.
All in all, though, I’m really happy with the outcome of this experiment. Real computers can suck it!
Apps Used To Write This Blog Post
I was pretty successful in writing this post on my iPad. I used the following apps:
-
Working Copy for text editing and
gitwork. -
Prompt for SSHing into my HTTP server to tweak some configuration.
-
Cascable for copying photos from my camera and light editing.
-
Affinity Photo for sizing photos down to the right dimensions for my blog.
Maybe next time I’ll even manage to do the Audioblog recording on my iPad!